
 HalfMoonの10回目です。
#9(6月21日投稿)の続きです。
今回は、砲門、アンカー艤装で、完成です。
大継会員製作
A Build Log
The 10th
A work of Ootugu Please push ”More” (続きを読む)
 砲門蓋の製作
左側がキットの蓋で檜のうす板に外板用のマホガニーを貼り付け、裏は赤色を塗装するようになっております。
Production of the Gun port lids
The left is the lids of the kit.
ホームセンターで色々な材質の端材が袋詰めで販売されており、その中に材質名は不明だが濃赤色の端材があったのでこれを流用しました。
薄くカットし、その上にマホガニーを貼り付けました。
I direct a manual to stick a shell made of mahoganies on a thin board of hinoki materials. The back directs it to paint red.
The other side of the gun-port lid is red, and to paint it with the manual.
In Home Center, various edges materials were sold by bag filling.
I did not understand the name of the wood in that, but decided to use this because there were edge materials of the oxblood.
I cut wood thinly and stuck mahogany on the top.
豆知識
裏側が赤く塗装されているのは、戦闘中に飛び散った血で戦意を喪失しない為だそうです。
A column
It is blood scattered during a battle that it is red, and the backside is painted, and the reason seems to be because it does not lose the fighting spirit.
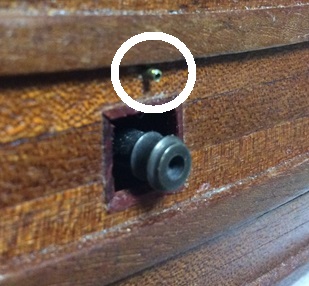 組み付けてしまえば解りませんが、こだわりで蓋の開閉用のロープの取り入れ口の穴に真鍮パイプを差し込んだ。
I considered it to be completed and cannot soak it, but inserted a brass pipe in the hole of the intake of a rope for the opening and shutting of the lids daringly.
 砲門蓋を取り付けた状態。
The state that installed an gun-port lids.
 アンカーの製作
アンカーはキットの部品に色を塗って使用したがストックは少し大きい気がするので、マホガニーで作り直した。
フープは真鍮板を銀狼付けで作り、黒染しています。
The anchor painted the part of the kit in a color and used it, but remade it in mahogany because I felt like having a big some stock.
リングも真鍮棒で作り、90番のミシン糸を巻きつけてあります。
The hoop forms a brass board on a silver soldering and does black dye. I make the ring with a brass stick, and it is wound the 90th sewing machine thread.
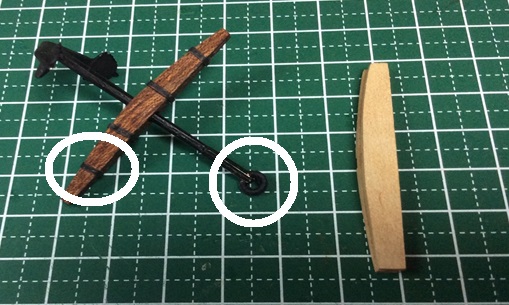
 アンカーケーブルも撚りが甘いので作り直した。
上がキット、下が自作品。ちょっと分かりにくいかもしれません。
Because the twist of the anchor cable was insufficient, I remade it.
It is an own work a kit, a bottom the top.
写真のような、手芸店で販売されている糸撚器を使うと便利です。
It is convenient when I use the Nemipteridae device sold in handicrafts shop such as the photograph.
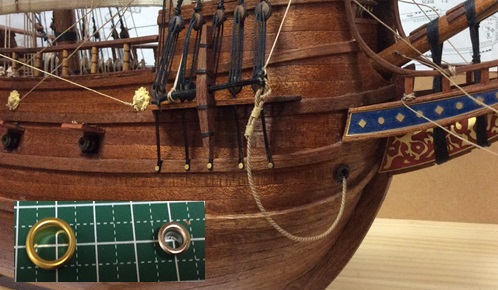 アンカーケーブルの取り入れ口のハトメだが、キットに入っていた部品は、バランス的にすごく大きい気がするので、手芸店で探したハトメを黒染して取り付けました。
About the eyelet of the intake of the anchor cable
The part which was in the kit felt very big for balance.
I did black dye of the eyelet which I looked for in handicrafts shop and installed it.
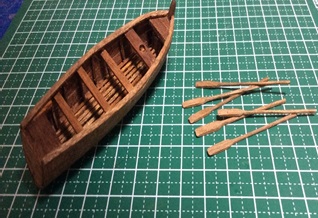 搭載用ボートの製作
マホガニー材で全て作り直しました。
オールは1枚の板から削りましたが、もろくて苦労しました。
詳細は製作技法で紹介されていますので省略します。
The production of the boat for deployment
I remade it with a mahogany entirely.
I sharpened the oar from one piece of board, but materials were fragile and had a hard time.
Because it is introduced in book(production technique), I omit the details.
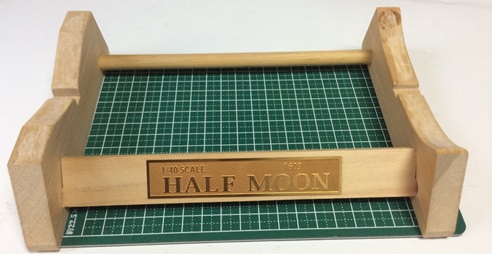 キットの船台です。
これに塗装するよう指示されています。
It is the building berth of the kit.
It is directed this to paint it.
 取り敢えず手持ちの濃茶色を塗ってみました。
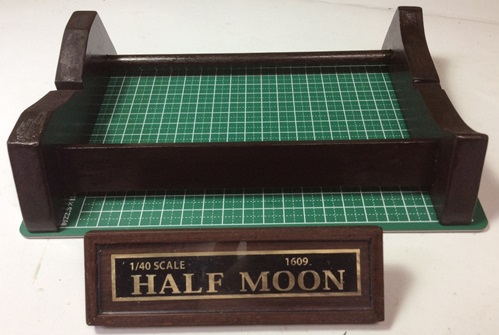
良い材料が見つかれば作り直す予定です。
ネームプレートは全面に黒色を塗り、乾燥後ペーパーで名前の部分だけ色を落としております。
丁度適当な紫檀の端材がありましたのでケースを作って見ました。
前面にはアクリル板をはめ込んでおります。
重厚な感じで格好よく出来たと自負しております。
I painted with umber on hand first of all.
If good materials are found, I am going to remake it.
The nameplate paints the entire surface in black, and only an excellent forepiece loses a color with paper after drying.
Because there were the edge materials of a just suitable rose wood, I made a case.
I fit an acrylic board in the front.
I take pride in having been made cool for a solid feeling.
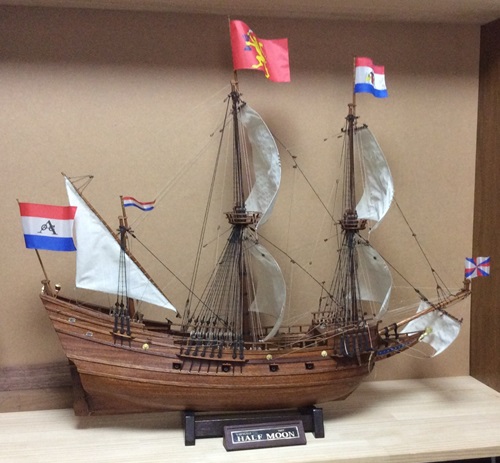
旗を取り付けて完成です。
旗の4辺に0.3mmの真鍮棒を入れて、風になびいているように成型しております。
I install a flag, and it is completion.I put a brass dash of 0.3mm in four sides of the flag and mold it to bow to wind.
2015年1月5日からスタートして2016年5月28日完成。
途中4ヶ月ほど休憩時期がありましたが、約1年半で多々問題点はありましたが、どうにか完成することが出来ました。
制作中は気付きませんでしたが、完成してみると種々粗が目につき、帆船模型の奥ゆかしさを痛感致します。
I start on January 5, 2015 and am completed on May 28, 2016.
There was the break time on the way for approximately four months, but there were the many problems in about one year and six month, but was able to be completed somehow.
I did not notice during production, but a fault stands out in various ways when completed and keenly realizes the courteousness of the sailing boat model.
Produktion der Kanonen-hafendeckel
Die Linke ist die Deckel des Werkzeuges.
Ich weise ein Handbuch an, um eine in einem dünnen Aufsichtsrat der hinoki-Materialien aus mahoganies gemachte Muschel zu stecken. Der Rücken weist es an, rot zu malen.
Die andere Seite des Kanone-Hafendeckels ist rot, und es mit dem Handbuch zu malen.
In Home Center, verschiedene Ränder, die Materialien von Taschenfüllung verkauft wurden.
Ich verstand den Namen des Holzes nicht darin, aber entschied, dieses zu benutzen, weil es Randmaterialien des oxblood gab.
Ich schnitt Holz und festgefahrenes Mahagoni dünn auf die Spitze.
Eine Säule
Es ist während eines Kampfes zerstreutes Blut, daß es rot ist, und die Kehrseite wird gemalt, und der Grund scheint zu sein, weil es den kämpfenden Geist nicht verliert.
Ich betrachtete es vervollständigt zu werden, und kann es nicht durchnässen, aber legte eine Messingleitung ins Loch der Aufnahme eines Seiles für die Öffnung und das Schließen wagehalsig von den Deckeln ein.
Der Staat, der installierte, ein Kanone-port@lids.
Der Anker malte die Rolle im Werkzeug in einer Farbe und benutzte es, aber machte wieder es in Mahagoni, weil ich Lust hatte auf das Haben einem großen etwas Aktien.
Der Reifen bildet einen Messingausschuß auf einem Silber, das lötet, und macht Schwarze-Farbstoff. ich mache den Ring mit einem Messingstock, und es, der maschinellen Faden Nähen, wird die 90.
Weil die Drehung des Ankerkabels ungenügend war, machte ich wieder es.
Es ist eine eigene Arbeit ein Werkzeug, ein Boden die Spitze.
Es ist zweckmäßig, wenn ich das in Handarbeiten-Geschäft wie dem Foto verkaufte Nemipteridae-Gerät benutze.
Über der Öse der Aufnahme des Ankerkabels
Der Teil, der im Werkzeug war, suchte sehr groß nach Gleichgewicht.
Ich schwärzte Farbstoff von der Öse, die ich für in Handarbeiten-Geschäft sah und es installierte.
Die Produktion des Bootes für Einsatz
Ich machte wieder es mit einem Mahagoni ganz.
Ich schärfte das Ruder von einem Stück Ausschuß, aber Materialien waren zerbrechlich und hatten eine harte Zeit.
Weil es darin (Produktionstechnik) eingeführt wird, lasse ich die Details aus.
Es ist der Gebäudeankerplatz des Werkzeuges.
Es wird dieses angewiesen, um ihn/es zu malen.
Ich malte zuerst mit umber auf Hand von allem.
Wenn gute Materialien gefunden werden, werde ich wieder es machen.
Das Namensschild malt die ganze Oberfläche in Schwarzem, und nur ein ausgezeichneter forepiece verliert eine Farbe mit Papier, nachdem er getrocknet ist.
Weil es die Randmaterialien eines einfach geeigneten Rosenholzes gab, machte ich einen Fall.
Ich füge einen Acrylausschuß in die Front ein.
Ich bringe Stolz herein, gehabt für ein festes Gefühl kühl gemacht.
Ich installiere eine Fahne, und es ist Vollendung.
Ich setzte einen Messingschuß von 0.3mm in vier Seiten der Fahne und forme es, sich Wind zu beugen.
Ich beginne am 5. Januar 2015 und werde am 28. Mai 2016 vervollständigt.
Es gab ungefähr vier Monate lang die Bruchzeit auf dem Weg, aber es gab die vielen Probleme für ungefähr ein Jahr und sechs Monate, aber war fähig, irgendwie vervollständigt zu werden.
Ich merkte während der Produktion nicht, aber eine Schuld steht hinaus in verschiedenen Wegen als vervollständigt und scharf den courteousness vom Segelnbootsmodell erkennt.