
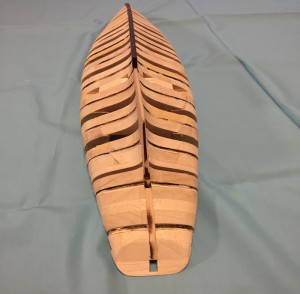
MODEL SHIPWAYのBluenoseは1/64のスケールです。
船体だけでも670mmあり、そのため船体は3つに分割されています。
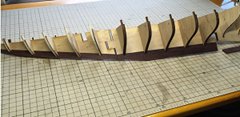
Bluenose of MODEL SHIPWAY is 1/64 scales.Even the hull has it of 670mm.
Therefore the hull is divided to three.
キールは下側のみ紫檀材を切って貼り、キールは貼り付ける前にラベットを掘っておきます。
ラベットの位置は図面通りに測って慎重に加工します。
As for the keel, only bottom cuts red rosewood and puts it.
I dig rabetto before sticking a keel.
I measure the position of rabetto according to the drawing and process it carefully.
キールとフレームは90度を保つようスコヤを使って慎重に接着します。三角の木材を使って接着します。
The keel and the frame adhere with L-shaped square carefully to keep 90 degrees.I adhere with three angle of wood.
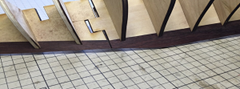
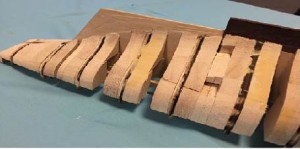
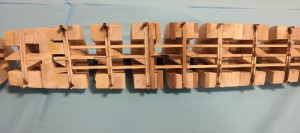
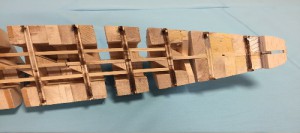
外板が一枚張りなので全てにフィラーを接着します。
(ホームセンターで買ったファルカタ材)
ファルタカや桐は大変安価で入手できます。
Because single layer of external planking, I use filler blocks to all.
(falcata materials which I bought in Home Center)
フレームのラインが基準になるので、フレームを削り過ぎないように気をつけます。
3つの船体の接合します。
Because the line of the frame becomes the standard, I am careful not to sharpen too much a frame.
Of three hulls join it.
フレームのラインが基準になるので、フレームを削り過ぎない様に気をつけます。
3つの船体を接合します。
Becase the line of the frame becomes the standard,I am careful noto to sharpen too mach a frame.
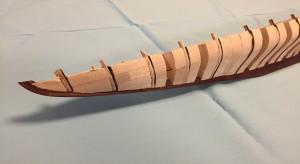
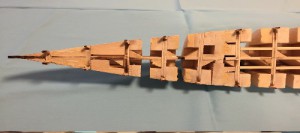
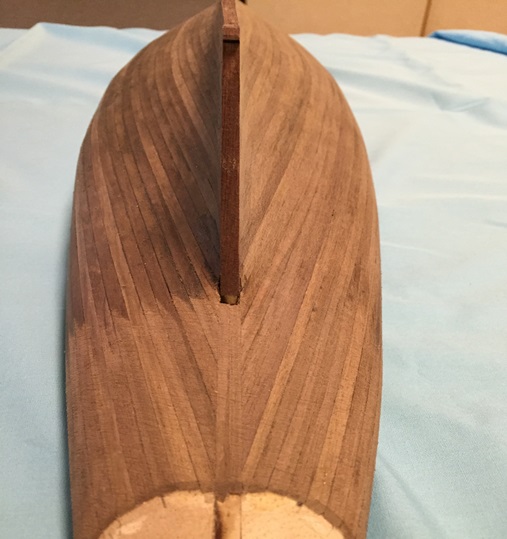
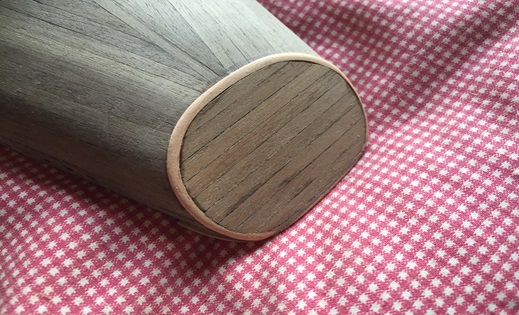
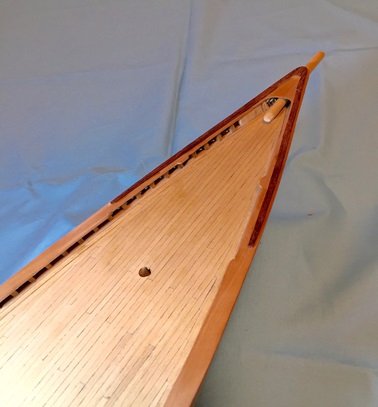
キールのスターン側はスターンポストに向かって徐々に薄くなっているので外板を貼った時を想像しながら綺麗に薄くなるよう削る.
Sterne side of the keel becomes thin slowly toward the Sterne post.
Therefore, I sharpen it neatly while imagining time when I put a shell to become thin.
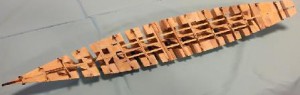
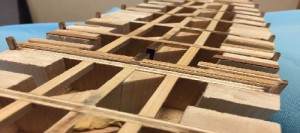
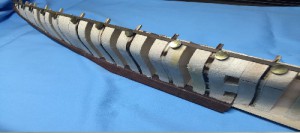
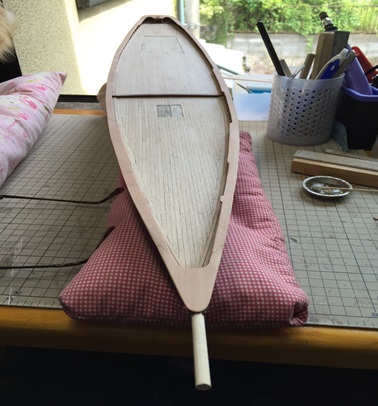
Bluenoseは船体がとても綺麗な流線型になっているのでフィラーの段階でほぼ形作る
Bluenose almost forms it at the stage of the filler in becoming streamlined that the hull is very clean
低いところは木工用パテで埋める
I fill up the low place with pate for woodwork
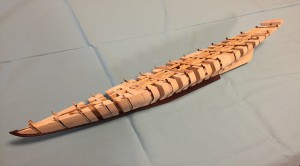
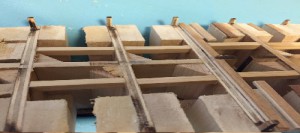
デッキは0.8ミリの航空ベニアを貼り、0.5ミリ厚のタンガニイカを貼る予定なのでデッキが波打つ事が無いように補強の為角材を貼り付ける
The deck puts aviation veneer of 0.8 millimeter.
I am going to complete the Tanganyika of the 0.5 mm thickness.Therefore I stick squared lumber for reinforcement as a deck does not wave
Bluenoseは真ん中辺りでデッキに段がついており、後ろ側が少し高いので、それぞれのデッキが綺麗な面になるように定規を当てながらフレームの上面、フィラーの上面を同一面になるよう削ったり、足したりします。
時間がかかる割にはあまり代わり映えのしないここまでの作業ですが
でも、ここで手を抜くと後で大きな後悔をします。
下地が荒いと外板貼りで修正は効きません。ベコベコの外板となります。
やっとのことでようやく外板貼り、1ミリ厚のウォールナットを一番上の基準板より貼り付けます。
ここまでフィラーを入れておくと外板貼りが非常に楽で綺麗にできます。
It is the fourth
A step points out Bluenose on a deck in center area.
In addition, some rear are high.
Therefore, each deck is clean; sharpen it so that is acted.
I sharpen the top surface of the frame, the top surface of the filler while winning a ruler to become the same aspect and add it.
It is the work that it is replaced, and the brilliancy does not do very much although it takes time.
However, I will do big regret later when I do a slipshod job here.
If a base is rough, a gaiban* ride revision does not work.
I become the shell of bekobeko.
I enter to finally put a shell at long last.
I stick the walnut of the 1 millimeter thickness than a top standard board.
A gaiban* riga emergency can clean it for comfort when I put a filler to here.
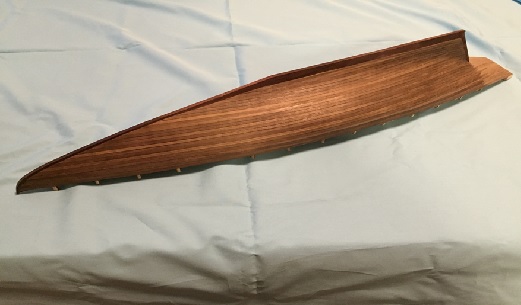
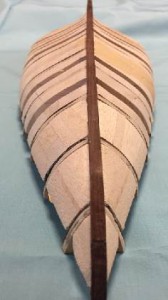
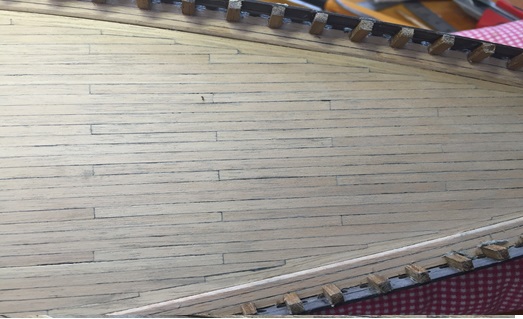
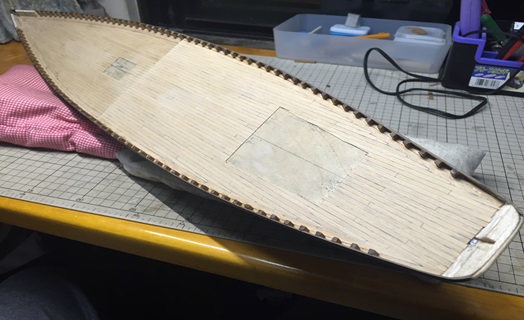
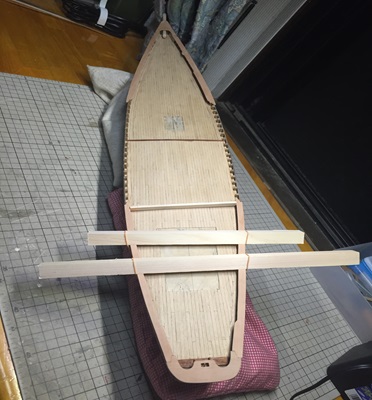
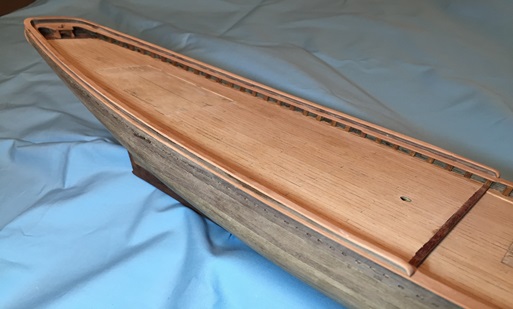
外板貼りが完了した状態です。今回は1枚張りです。
綺麗な一通張りができています。
貼り方にもコツがありますが、これは別の機会にご紹介します。
(17世紀の帆船と違い)船首が丸く無い形なので、極端なB曲げをしなくても良く貼りやすかったです。
※B曲げとは幅方向の曲げのことで、通常の曲げをA曲げと呼び区別しています。B曲げは大変曲りにくいです。
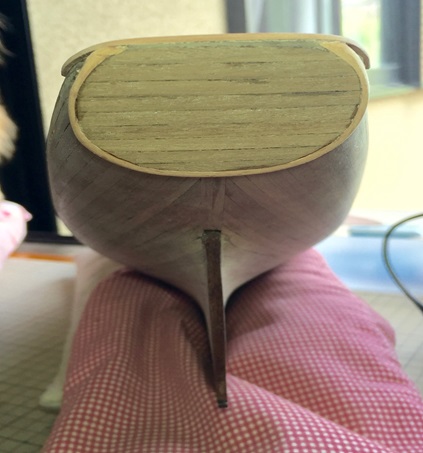
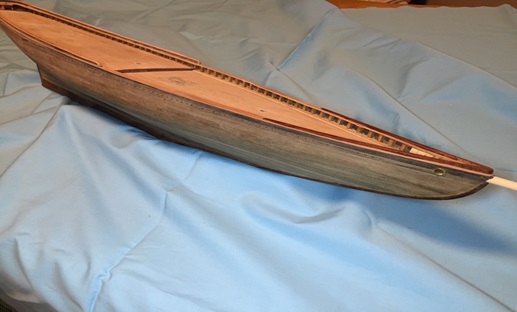
スターンポストから船尾にかけて左右の外板がV字型に収束します。
この船は、このラインが見せ場ですので。 綺麗に合わすのが難しかったです。
キールとスターンポストは先端に向かって細くなっており、また外板の綺麗な曲線が大変美しい船で、見せ所なので手間をかけ慎重に張り合わせました。
一通張りですから、スティーラー(三角形の詰め板)はありません。

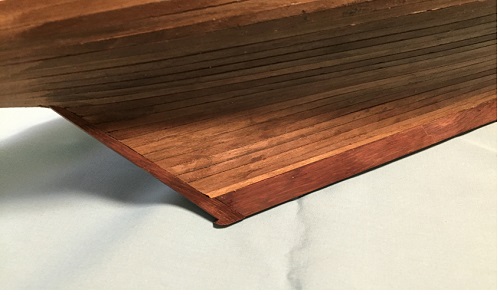
入り終わったら、ホームセンターで買った磨き用のスポンジを使ってピカピカになるまで磨いていきます。
粗いサンドペーパー#60から#150 #240,#400と念入りに磨き上げます。焦らずに丹念に仕上げていきます。
銘木ならではの艶が出てきます。(^o^)
写真に写っている赤い布は模型作り専用に作った枕です。
結構重宝する作業台です。
今回はデッキ作業です。
このキットのデッキ貼りは1枚貼りで1.5ミリ厚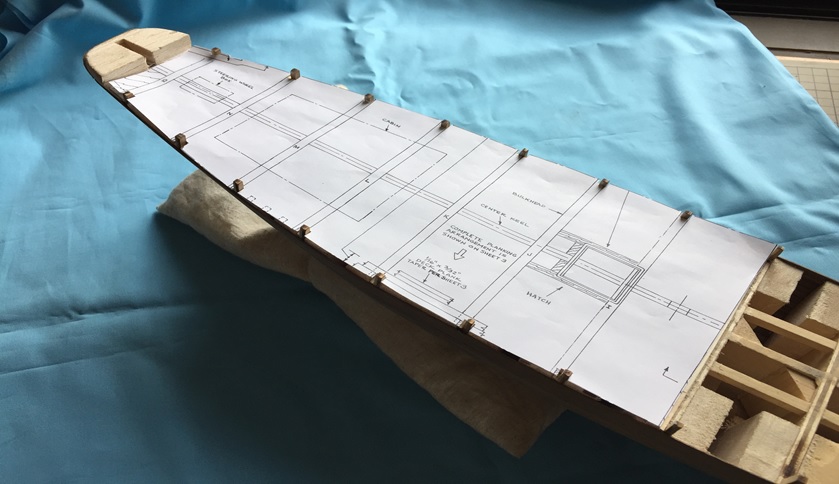 の化粧板を貼ることになっているが、小生そんな高度な技能力を持ち合わせていないので、0.7ミリの航空ベニアを貼って、その上から0.5ミリのタンガニイカの化粧板を貼ることにする。
図面をコピーして合わせてみる。
 木工ボンドを水で薄めて航空ベニアに貼り付けて、鋸(Proxxsonのコッピングソウ)でカット
 木工ボンドで貼付け、ゴムバンドで固定して乾くのを待つ。
作業は、焦らずにひとつひとつ確実に!!
作業のやり直しは何倍もの時間を無駄にし、気分がめいりますから・・・・・
<しまった!!>
貼り付けが完了してから、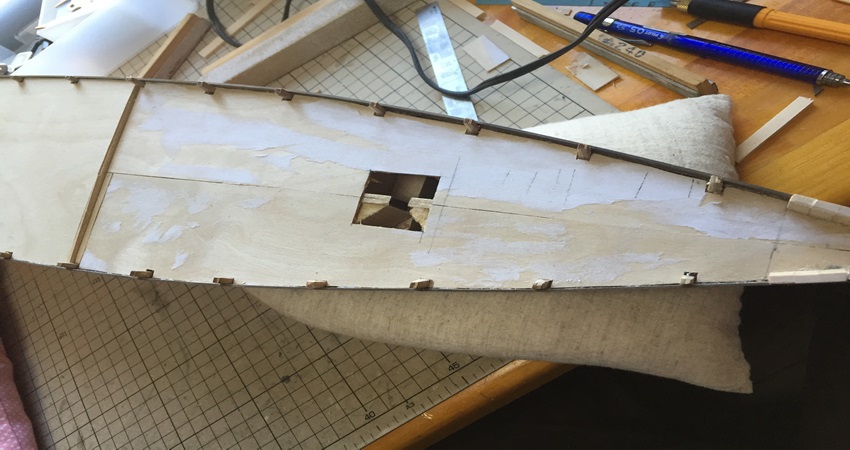 キールにマストを立てるための板を接着するのを忘れていたことに気がついた。トホホ
2本のマストの周りを切り欠いて修復するしか無い。
気が滅入りますが、落ち着いて前に進みます。(>_<)
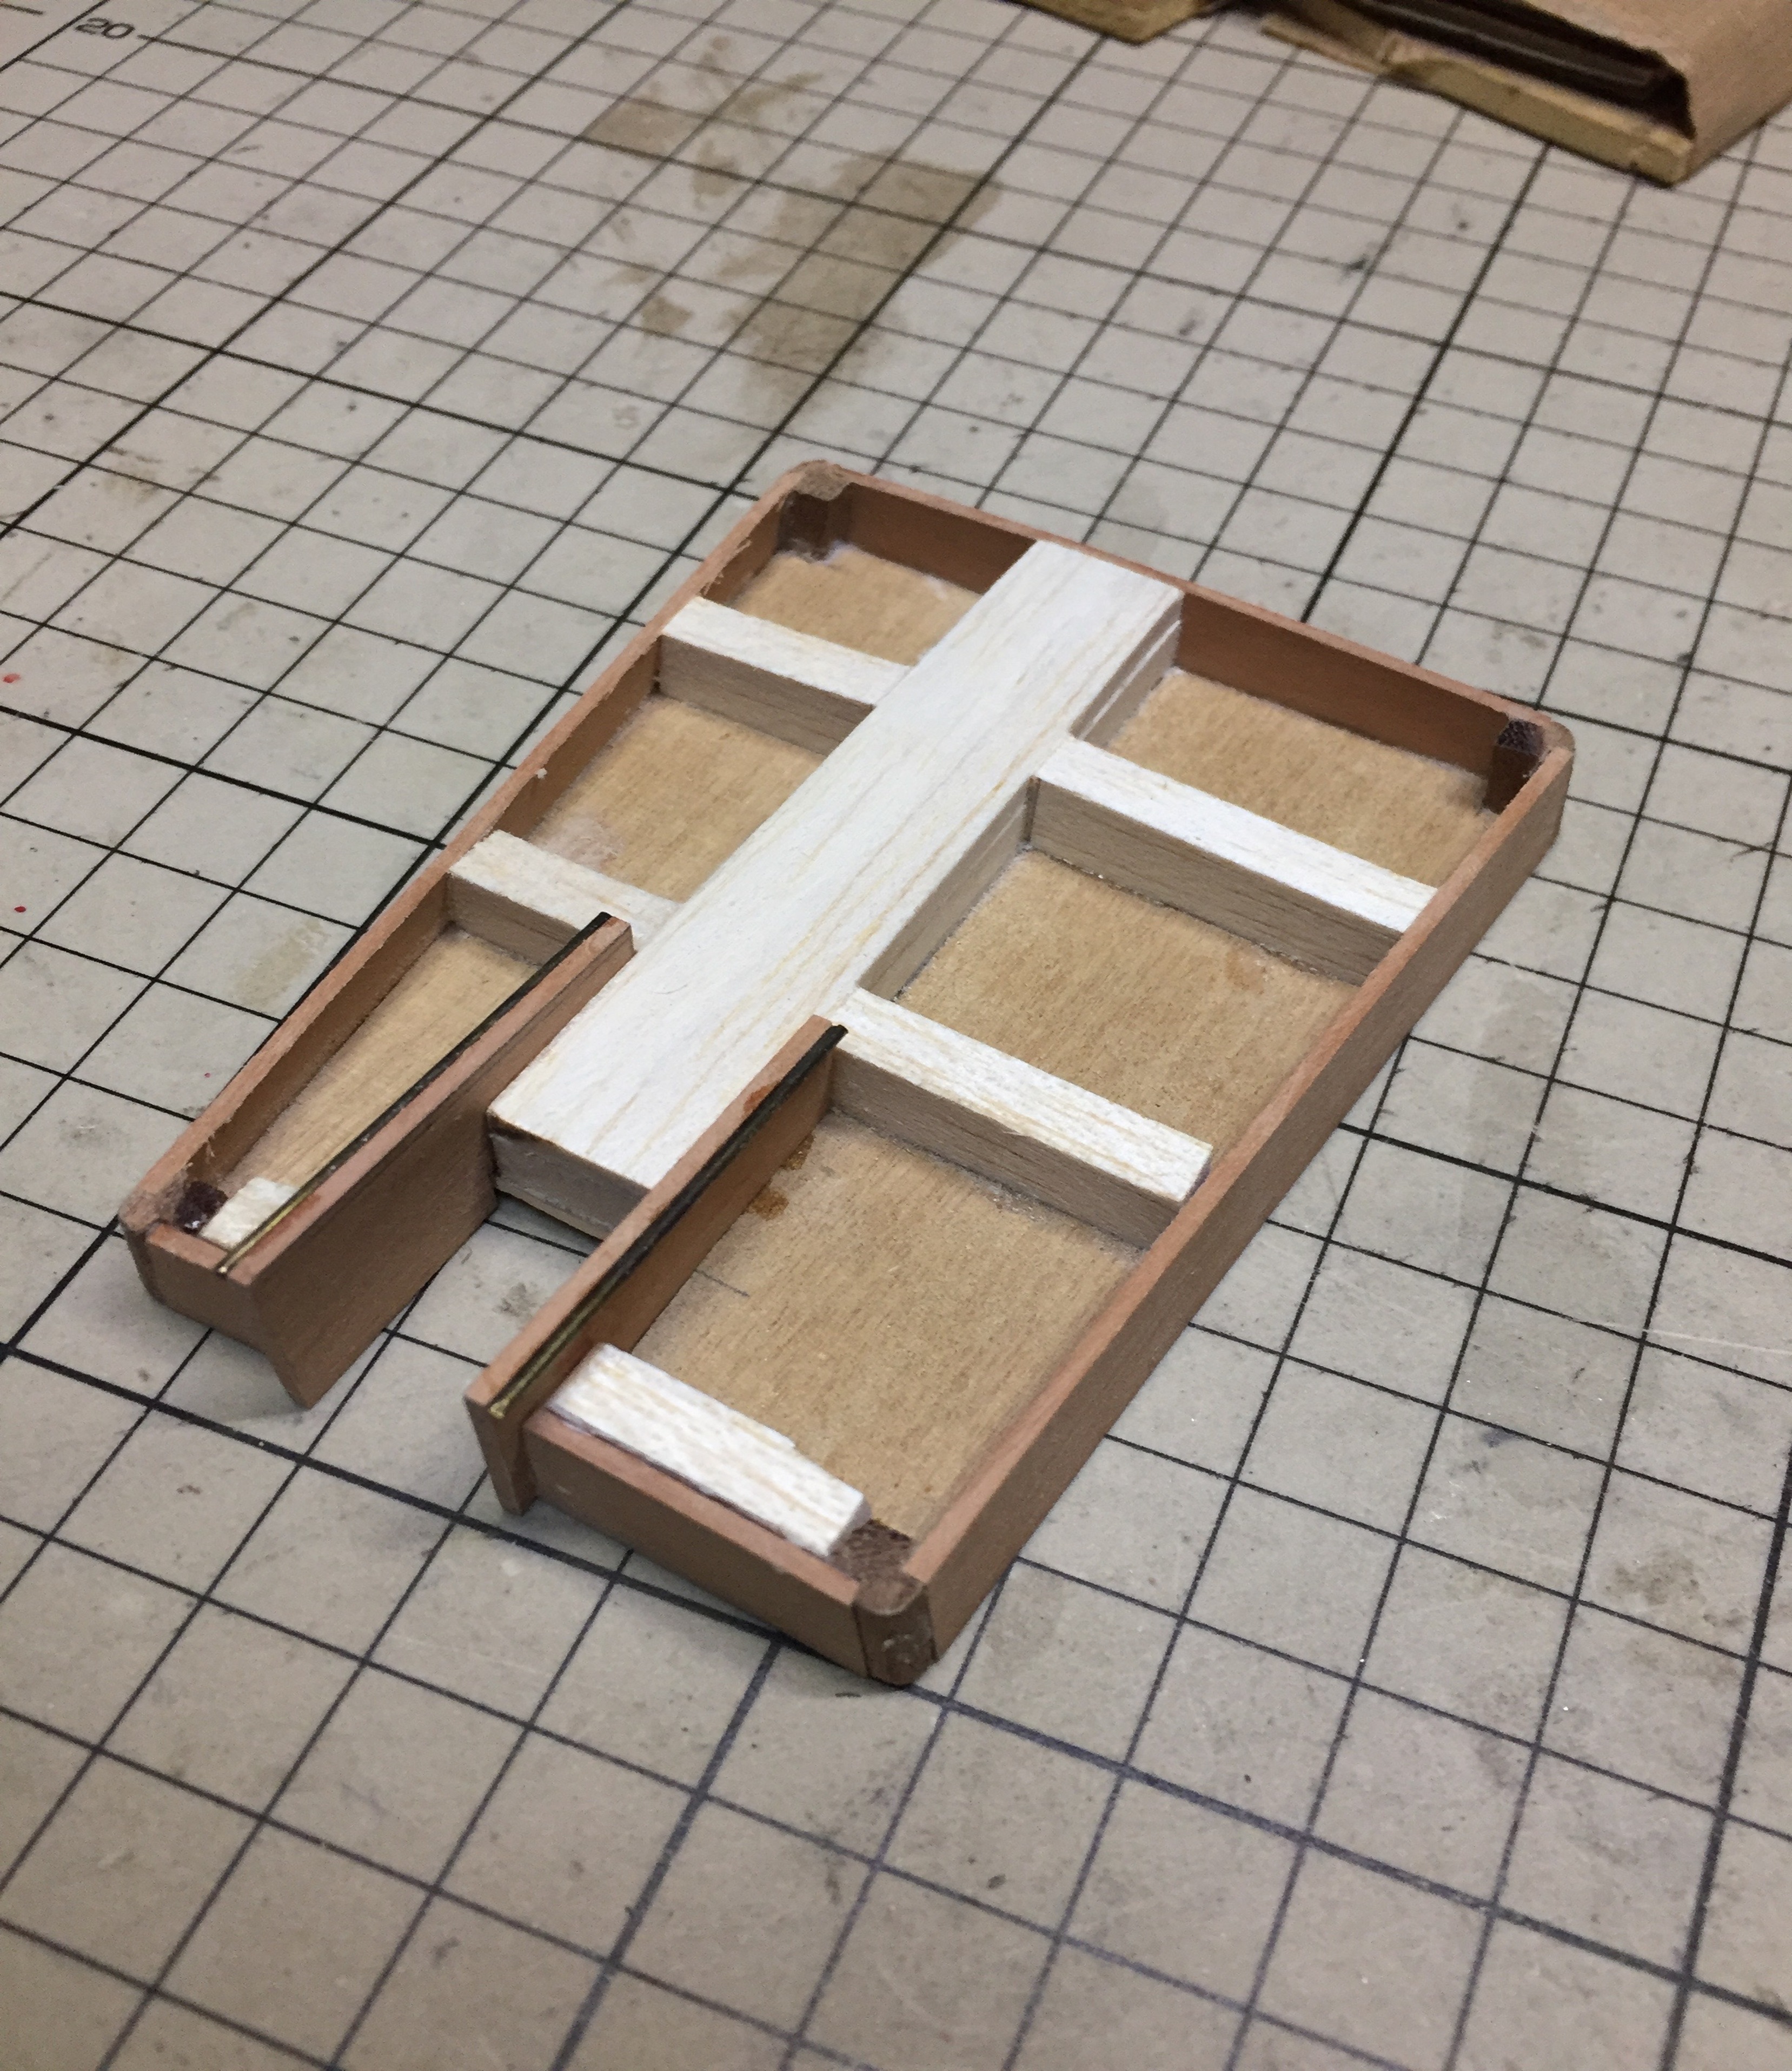
 キールを挟み込む板を貼り、蓋をするための受板を貼り修復
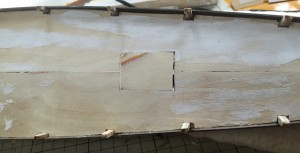
蓋を貼付け、修復完了、(^o^)
今回は、scuppers(排水口)の加工です。
 デッキの下貼りが貼れたところで、両サイドの排水口の加工及び手摺の支柱の取り付けに入ります。
下貼りから突き出ているのはフレームのツノです。
これを支柱の一部として使うと言う事らしい。
After I lay the first layer of the deck planking, I install scuppers both sides.
In addition, I begin the installation work of the prop of the handrail.
It is a bit of the frames to stick out from the first layer of the deck planking.
It seems to be to say that I use this as the best group of the bit.
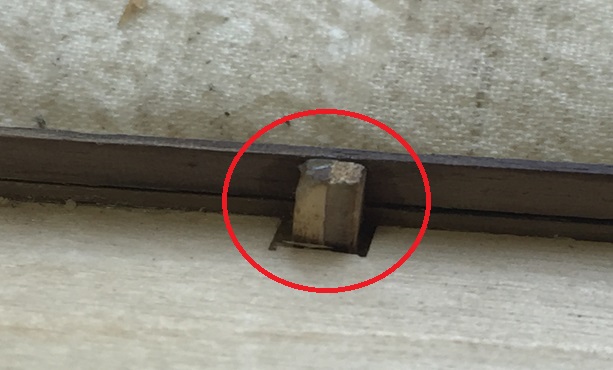 しかしよく見るとフレームが合板のためツノの色彩が綺麗に分かれているではないか!
このキットは絵の具で色を付けるのが基本なのでこれでも構わないが、私の目指すところは木材の自然の色を活かす事にあるので、やむなくニッパで切断
However, I realized that the color of the bit is mottled pattern,because the frame is made of plywood .
This kit is specifications to paint a tree basically, and, therefore, even this will not mind.
However, it is unavoidable, and what I aim at cuts it off in a nipa because it is to make use of a color of nature of the wood
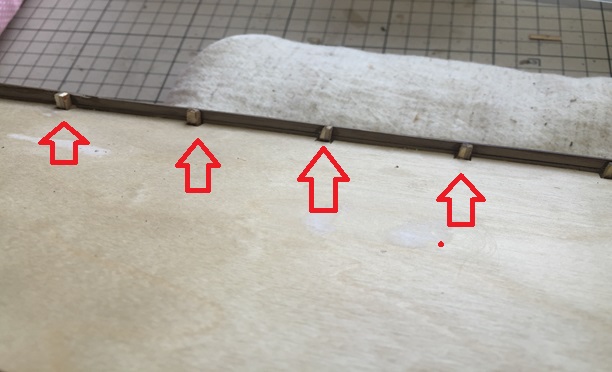
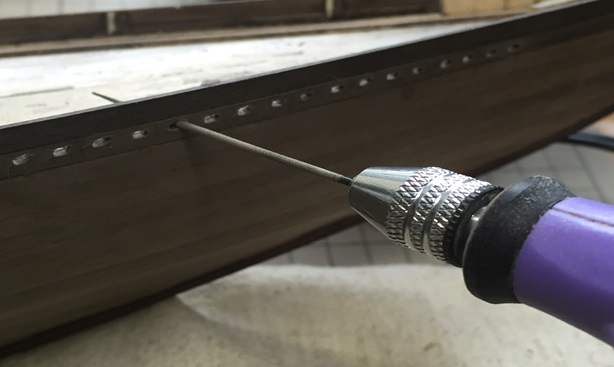
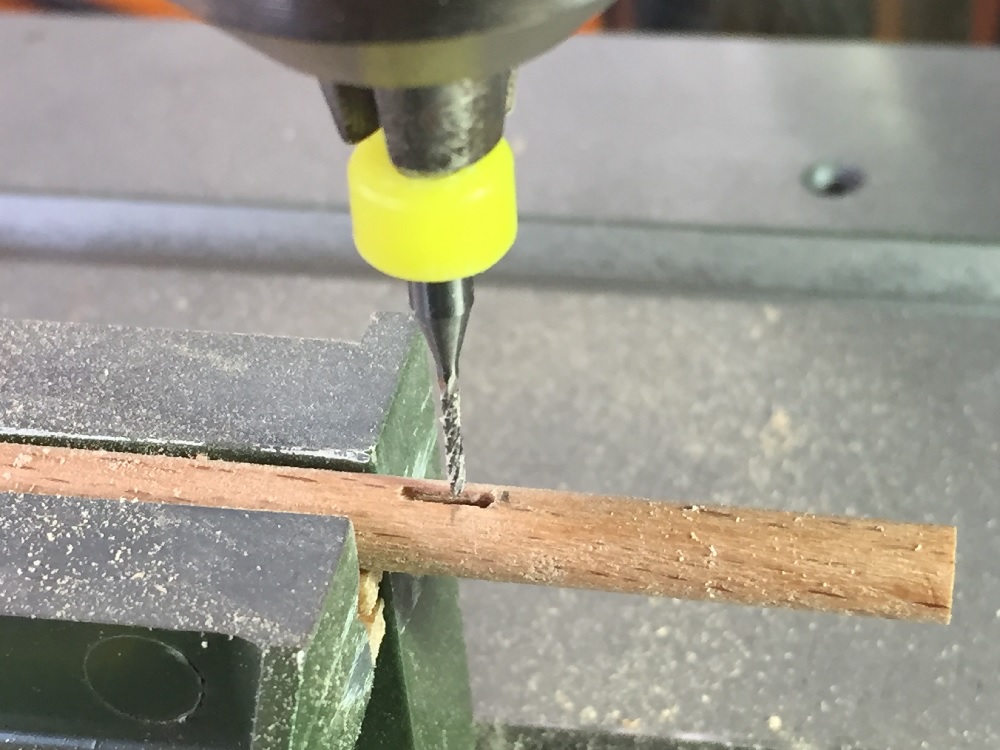
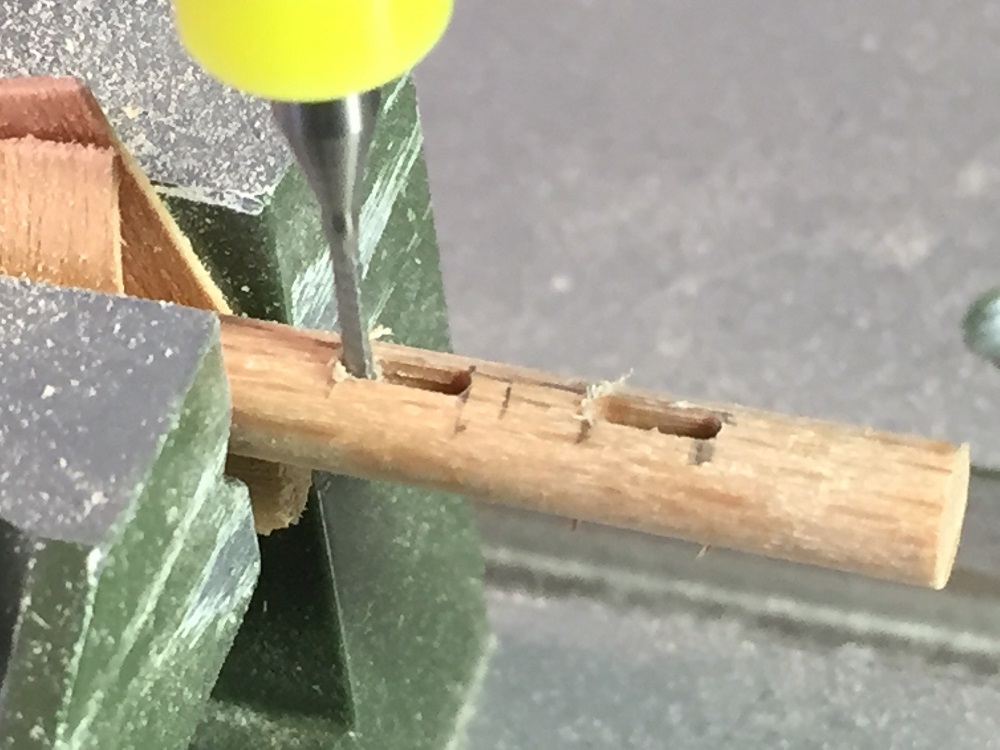
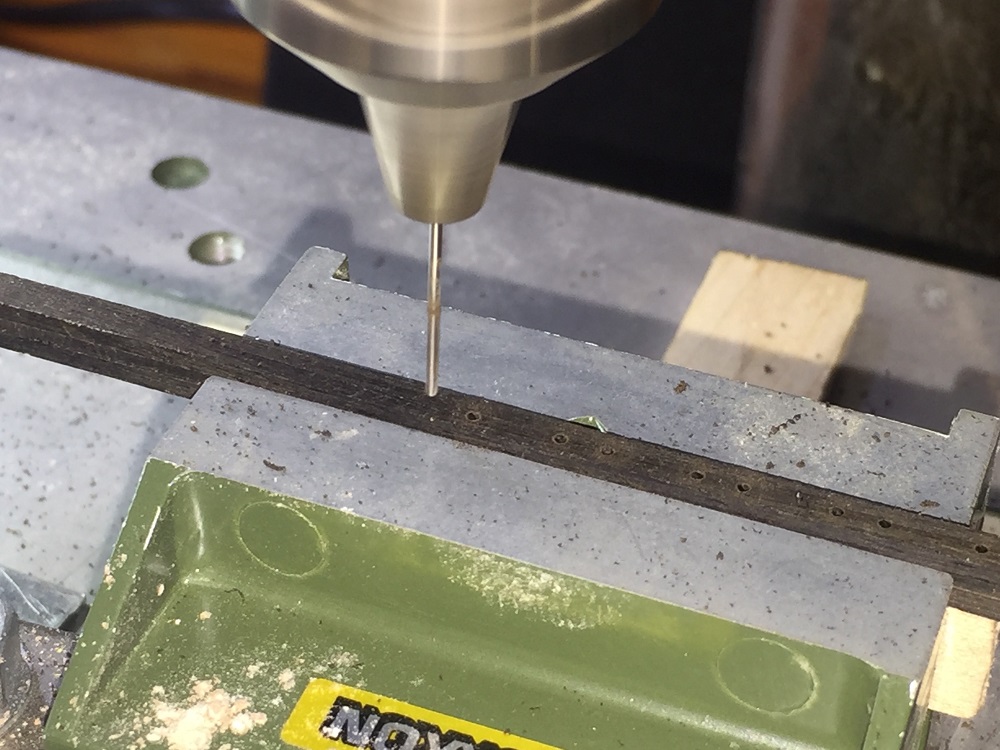
 フレームのツノが無くなったところにウォーターウェイを貼り、その上面に排水口が来るように内側からピンバイスで穴あけ。
穴の大きさは1/64スケールを勘案し高さ1.5横幅2ミリとした
ピッチは添え木をゲージとして等間隔に開けるように注意した。
I put a water way on the place where the horn of the frame disappeared.
I open a hole in pin vice from the inside so that the position of the outlet port comes to the top surface.
1/64 size of the hole assumed it 1.5 in height 2 millimeters in width in consideration for a scale.
The pace warned it to open a supporting pole as gauges at an interval.
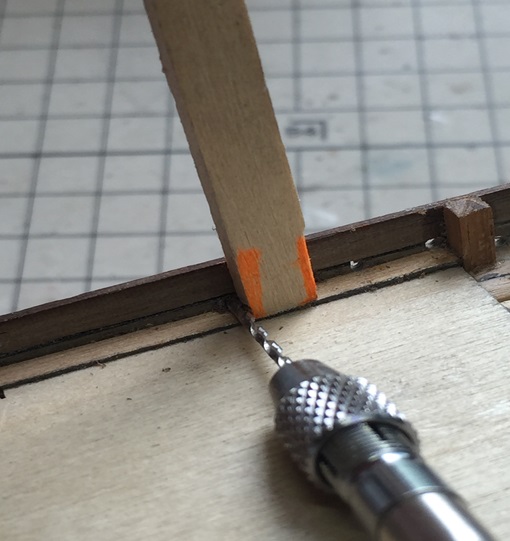
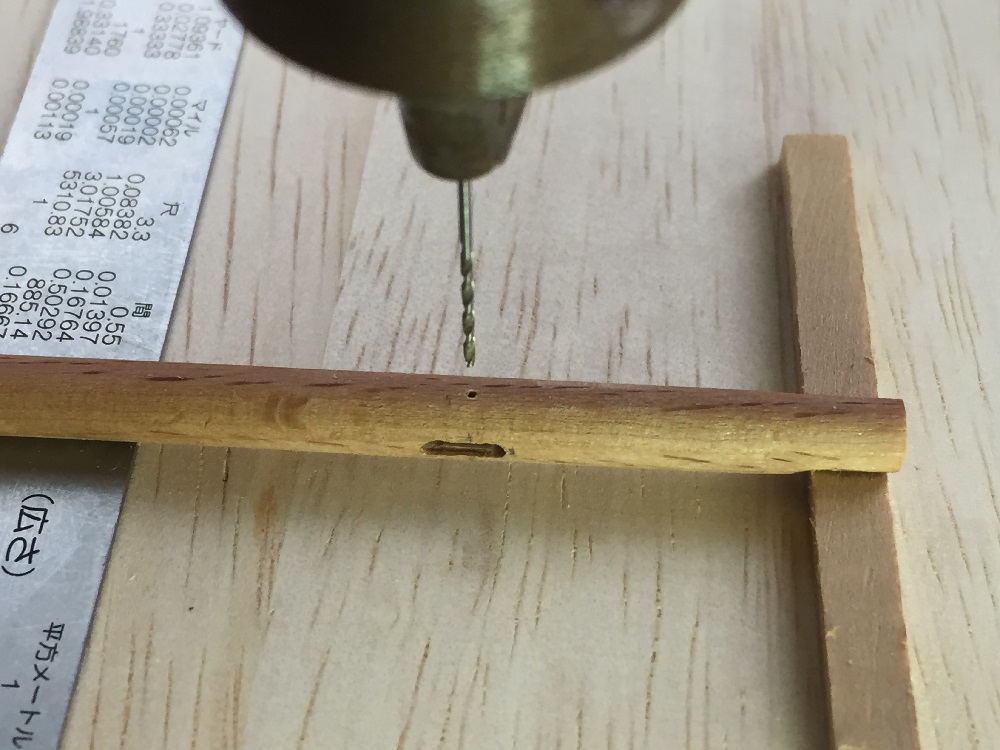
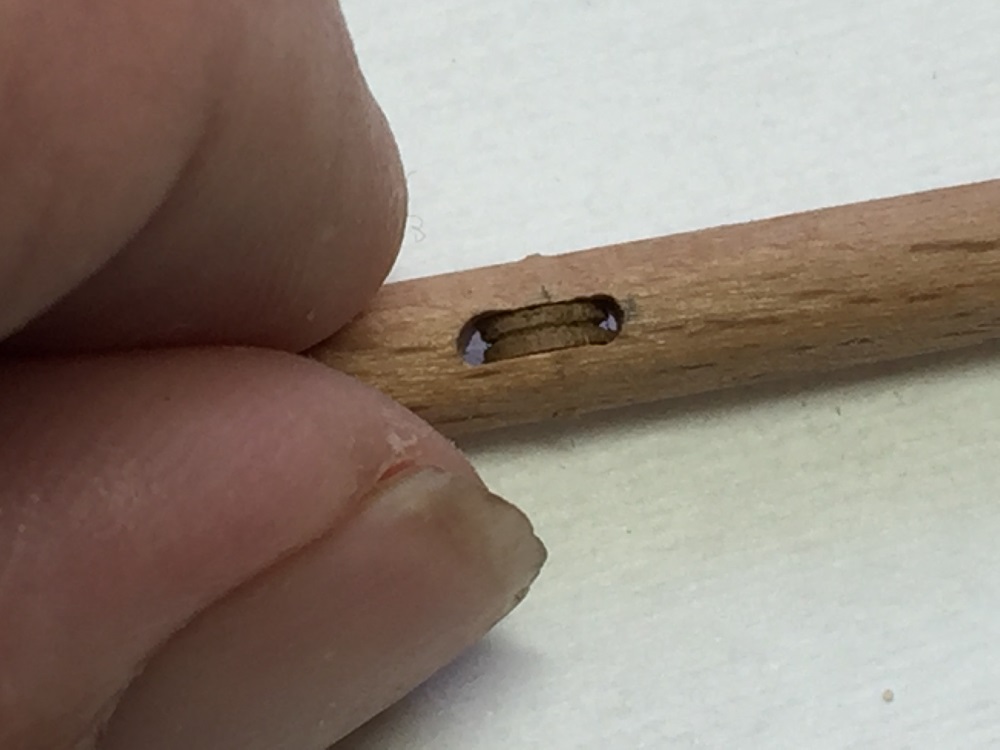
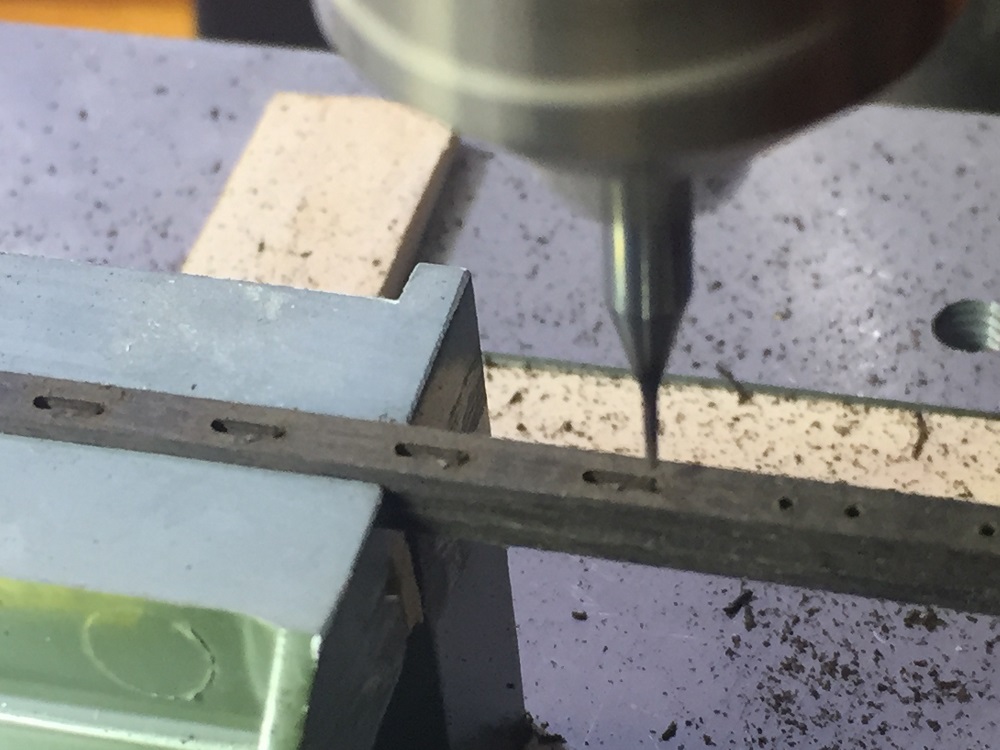
 外側より内側から開けた穴の隣に穴を開け同じ幅の長穴になるよう注意しながら開けるがこれが結構難しい。
I can open while I open a hole next to the hole which opened out inward from the outside, and warning the long hole of the same width so that it is.
This work is quite difficult.
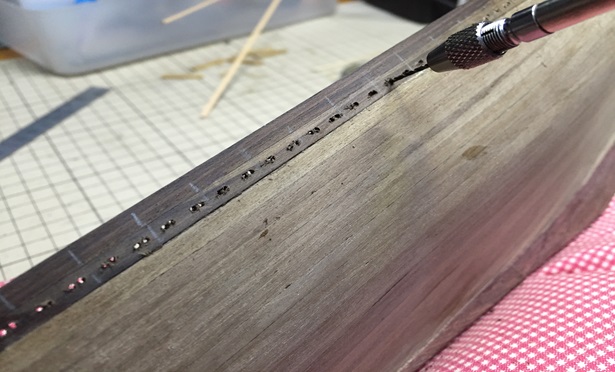
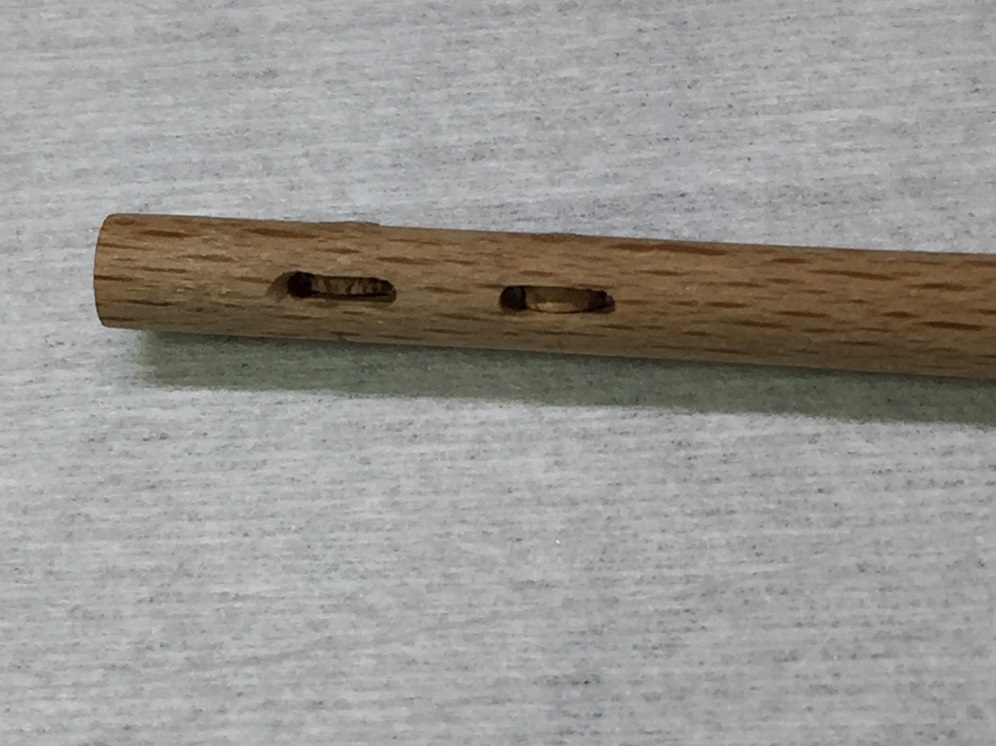
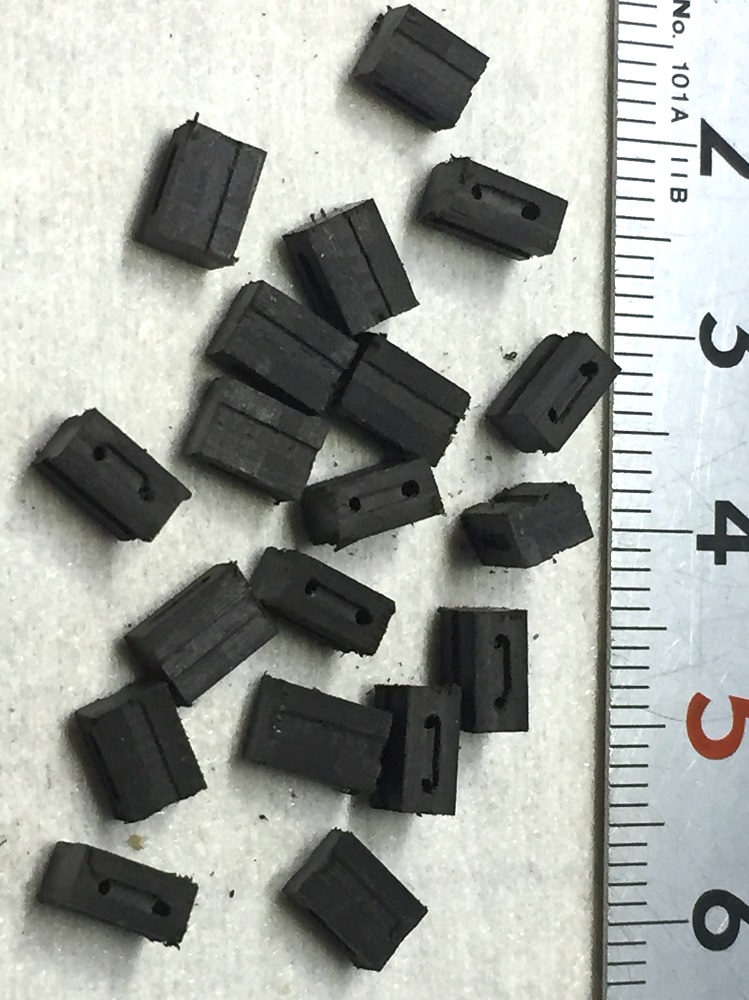
 両側の穴をつなげるように極細ヤスリ(Φ1.2)で整形
I have orthopedic treatment with an extra-fine file (a diameter of 1.2mm) to connect the hole of both sides.
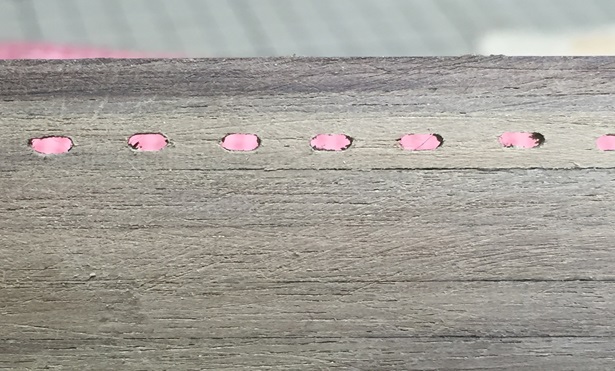 一応、それらしくなった。
It seems to have become it for the time being.
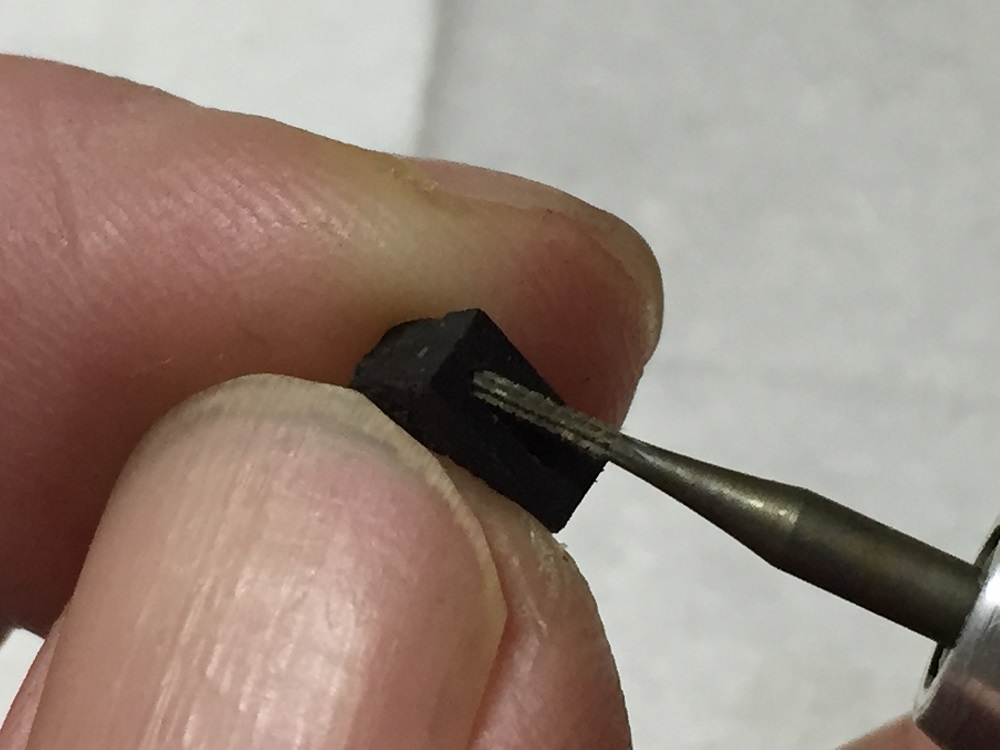
 3ミリ角のマホガニー材を等寸法に切断し穴が隠れないように爪楊枝で挟みながら位置を決め接着
I cut off the mahogany of the 3 mm corner to equal dimensions.
I locate it while picking it up with a toothpick so that a hole does not hide and adhere.
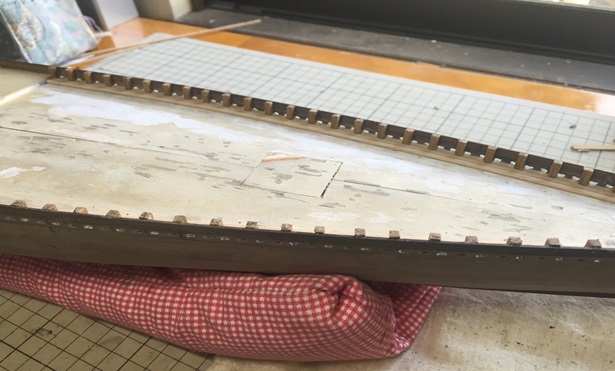 だいたい等間隔に支柱が立ち排水口の加工も出来た。
Generally a prop stood to equal distance, and I could do it, and processing of the outlet port came, too.
Ein Produktionstagebuch
Der siebte
Eine Arbeit von Yonekawa
ußerdem fange ich die Installationsarbeit der Stütze des Geländers an.
Es ist ein Horn der Rahmen, vom Säumen hervorzustehen.
Es scheint zu sein, zu sagen, daß ich dieses als die beste Gruppe von der Stütze benutze
Aber ich verstehe, daß ich die Farbe des Hornes des Rahmens des Sperrholzes ordentlich verstehen kann, wenn ich es gut nehme.
Dieses Werkzeug ist genaue Angabe, im Grunde einen Baum zu malen, und, deshalb wird sich sogar dies nicht kümmern.
Aber es ist unvermeidlich, und das, was ich es in einem nipa auf Schnitte weg richte, weil es ist, eine Farbe der Natur des Holzes zu nutzen
Ich setzte einen Wasserweg auf die Stelle, wo das Horn des Rahmens verschwand.
Ich eröffne in Nadellaster vom Innere ein Loch, damit die Position des Abflußshafens zur höchst Oberfläche kommt. 1/64 Größe des Loches nahm es 1.5 in Höhe 2 Millimeter in Weite in Rücksichtnahme auf einen Maßstab an.
Das Tempo forderte es auf, bei einem Intervall eine unterstützende Stange als Maßstäbe zu öffnen.
Ich kann mich öffnen, während ich ein Loch neben des Loches eröffne, das sich von der Außenseite innerlich verbreiterte, und das Warnen des langen Loches vor der gleichen Weite, damit es ist.
Diese Arbeit ist ganz schwierig. Ich habe orthopädische Behandlung mit einer besonder-feinen Akte (ein Durchmesser von 1.2mm), das Loch von beiden Seiten in Verbindung zu bringen. Es scheint es vorläufig geworden zu sein. Ich schnitt das Mahagoni der 3 mm-Ecke ab, um Dimensionen zu entsprechen. Ich finde es, während ich es mit einem Zahnstocher aufhebt, damit sich ein Loch nicht versteckt und haftet. Im allgemeinen stand eine Stütze, Entfernung zu entsprechen, und ich konnte es machen, und vom Abflußshafen zu marschieren,
kam auch.
両サイド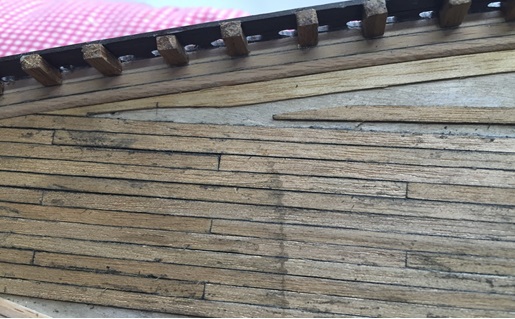 のウォーターウェイを先に貼ってデッキ板を貼ることにした。
貼り方は3バットシフトシステム(横隣の継ぎ目が中3枚置いて配置される) とし板の長さは実船では30フィート位らしいので1/64スケールを勘案し 採寸しやすい12センチとした。
船の中心から両サイドに向けて貼って行きマージンプランクの位置に達した時 マージンプランク用の板をウォーターウェイ側だけ接着し仮付し、デッキ板を 規則に沿って斜めにカットし(先端を斜めにカットした残りの平坦部は板幅の 1/2、斜めのカット部分の長さは板幅の2倍以上が規則らしい) そのカットしたデッキ板に合うようにマージンプランクをカットし接着してゆく。
I put the water way of both sides earlier.
I put a deck board afterwards.
I put on 3batsystem (the wide next joint establishes three pieces of inside).
Length of the boards is around 30 feet by the true ship.
Because it was 1/64 scales, I assumed it 12 cm .
I put it in a ship heartily for both sides.
When I reached the position of margin Planck, only the water way side glues a board for margin Planck together.
I cut a deck board along a rule diagonally.
(the board which cut the tip diagonally, the land, 1/2 of the board width, the length of a diagonal cut-out, more than double of the board width, rule)
I cut margin Planck to match the deck board which I cut and adhere.
今回初めてマージンプランクの加工にチャレンジしてかなり不安であったが
それなりに貼れたように思う
I was uneasy probably because I challenged processing of margin Planck for the first time this time.
I think that I was able to put it as such
 キャビン等の部分を切り抜いてデッキの仕上げ板を張り終えると船らしくなってきた
When it clipped out the parts such as cabins, and it finished setting up the finish board of the deck, it seems to have become a ship.
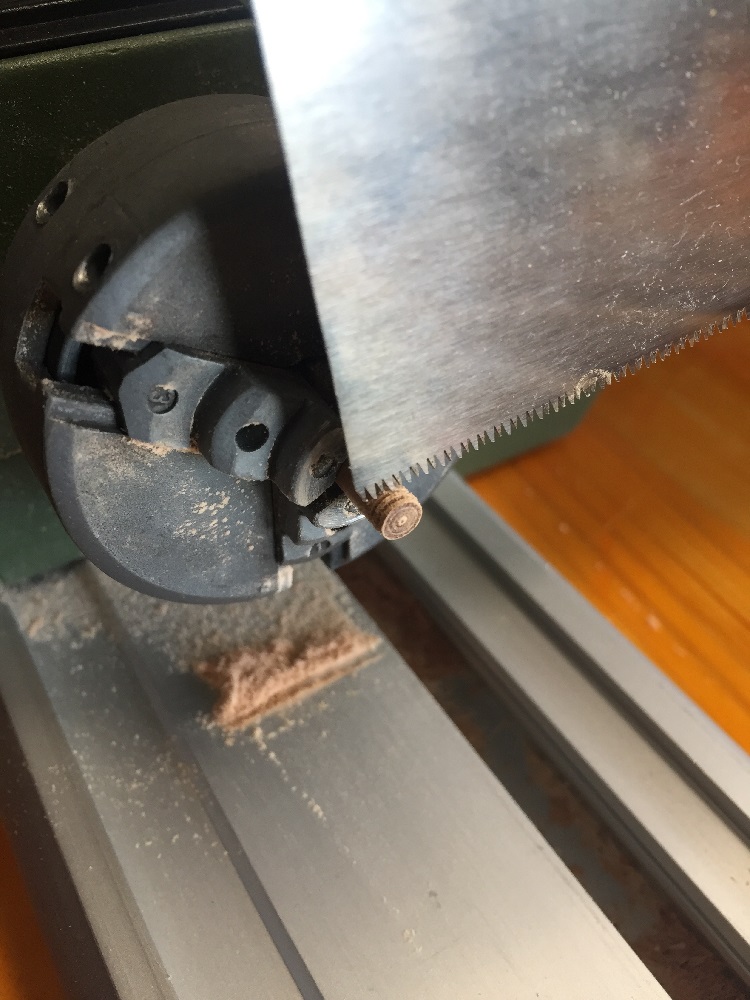
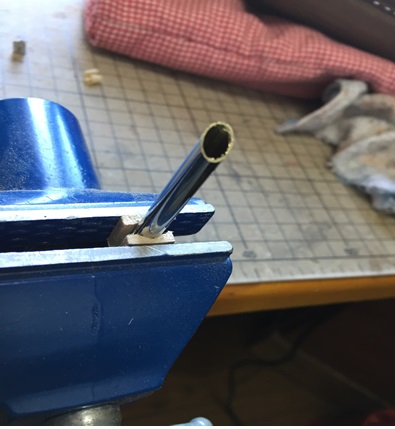 次はアンカーロープが降りる横穴にはめ込むパイプの加工
斜めにカットした薄肉真鍮パイプをバイスにはさみ
The next is processing of the pipes to fit in the cave which an anchor rope goes down.
I put the escalope brass pipe which I cut diagonally in the vice.
 バーナーでパイプを炙ってなます。バイスの口金の木片の挟み板がその熱で
焦げてしまった
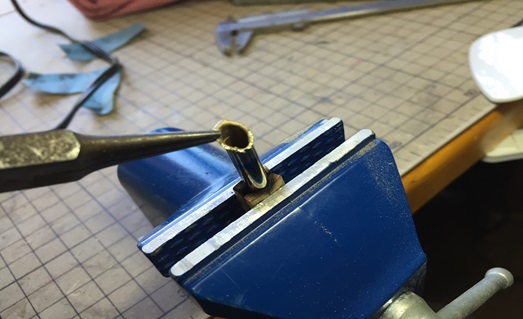
斜めの切り口をラジオペンチの細い先端で少しずつ円周に沿って広げてゆく
欲張って一気にしようとするとパイプが切れてしまうので少しずつ気長に進める
I anneal the pipe in a burner and cool it down.
The wings of the gate of the chip of wood of the clasp of the vice have been burnt be the heat.
I enlarge the diagonal opening along circumference little by little at the narrow tip of radio pliers.
When I am going to do it at a stretch greedily, a pipe cuts.
I push forward work little by little slowly carefully.
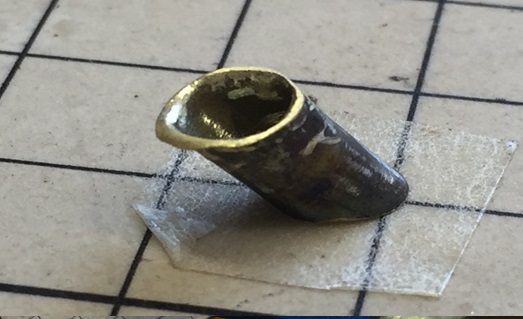 2個失敗して3個目、これも満足できないがパイプが無くなるので妥協 ((+_+))
Two fail; and three.I cannot be satisfied, but this compromises because a pipe disappears.
両サイド用に何とか2個作って先に開けた船体の穴にはめ込む
まあ、何とか形にはなったかと自分に言い聞かせる!(^^)!
I made two somehow for both sides.I fit it in the hole of the hull which opened out earlier.
I tell oneself whether I hit it in form somehow.
Die Verarbeitung des Deckes & Ankerhalle
Ich setzte, der Wasserweg von beidem unterstützt früher.
Ich setzte danach einen Deckausschuß.
Ich zog 3batsystem (das breite nächste Gelenk begründet drei Stücke von innen) an.
Länge der Ausschüsse ist um 30 Füße neben dem wahren Schiff.
Weil es die 1/64 Waage war, ich nahm es 12 Zentimeter an.
Ich unterstütze, der es herzlich für beide in ein Schiff gesetzt werde.
Als ich der Position des Randes Planck herüberreichte, nur der Wasserweg Seiten klebt einem Ausschuß für Rand Planck zusammen.
Ich schnitt diagonal an eine Regel einen Deckausschuß.
(der Ausschuß, der die Spitze diagonal kürzte, das Land, 1/2 von der Ausschußweite, der Länge von einem diagonalen Ausschnitt, mehr als Doppelgänger von der Ausschußweite, Regel,)
Ich schnitt Rand Planck, um zum Deckausschuß zu passen, den ich schnitt und hafte.
Ich fühlte mich wahrscheinlich unwohl, weil ich Verarbeitung des Randes zu dem ersten Mal dieses Mal Planck herausforderte.
Ich glaube, daß ich fähig war, es als solchen zu setzen
Als es aus den Teilen wie Kabinen schnitt, und es hörte auf, den Endeausschuß des Deckes aufzustellen, es scheint ein Schiff geworden zu sein
Der nächste marschiert von den Leitungen, um in die Höhle zu passen, die ein Ankerseil hinuntergeht.
Ich setzte die escalope Messingleitung, die ich diagonal ins Laster schnitt.
Ich glühe die Leitung in einem Brenner und einer Kühle aus der es entlang.
Die Flügel des Tores des Chips des Holzes des Schlosses des Lasters sind verbrannt worden, seien Sie die Hitze.
Ich vergrößere die diagonale Öffnung nach und nach an Umfang bei der schmalen Spitze der Radiozange.
Wenn ich es bei einer Ausdehnung gierig machen werde, schneidet eine Leitung.
Ich schiebe die Arbeit nach und nach langsam vorsichtig vorwärts.
Zwei scheitern; und drei
Ich kann nicht zufriedengestellt werden, aber dies schließt, weil eine Leitung verschwindet.
Ich unterstütze, dem irgendwie zwei für beide gemacht werden.
Ich füge es ins Loch vom Rumpf ein, der sich früher verbreiterte.
Ich erzähle sich selbst
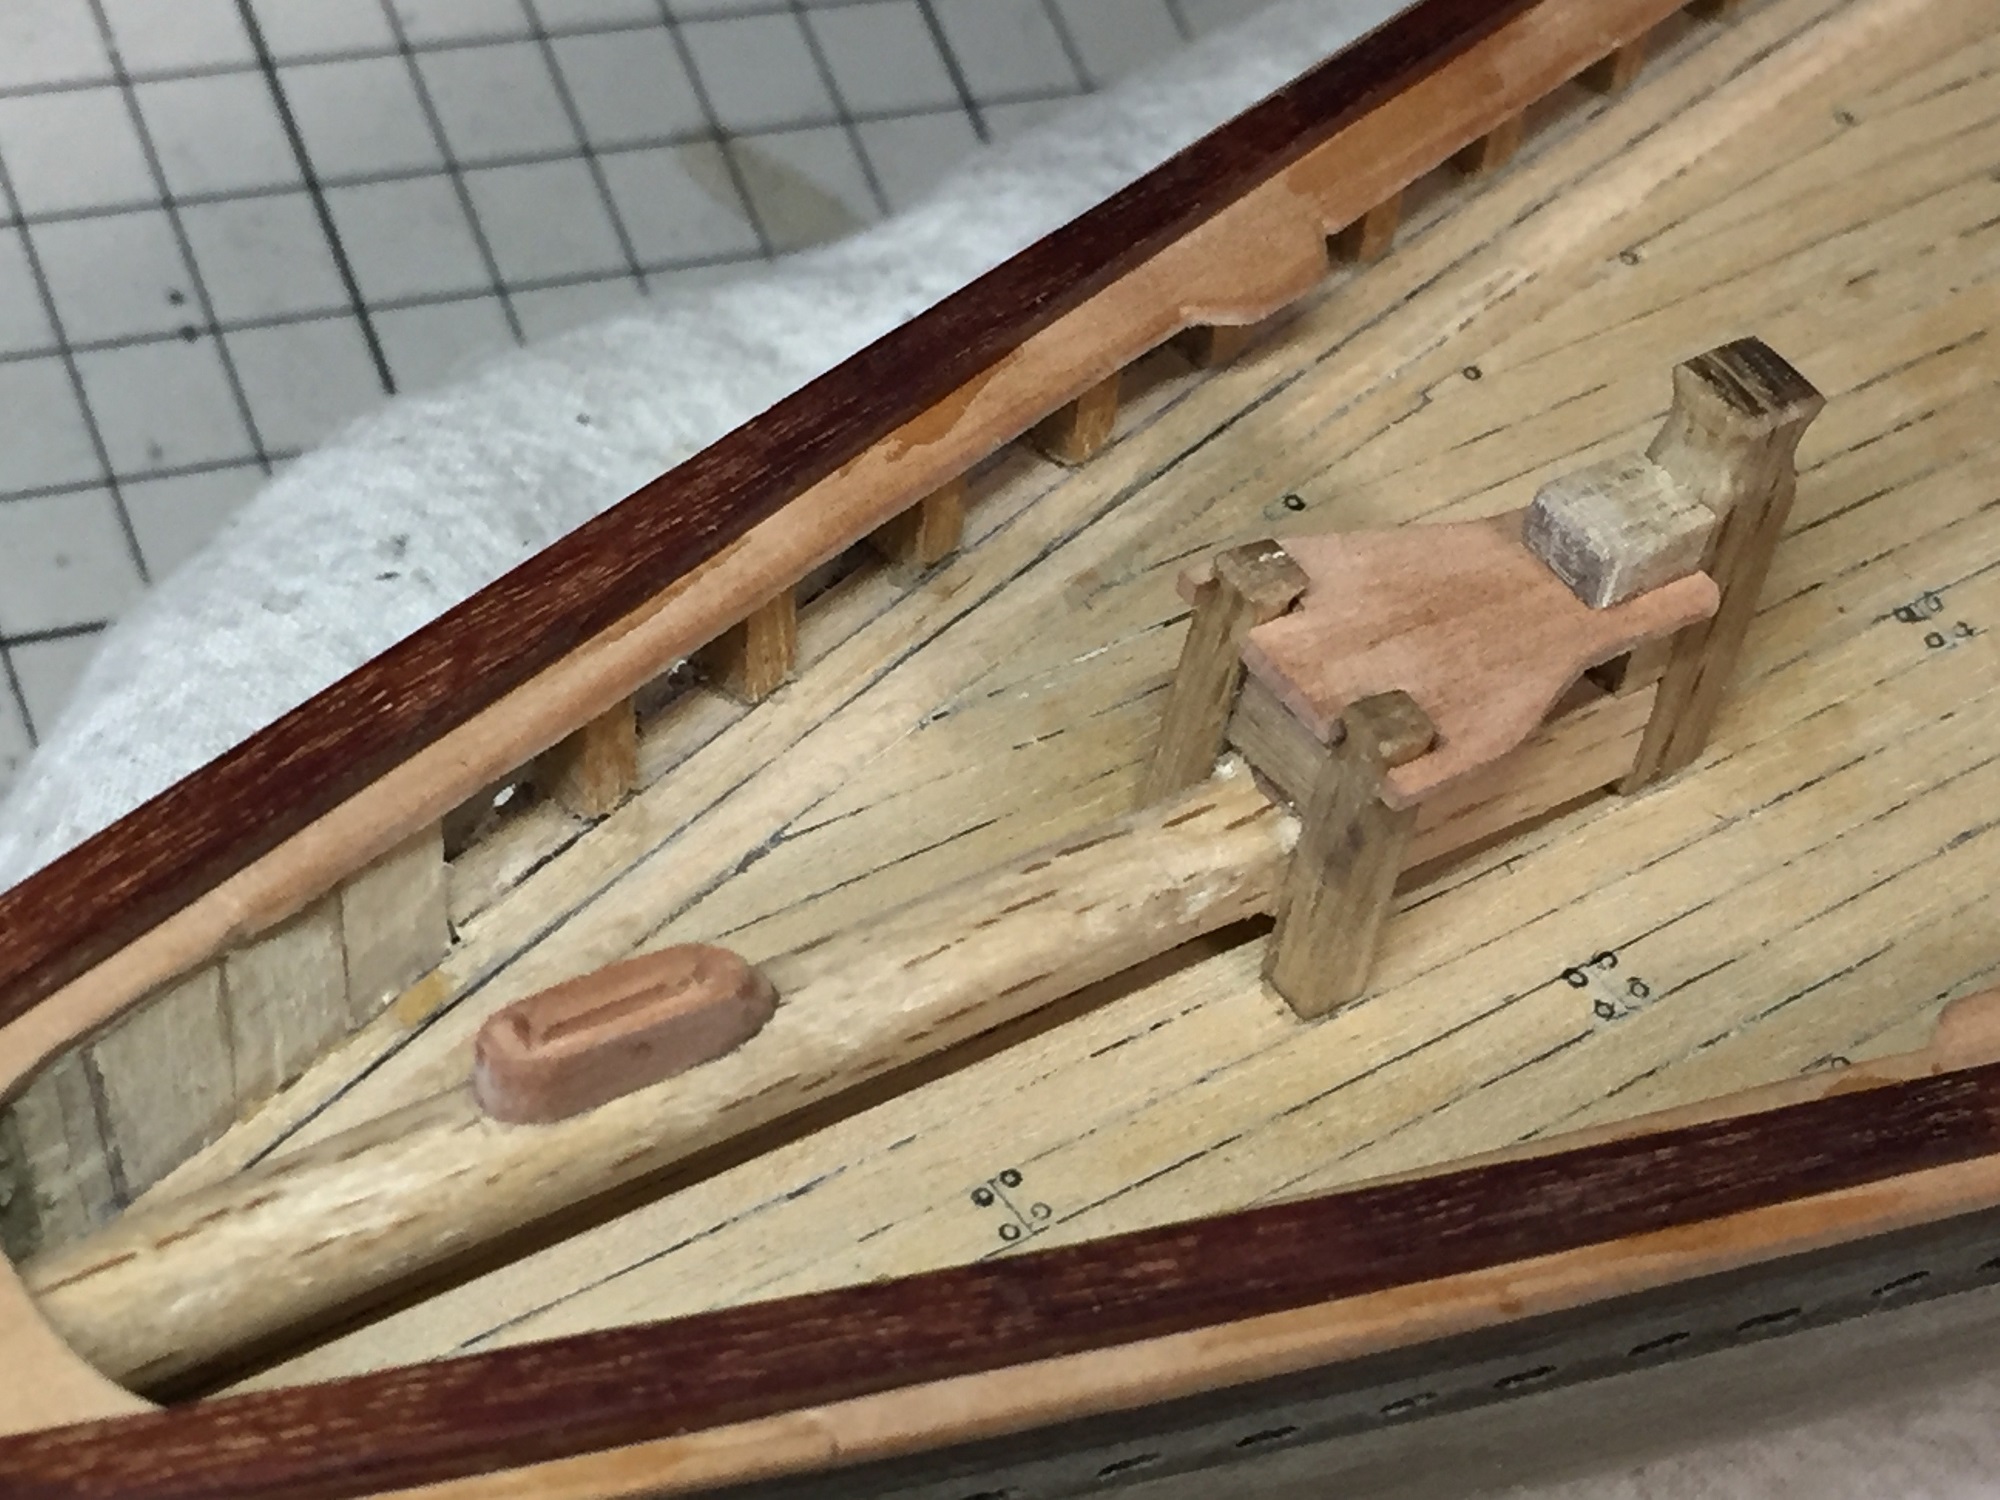
【船尾(スターン)と手摺の製作】
The production of the stern (Sterne) and the rail
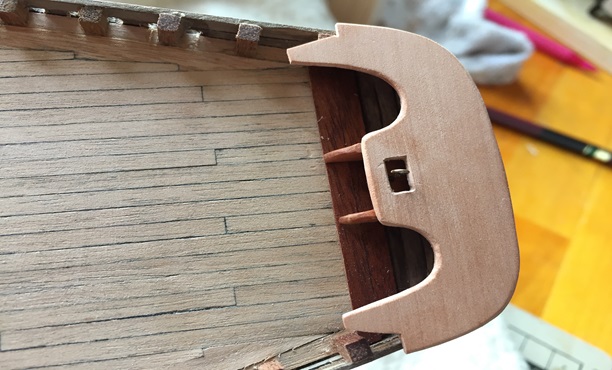
 船尾のフィラー材を極限にまで削り取り、内側に板を貼り手摺を支えるリブを取り付ける
I sharpen filler materials of the stern in an extremity.
I get lib I put a board inward, and to support a rail.
 以前のフィラー材を貼ってある写真
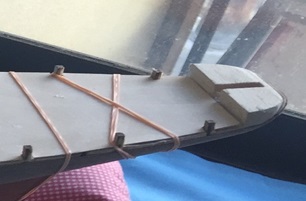
 船尾のてすりの取付
The installation of the rail of the stern
材料はペアウッドのブロックをスライスし型紙に沿って成形したもの
ペアウッドは目が細かく割れにくいように思います
The materials is pair Wood.
I slice a block and mold it along a paper pattern.
I think that Pair Wood is a tight grain and hard ,not crisp.
船尾の化粧板を貼り付けた
I stuck a smoothly planed board of the stern.
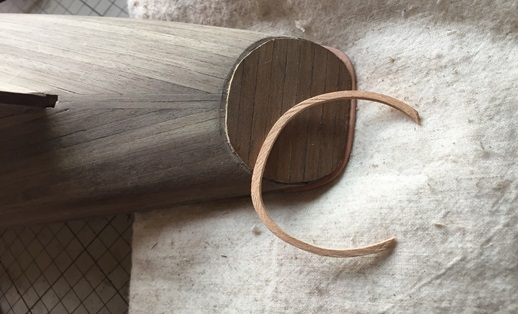 その周りを額縁を取り付けるようにして処理しようと考えた
材料は柔木を用いた、スチームアイロンでたやすく曲がった
I installed a frame, and to handle the rotation.
The materials used a softening wood.
I bent with a steam iron easily
 瞬間接着剤で接着しヤスリとペーパーで仕上げた
I adhered in superglue and finished it with a file and paper
 ペーパー掛けは充分では無いものの変な感じにはならなかった
Sanding is not good but look nice.
 船首部分も同じくペアウッドのスライスを整形し貼り付ける
I had orthopedic treatment and stuck the materials that the bow part sliced pair Wood in the same way.
 両サイドの手摺も貼付け
The rail of both sides is pasting up, too
 一応全周貼り終えた、まあまあの出来か
I have finished putting all laps for the time being.
The pretty good result.
船首部分の飾りの手摺はパオロッサで色違いにし
引き締まった感じにしたが、さあ、どうですか?
I make it different colors in paorossa, and the rail of the decoration for the bow section did it in a compact feeling.
How do you like that?
 この船は後部の手摺は2段になっているので注意深く貼付け
特に中央のR形状にしてピッタシに合わすのが難しかった
As for this ship, the rear handrail becomes two steps.
When I made pasting up, I worked carefully.
It was difficult that I made it particularly central R shape and could put it together neatly.
ようやく船体の形らしくなってきた
It seems to have become finally the form of the hull.
Die Produktion vom Strengen (Sterne) und dem Geländer
Ich schärfe Spachtelmassenmaterialien vom strengen in einem äußersten Ende.
Ich bekomme Bewegung, die ich innerlich einen Ausschuß setzte, und ein Geländer zu unterstützen.
Die Installation des Geländers vom strengen
Die Materialien sind Paarholz.
Ich schneide in Scheiben einen Block und forme es an einem Papiermuster.
Ich glaube, daß Pair Wood ein dichtes Korn ist, und schwer, nicht knusprig.
Ich steckte einen glatt eingeebneten Ausschuß vom strengen
Ich beabsichtigte, ich installierte einen Rahmen, und mit der Drehung fertigzuwerden.
Die Materialien benutzten ein weiches Holz.
Ich beugte mich leicht mit einem Dampfeisen
Ich haftete in superglue und beendete es mit einer Akte und einem Papier
Schmirgelnd ist nicht gut, aber Guter.
Ich hatte orthopädische Behandlung und steckte die Materialien, die der Bogenteil in Scheiben Paarholz in die gleiche Weise schnitt
Das Geländer beider Seiten fügt auch aufwärts ein
Ich habe aufgehört, vorläufig alle Schöße zu setzen.
Das ganz Gutes resultiert
Mache ich es in paorossa zu anderen Farben, und das Geländer der Dekoration für den Bogenteil machte es in einem kompakten Gefühl, aber wie über saa?
Wie mögen Sie das?
Wie für dieses Schiff wird das hinter Geländer zwei Schritte.
Als ich das Einfügen aufwärts machte, arbeitete ich vorsichtig.
Es war schwierig, daß ich es zu besonders zentraler R-Form machte und es ordentlich zusammensetzen konnte
Es scheint schließlich die Form des Rumpfes geworden zu sein
 【キャビンの作成 その1】
キャビンのベースプレートにそれぞれの壁板を貼り付ける。
このキャビンにはスライドルーフが構成されているので そのためのレールに真鍮棒を接着し準備しておいた。
I stick each wainscot on the baseplate of the cabin.It is slide roof structure in this cabin.I get ready to bond a brass stick to a rail to be able to slide.
 入り口のドアは片開きのドアで形だけにしようと思ったが、あえて初めて開くように 蝶番をつけることに挑戦、内径0.5ミリの真鍮パイプに固定側に真鍮棒を差し込み ロー付け、ドア側はパイプで受けそれぞれに平板をロー付け、書くと簡単なようですが ロー付け何度も失敗し思うように形にならない。
The door of the entrance intended to make it only form at the door of the single swing.However, I challenged hinge making for the first time to be able to open and close it.I inserted a brass stick in the fixed side in a brass pipe of 0.5 mm inside diameter and did a silver-soldering.The door side supports it with a pipe.I do a silver-soldering of a flat board in each.It seemed to be easy, but failed in the silver-soldering many times .Think; is beautiful; is not finished
 やっと、形になってもそれぞれの平板を接着して固定し、どの位置が良いところに 位置するのは至難のワザ、付けてはハズレを何回もすると段々汚くなってくる 瞬間接着剤では固定できないので2液性の接着剤で固定、それも平板を 長くして接着面積を稼がないと止められない、マズイけどしょうがない。
まだまだ、研究しなければと思う。
It is necessary to glue each flat board together in the most suitable place.This is very difficult.It is the continuation of the trial and error.I cannot fix it in the superglue and use epoxy adhesive.Lengthen a flat board, and it does not earn an adhesion area, too; think that cannot fix it, and there is no help for it though is bad, and do not study it still more.
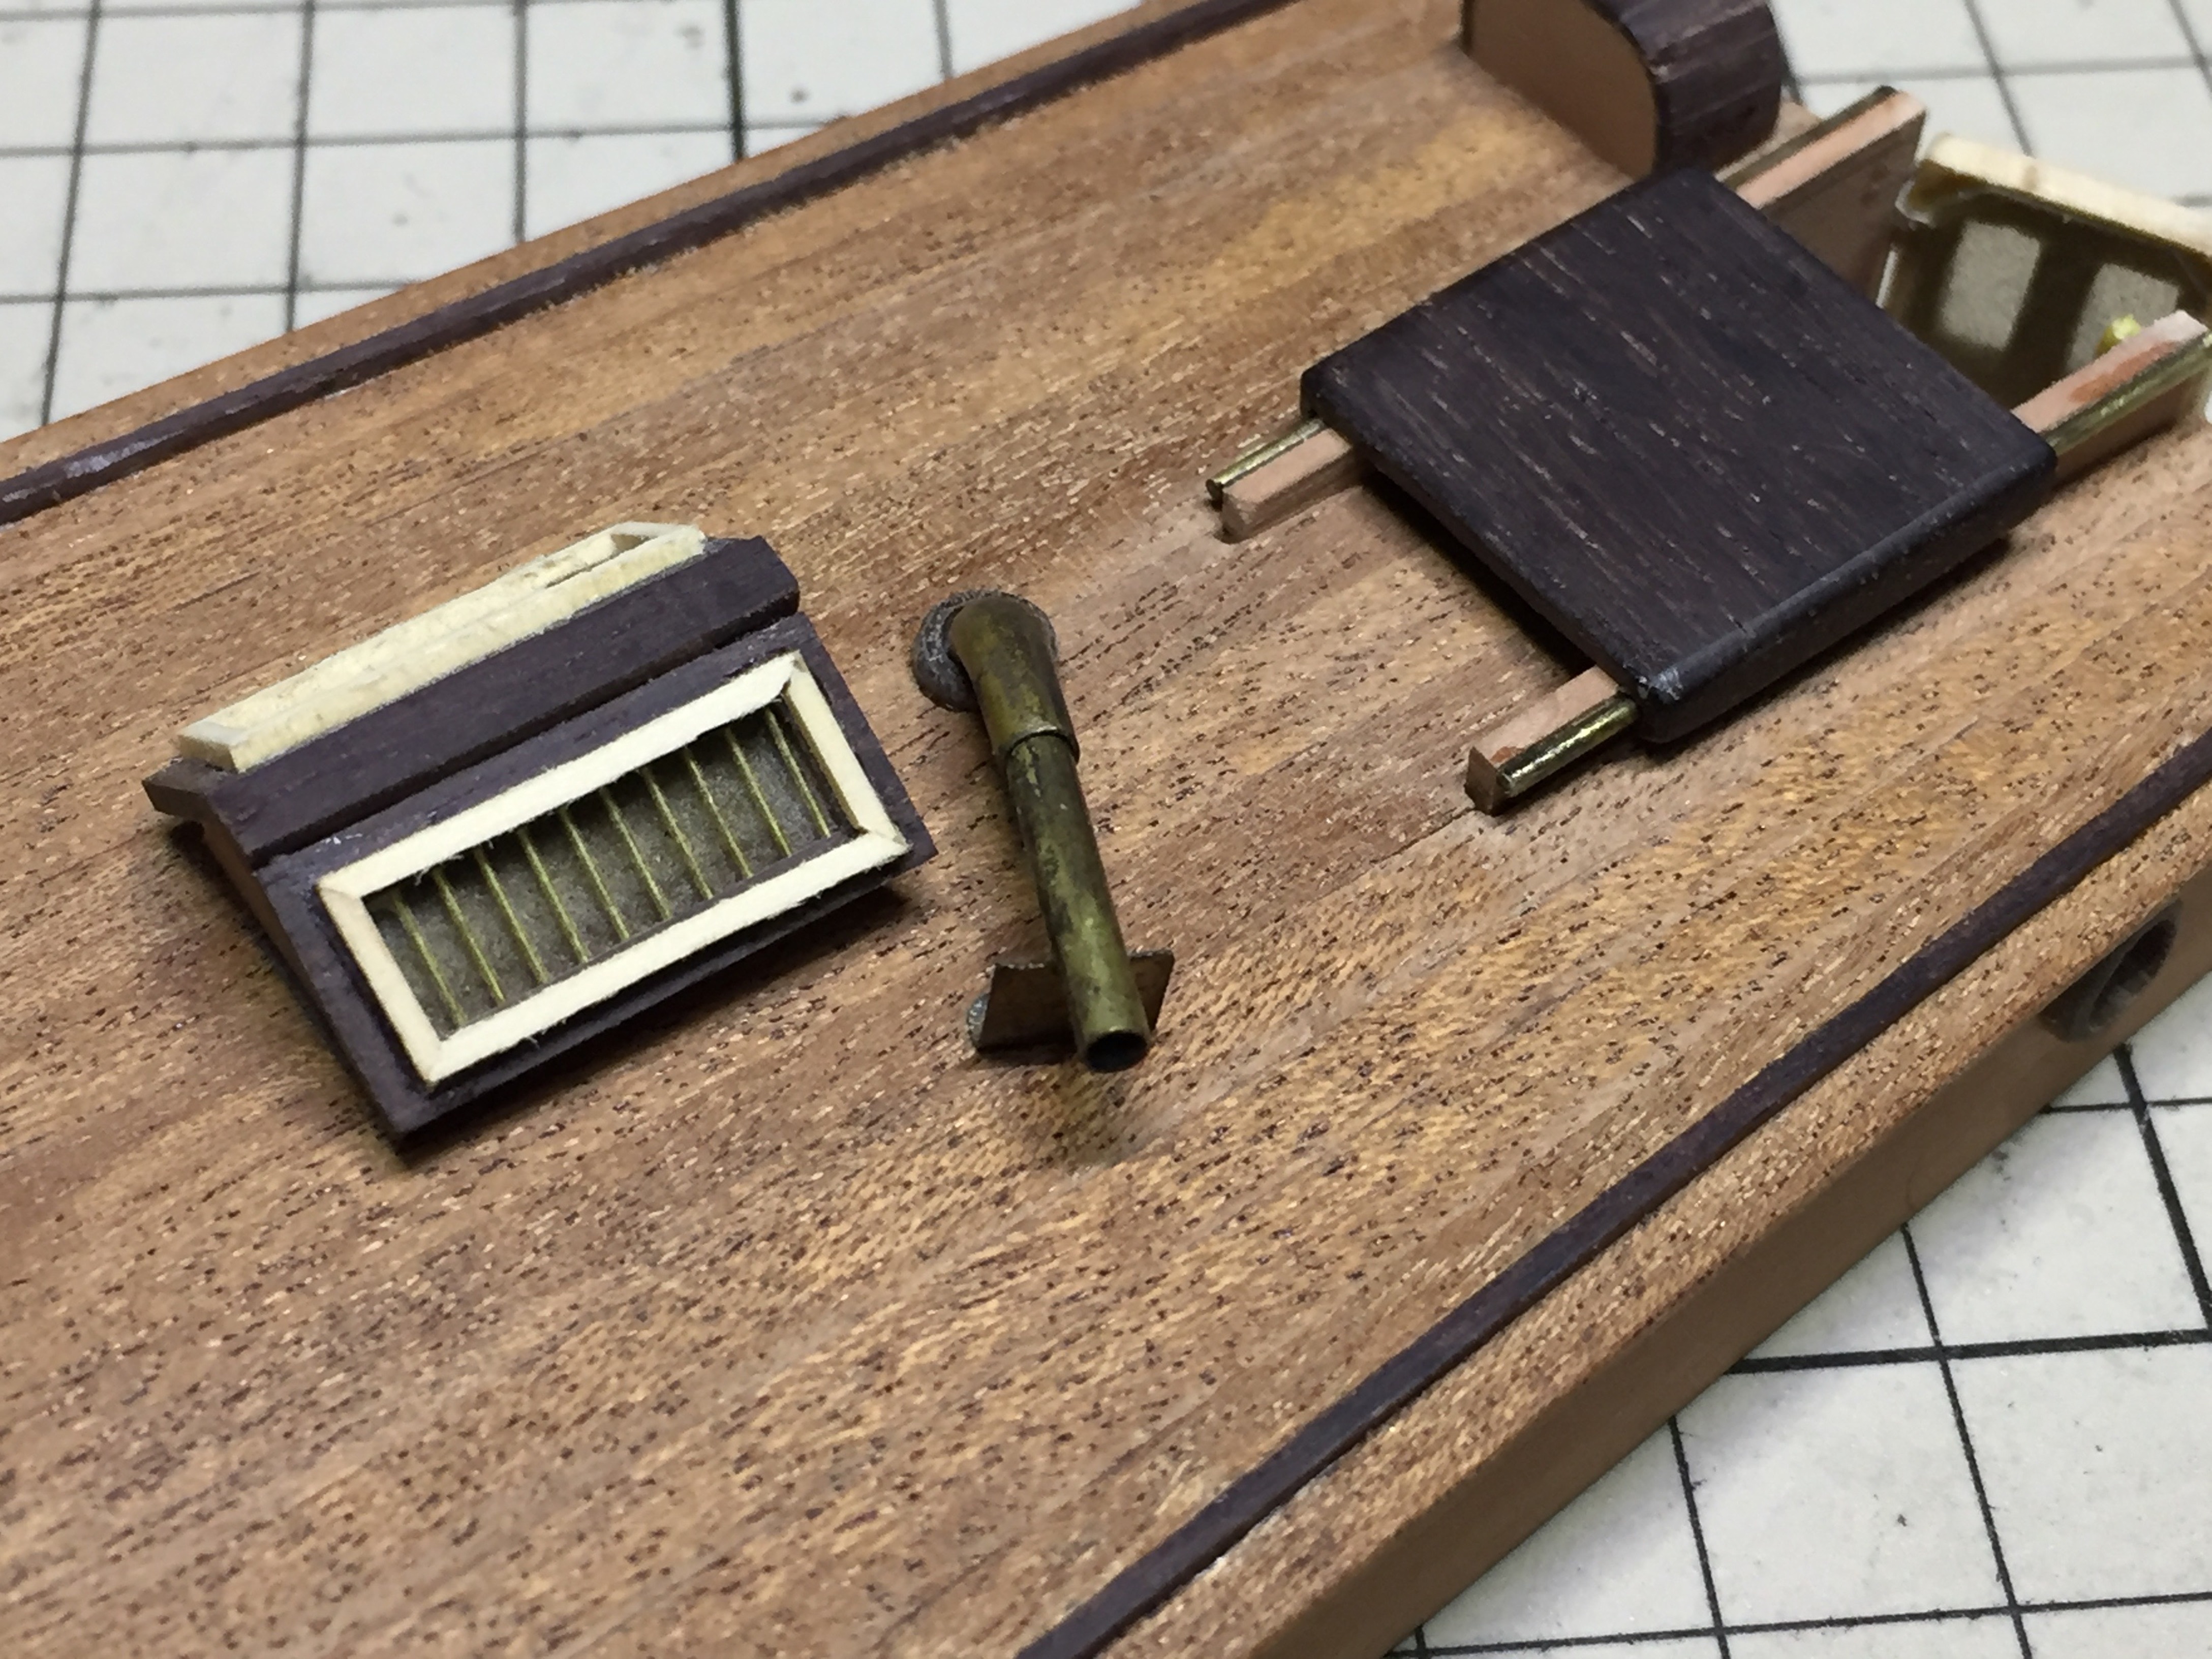
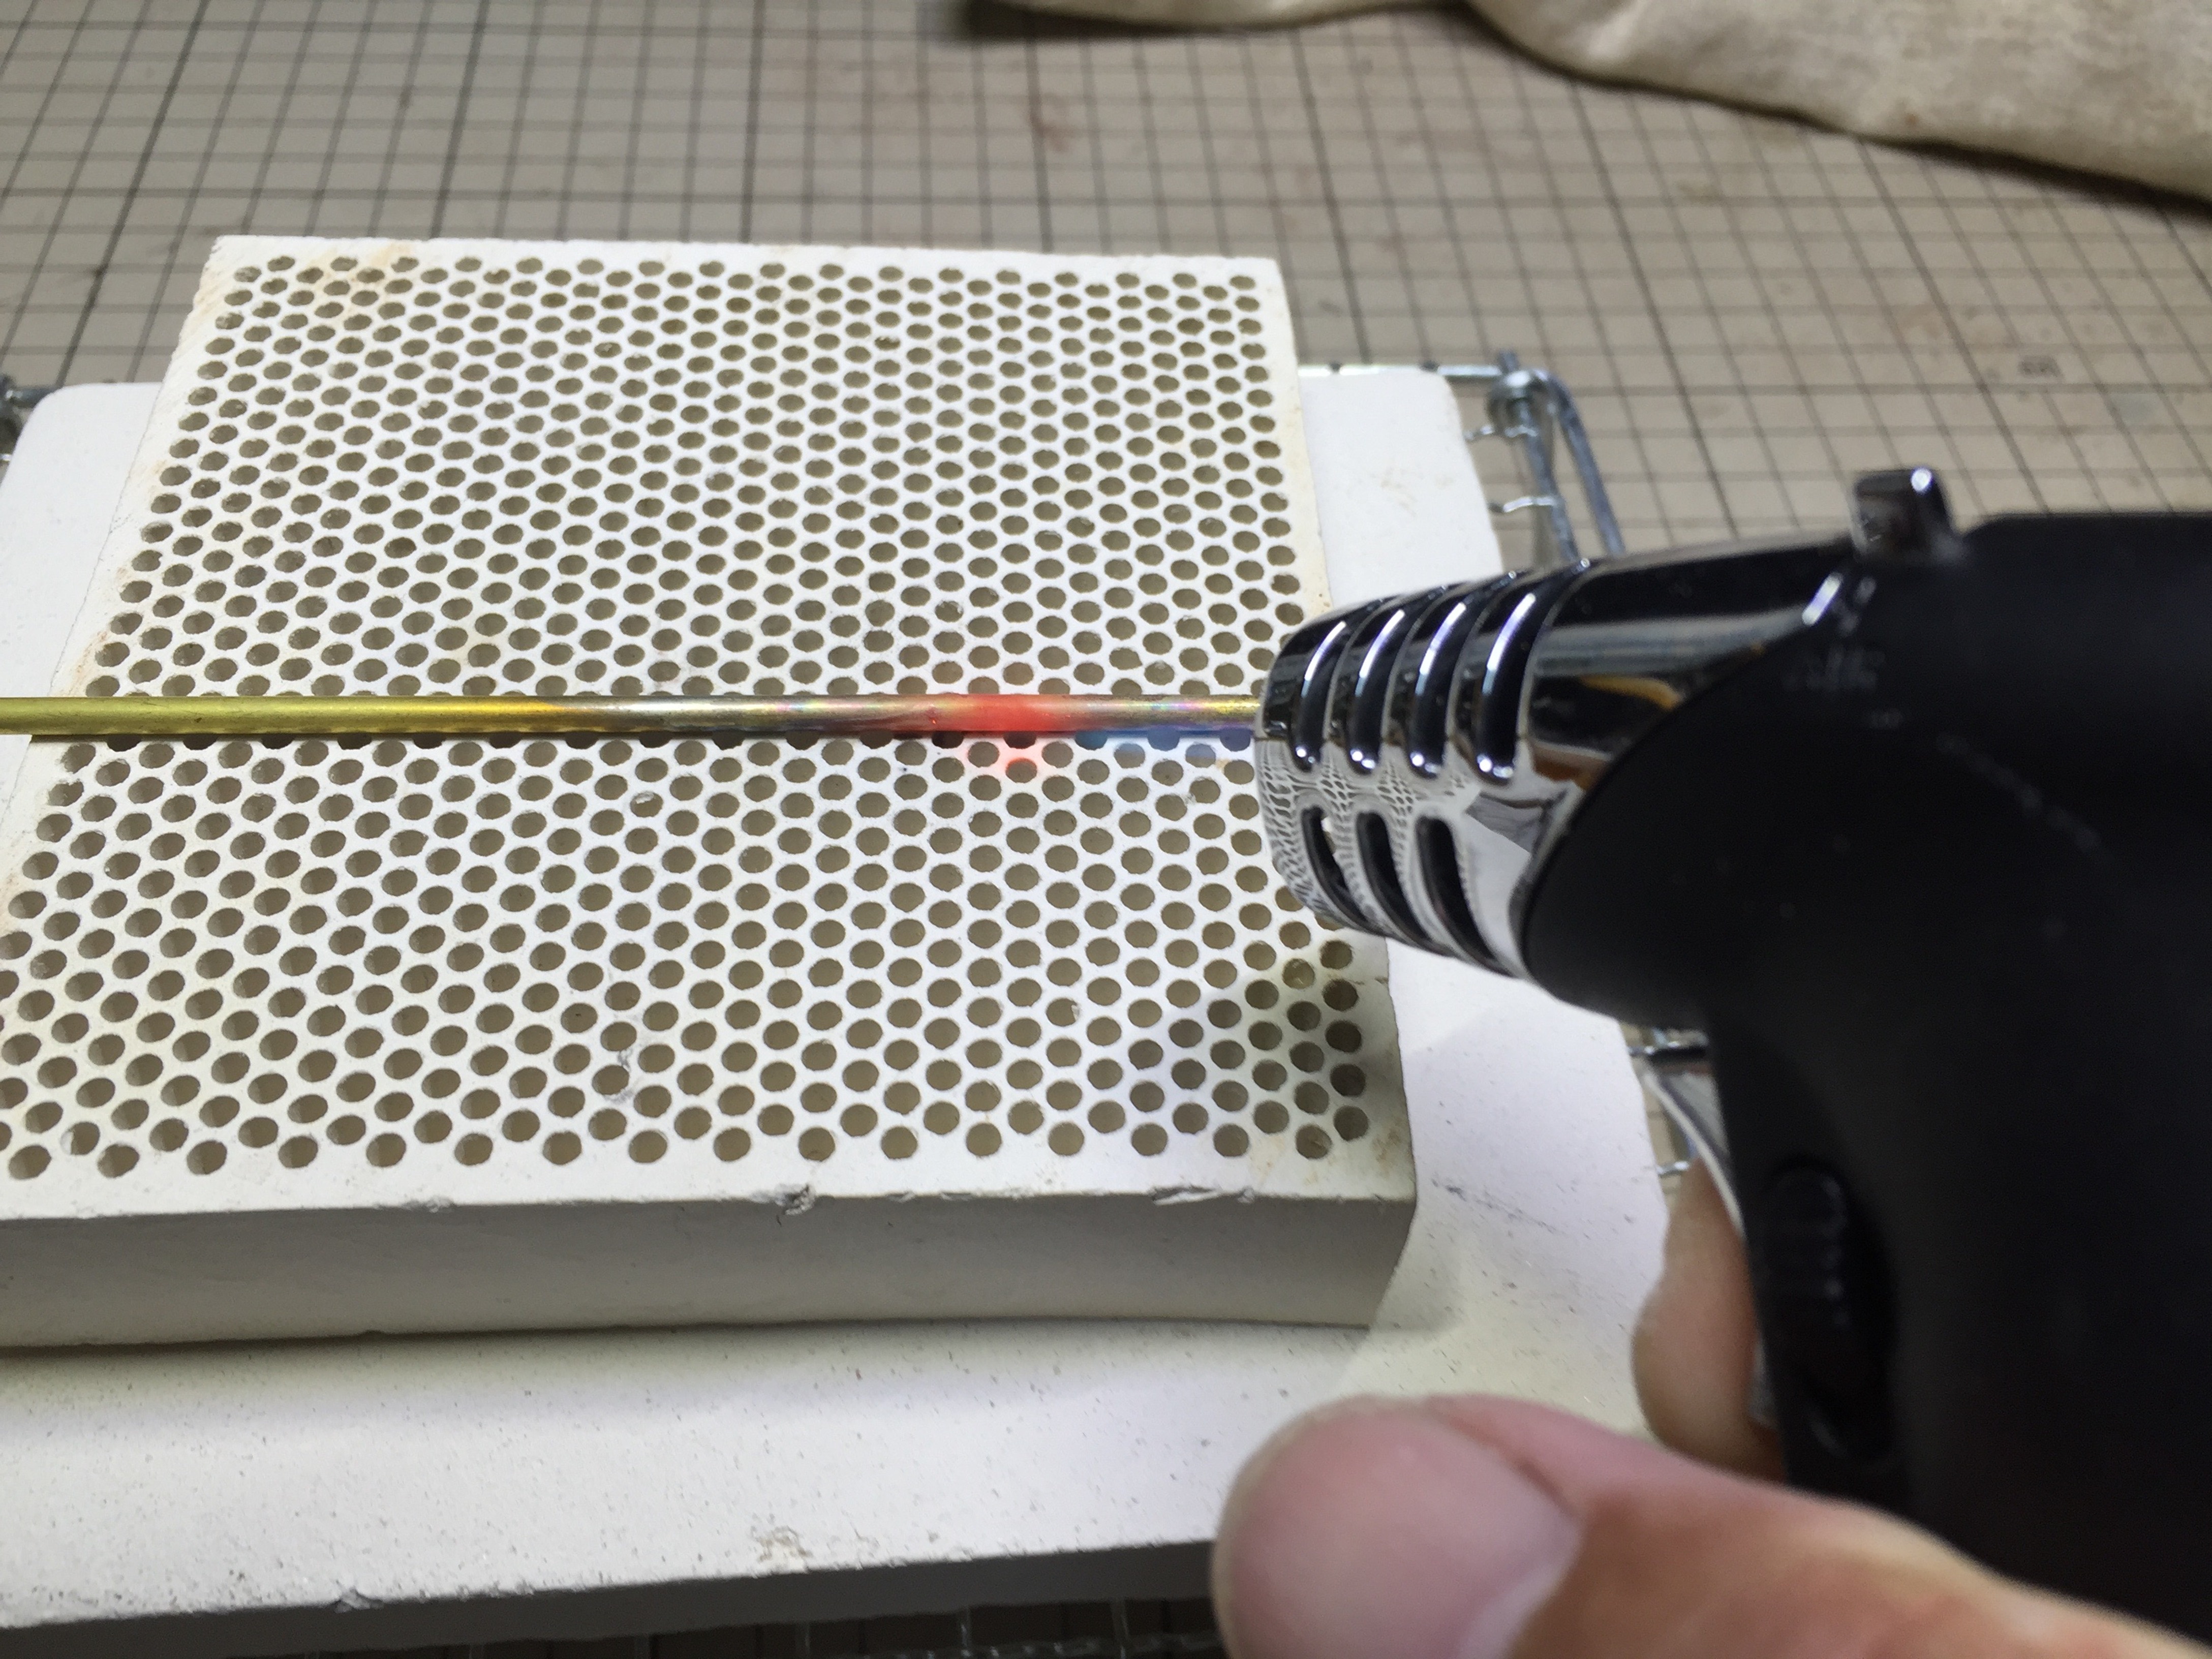 このキャビンには排気用の煙突があり90度曲がった形になっている。 パイプをへしゃげること無く曲げるにはどうするか。 まず、パイプを熱してなますことにした。
There is a chimney for exhaust in this cabin. It is necessary to bend a pipe 90 degrees. What would you do to bend a pipe neatly? At first I decided I heated a pipe, and to cool it down.
 そのパイプに砂を詰めて曲げればひしゃげないかと考えた。
ホームセンターで買った砂を詰めて、両側を木片で栓をする。
I thought whether I did not get squashed if a pipe could checkmate sand and bent it.I cut down the sand which I bought in Home Center.I cork it in a chip of wood at both sides.I make a jig.I drive a pipe into the board.
 治具となる板にパイプを打ち込み、その間に挟んで曲げる。
思ったようには曲がってくれない、やはりへしゃげる。 曲げる直前に加熱し、やけどしないように気をつけながら曲げてみる。
I decided I sandwich it in the meantime, and to bend it, but do not turn as having thought.After all the curved section of the pipe becomes dented.I heat right before I bend it and try to bend it while being careful not to burn itself.
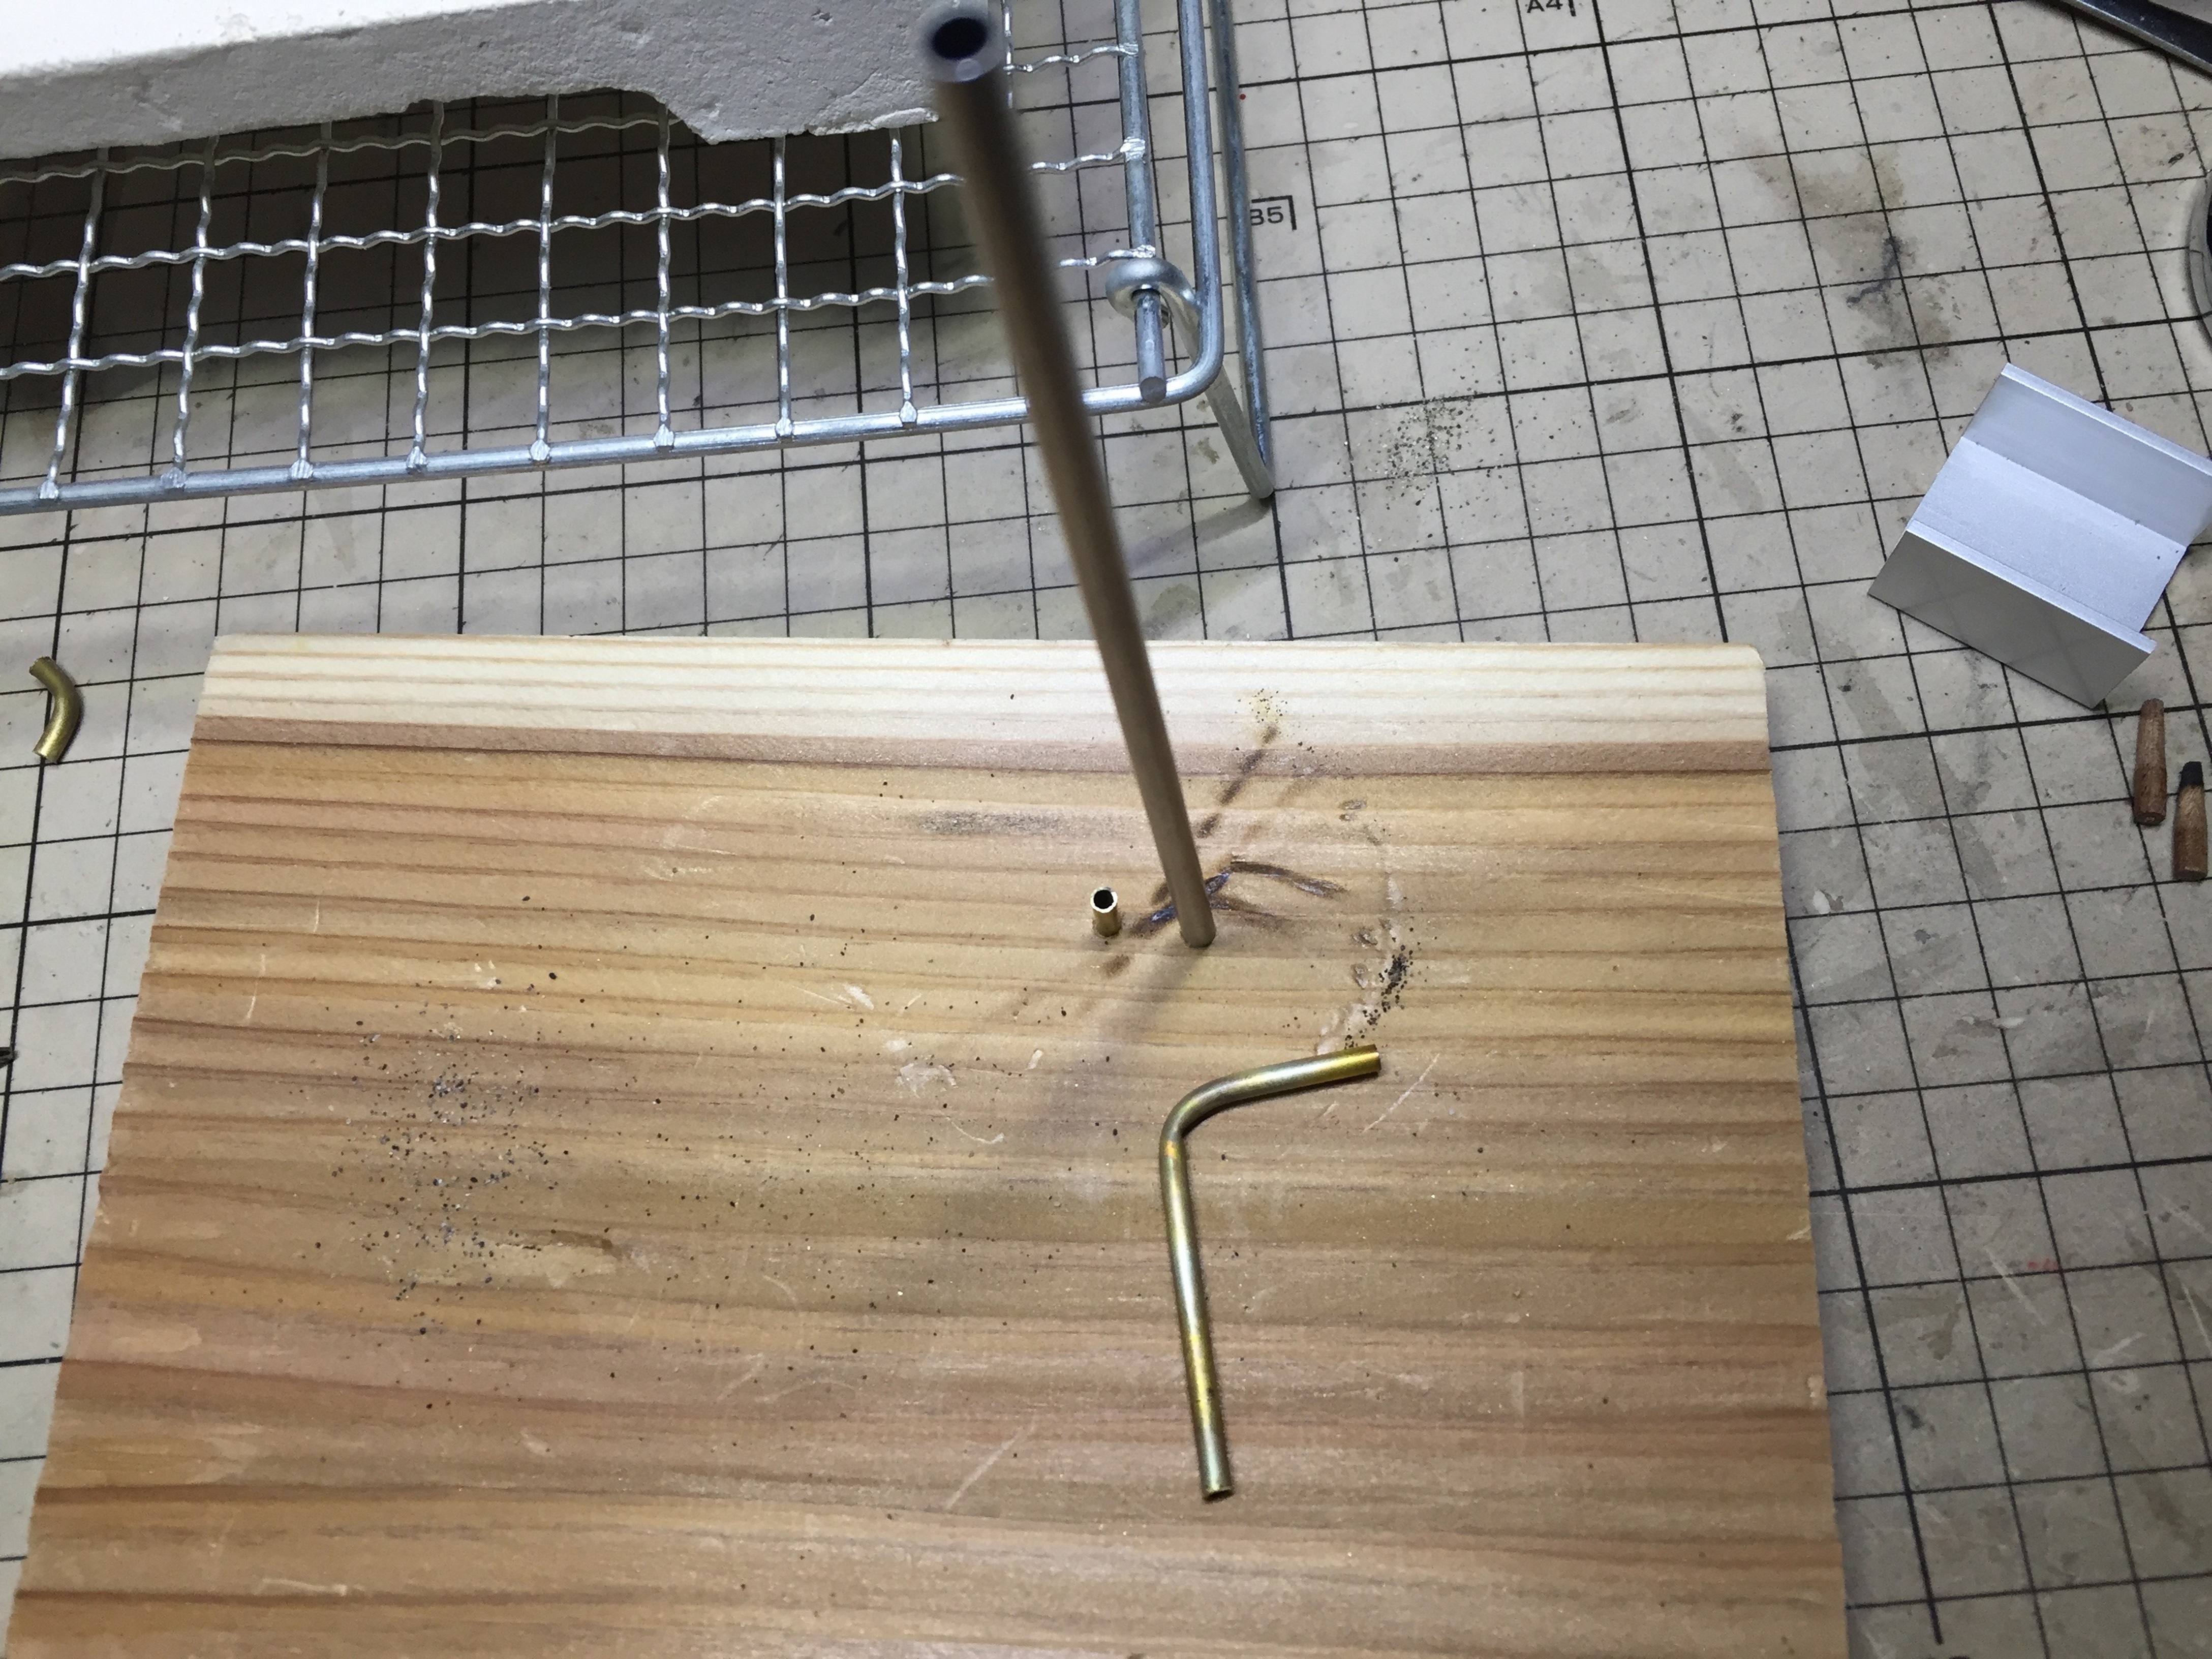 治具のパイプが細いとやはり、へしゃげるのでパイプを少し太いものに変える。 少しマシになってきた。
When the pipe of the jig is thin, the curved section of the pipe becomes dented.I try to test it with a slightly big pipe.It followed that I was slightly good.
 左が治具のパイプが細いもの、右が少し太くしたもの。
まだ、多少へしゃげているがまあ、これくらいか。!(^^)!
治具の板も焦げている、写真には写ってないが両側の栓もまる焦げ。
The processing of the pipe that processing of the pipe that the left photograph is thin, some right photographs are shameless.Some flexura of the pipe still yield.It is assumed that I am good in this.The board of the jig burns, too.I do not appear in the photograph, but it is the stopper momaru getting burnt of both sides.
 曲げたパイプを黒染めで少し色を付け屋根に取付、煙突とした
天窓は裏側から真鍮線がはまるように彫込を入れ0.5ミリの真鍮栓を取付。
更にプラバンを切って取り付けると天窓の様になった。
Was dyed and did black of the pipe which I bent.The skylight which I assumed a chimney did a case by cutting groove so that brass route fitted in from the backside.It is installation ta with a brass stopper of 0.5 mm.Furthermore, I cut plastic board, and it seems to have become a skylight when it installed it.
 キャビン単体の出来上がり、スライドルーフも上手くスライド出来、ドアは 外から見る分にはまあまあ、いいかというレベル。煙突はそれなりの雰囲気 全部は満足できないが、まあこれならよかろう。
The completion of the cabin simple substance.The slide roof was able to slide well, too.The door is passable in a thing judging from the outside.Some atmospheres are over the chimney.I cannot be all satisfied, but it will be assumed that I am good in this.
Die Gebäudekabinen
Part1
Ich klebe jeden wainscot auf den baseplate der Kabine.Es ist Rutschbahndachstruktur in dieser Kabine.Ich bekomme bereite, um einen Messingstock zu einer Schiene zu binden, um fähig zu sein, zu rutschen.Die Tür des Einganges beabsichtigte, es dazu zu bringen, sich nur bei der Tür des einzelnen Schwunges zu bilden.Aber ich forderte Scharnier heraus, das zu dem ersten Mal machte, fähig zu sein, es zu öffnen und zu schließen.Ich legte in einer Messingleitung von 0.5 mm in Durchmesser einen Messingstock in die feste Seite ein und machte ein Silber-löten.Die Tür Seiten unterstützt es mit einer Leitung.Ich mache ein Silber-löten von einem flachen Ausschuß in jedes.Es schien leicht zu sein, aber scheiterte im Silber-löten oft.Denken Sie; ist schön; wird nicht beendet.Es ist notwendig, jeden flachen Ausschuß in der geeignetesten Stelle zusammen zu kleben.Dies ist sehr schwierig.Es ist die Fortsetzung vom Versuch und dem Fehler.Ich kann es nicht im superglue reparieren und epoxy-Heftpflaster benutzen.Verlängern Sie einen flachen Ausschuß, und es verdient kein Adhäsionsgebiet, auch; glauben Sie, daß das es nicht reparieren kann, und es gibt, keine Hilfe dafür ist aber schlecht, und studiert es immer noch nicht mehr.Es gibt einen Schornstein für Auspuff in dieser Kabine..Es ist notwendig, 90 Grade eine Leitung zu biegen.Was würden Sie eine Leitung mit Biegung ordentlich machen?Zuerst beschloß ich, daß ich eine Leitung, und es abzukühlen, heizte.Ich glaubte, ob ich nicht zerquetscht wurde, wenn eine Leitung matt Sand setzen könnte, und bog es.Ich schnitt der Sand, den ich in Home Center kaufte, deprimiert.Ich verkorke es in einem Chip des Holzes bei beiden Seiten.Ich mache eine Gigue.Ich treibe eine Leitung in den Ausschuß.Ich beschloß, daß ich es, und es zu biegen, inzwischen hineinzwänge, aber dreht nicht, wie habend gedacht.Nachdem der ganze gekrümmte Teil der Leitung verbeult worden ist.Ich heize Recht, bevor ich es biege, und bemüht, es zu biegen, während das Sein vorsichtig, sich nicht zu verbrennen.Wenn die Leitung der Gigue dünn ist, wird der gekrümmte Teil der Leitung verbeult.Ich bemühe mich, es mit einer etwas großen Leitung zu prüfen.Es folgte, daß ich etwas gut war.Die Verarbeitung der Leitung der Verarbeitung von der Leitung, die das linke Foto dünn ist, einige richtige Fotos sind schamlos.Irgendein flexura der Leitung immer noch Ertrag.Es wird angenommen, daß ich gut darin bin.Der Ausschuß der Gigue brennt auch.Ich erscheine nicht im Foto, aber es ist der Pfropfen momaru, verbrannt von beiden Seiten.Wurde gefärbt und machte Schwarzen von der Leitung, die ich bog.Das Dachfenster, das ich einen Schornstein annahm, machte einen Fall, indem es Furche schnitt, so daß sich Messingstrecke von der Kehrseite einfügte.Es ist Installations ta mit einem Messingpfropfen von 0.5 Millimetern.Weiterhin schnitt ich plastischen Ausschuß, und es scheint ein Dachfenster geworden zu sein, als es es installierte.Die Vollendung der Kabine einfache Substanz.Das Rutschbahndach war fähig, gut auch zu rutschen.Die Tür ist in einer Sache passierbar, die von der Außenseite urteilt.Einige Atmosphären sind über dem Schornstein.Ich kann nicht alles zufrieden sein, aber es wird angenommen werden, daß ich gut darin bin.
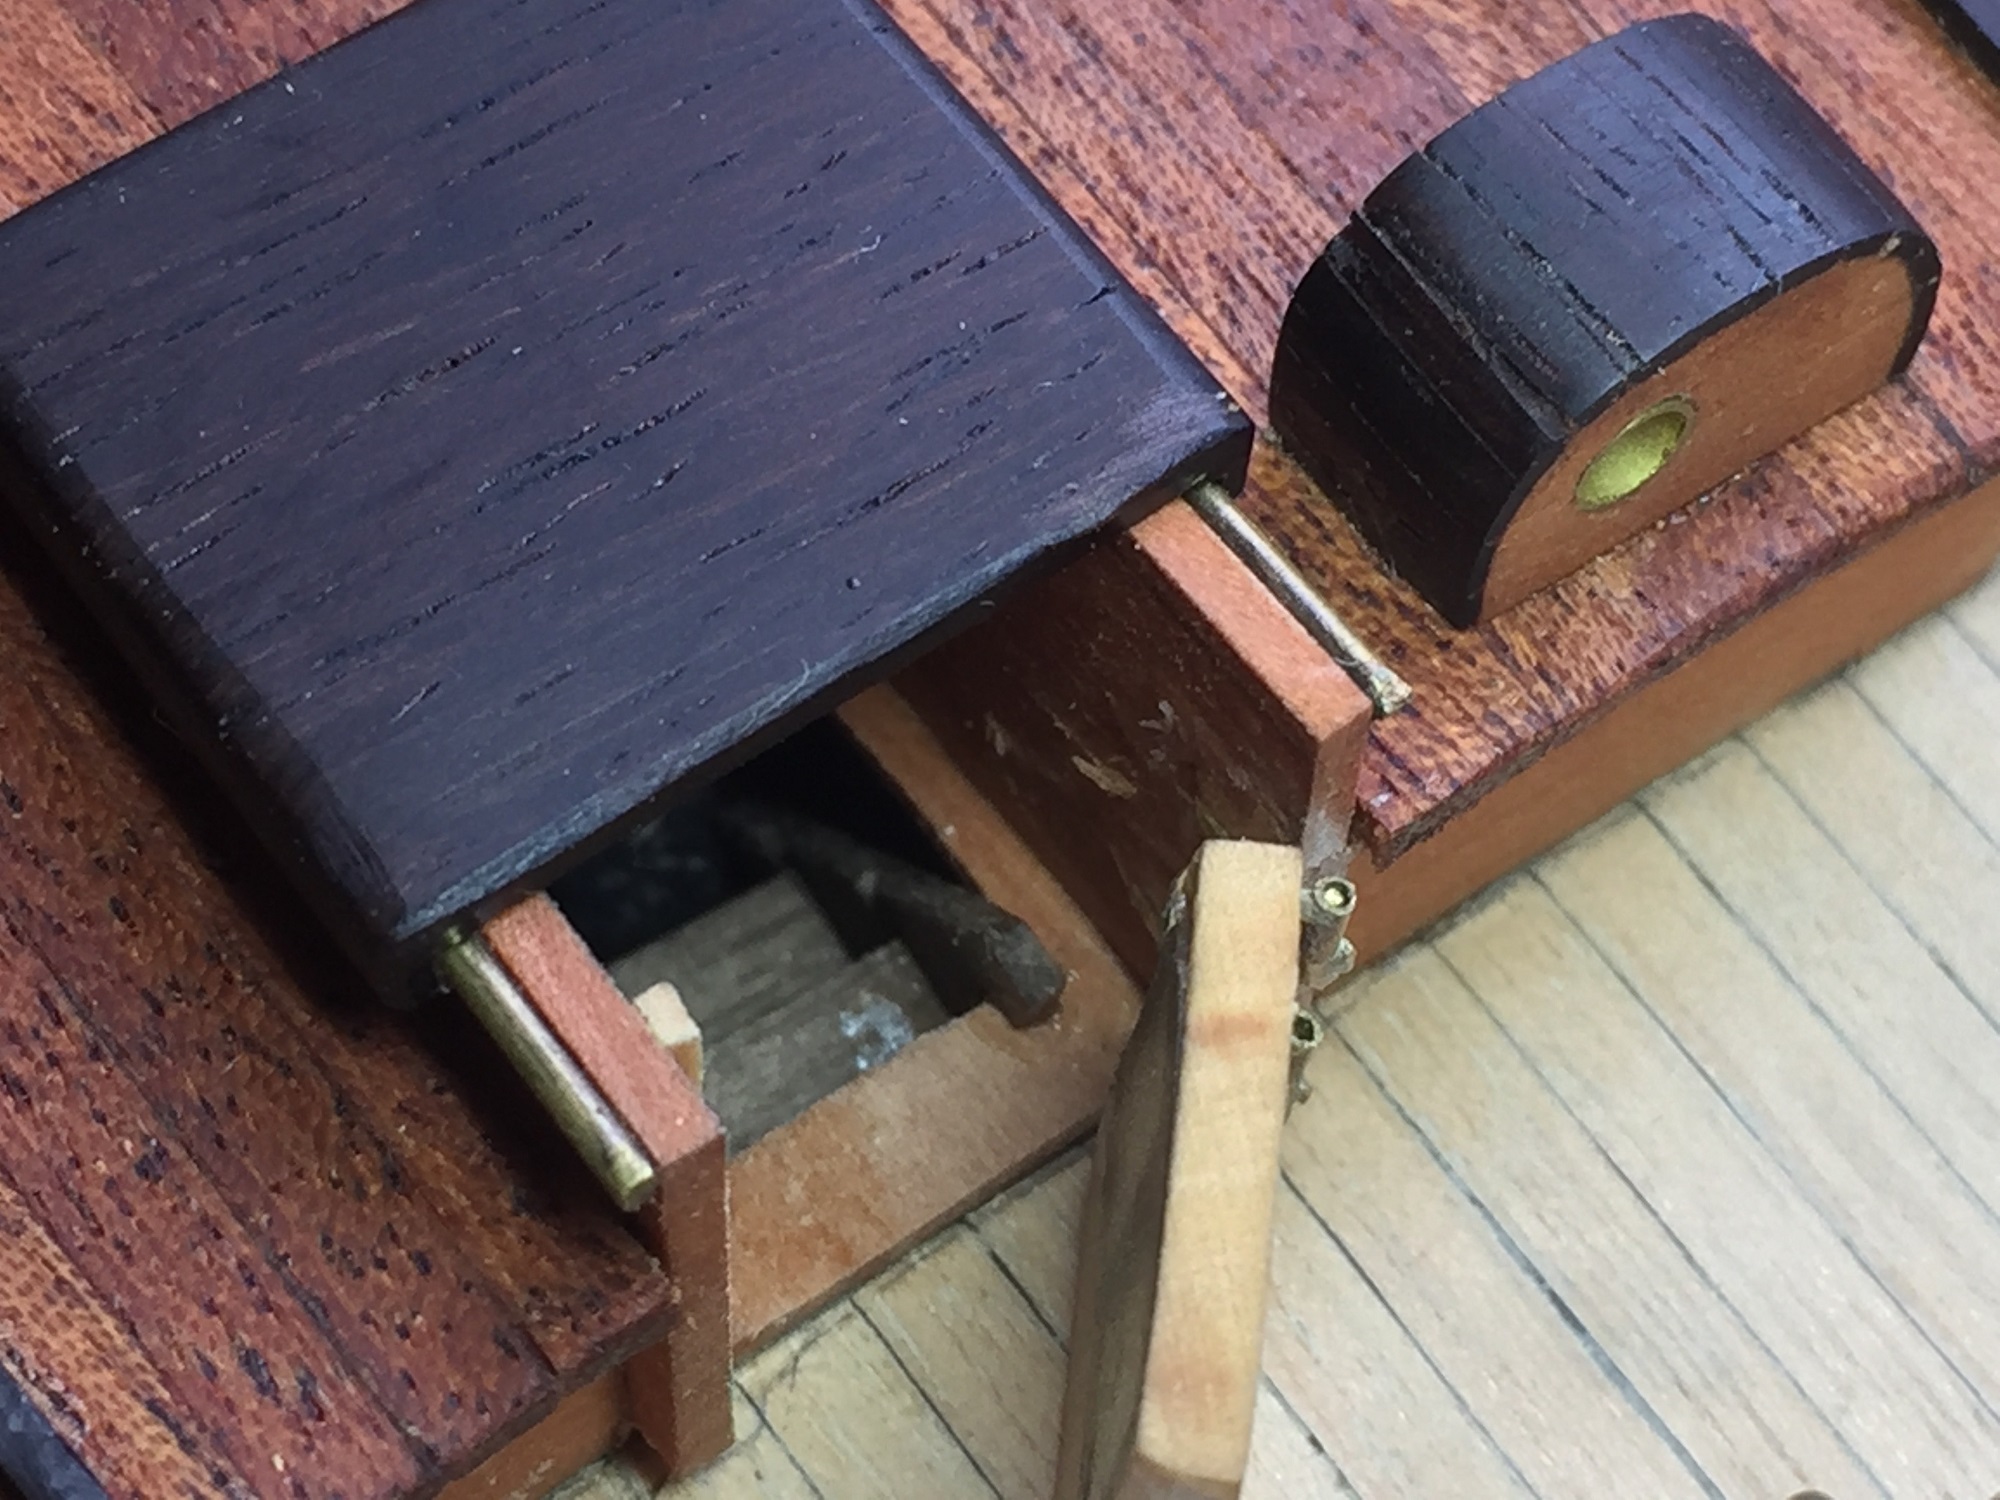 キャビンをデッキに取り付ける
船内に入る昇降階段があるとリアルにみえるので
デッキを切り取って階段を作り、取り付ける
I install a cabin on a deck.In pursuit of reality, I installed stairs in a ship.Therefore I cut a deck and make stairs and install it.
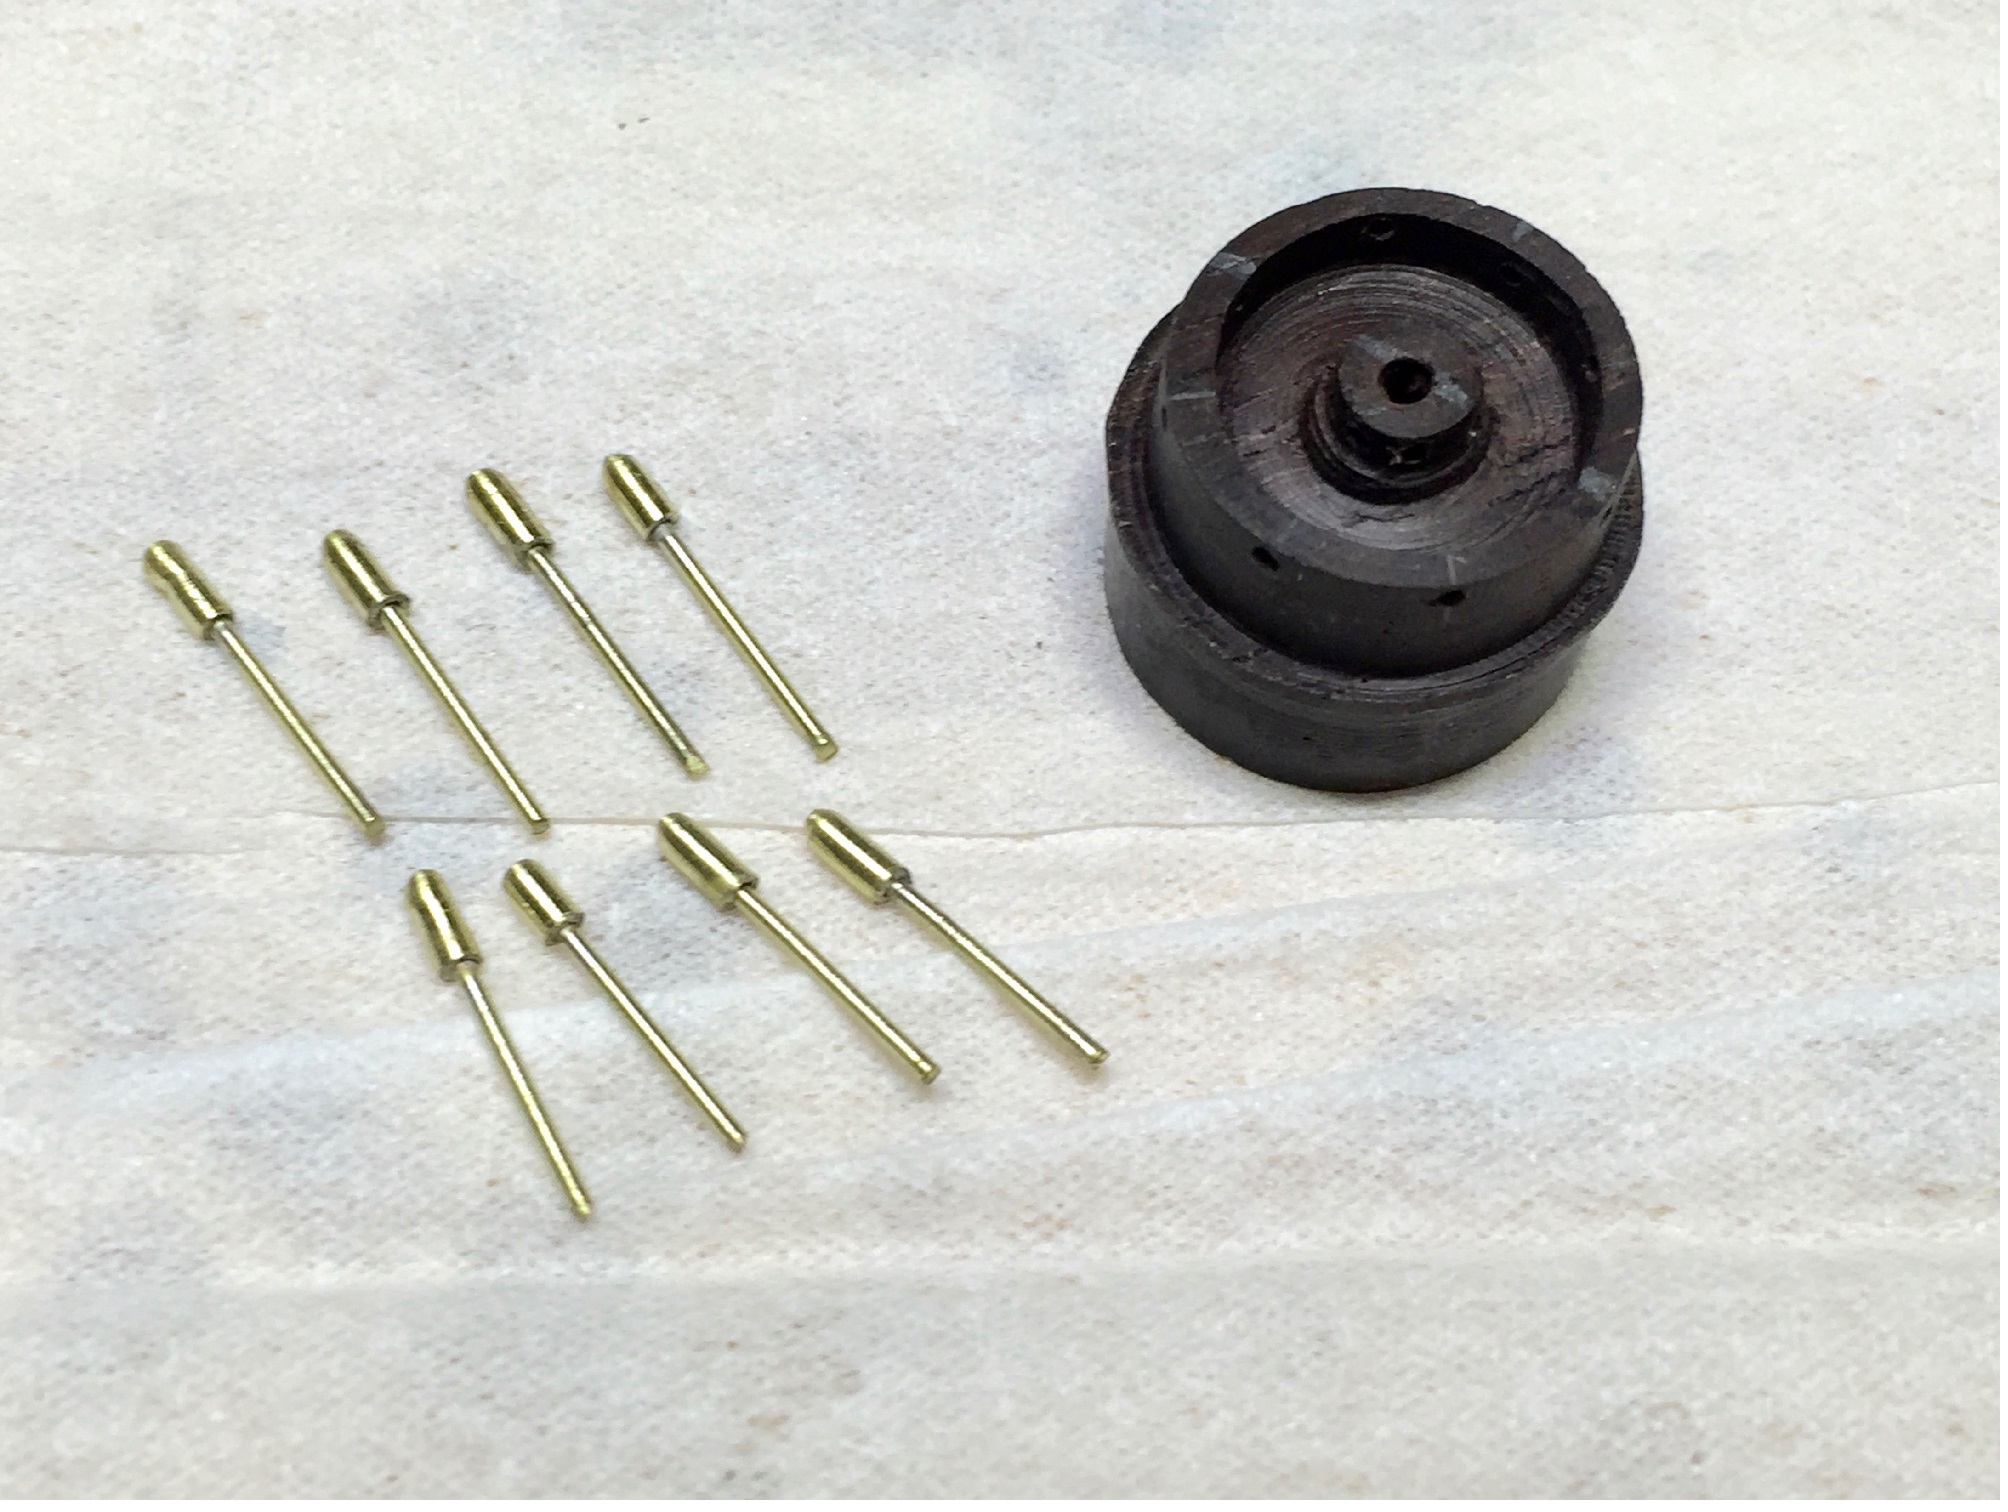 次は舵輪の製作にチャレンジ(もちろん初めて)
黒檀を木工レースで外輪と内輪を残し彫り込む
そこにスポークの通る穴を外から中にかけて貫通加工
8本のスポークは0.8ミリの真鍮線にパイプを差し込みロー付け
頭を整形しそれらしく
The next challenges the production of the steering wheel.Of course it is the first thing.I leave an outer ring and a conservative estimate and carve ebony with a lathe and am crowded.
The spoke goes there; drill it.I insert a pipe in the brass route of a diameter of 0.8 millimeter, and eight spokes do a silver-soldering.I have orthopedic treatment with a head.
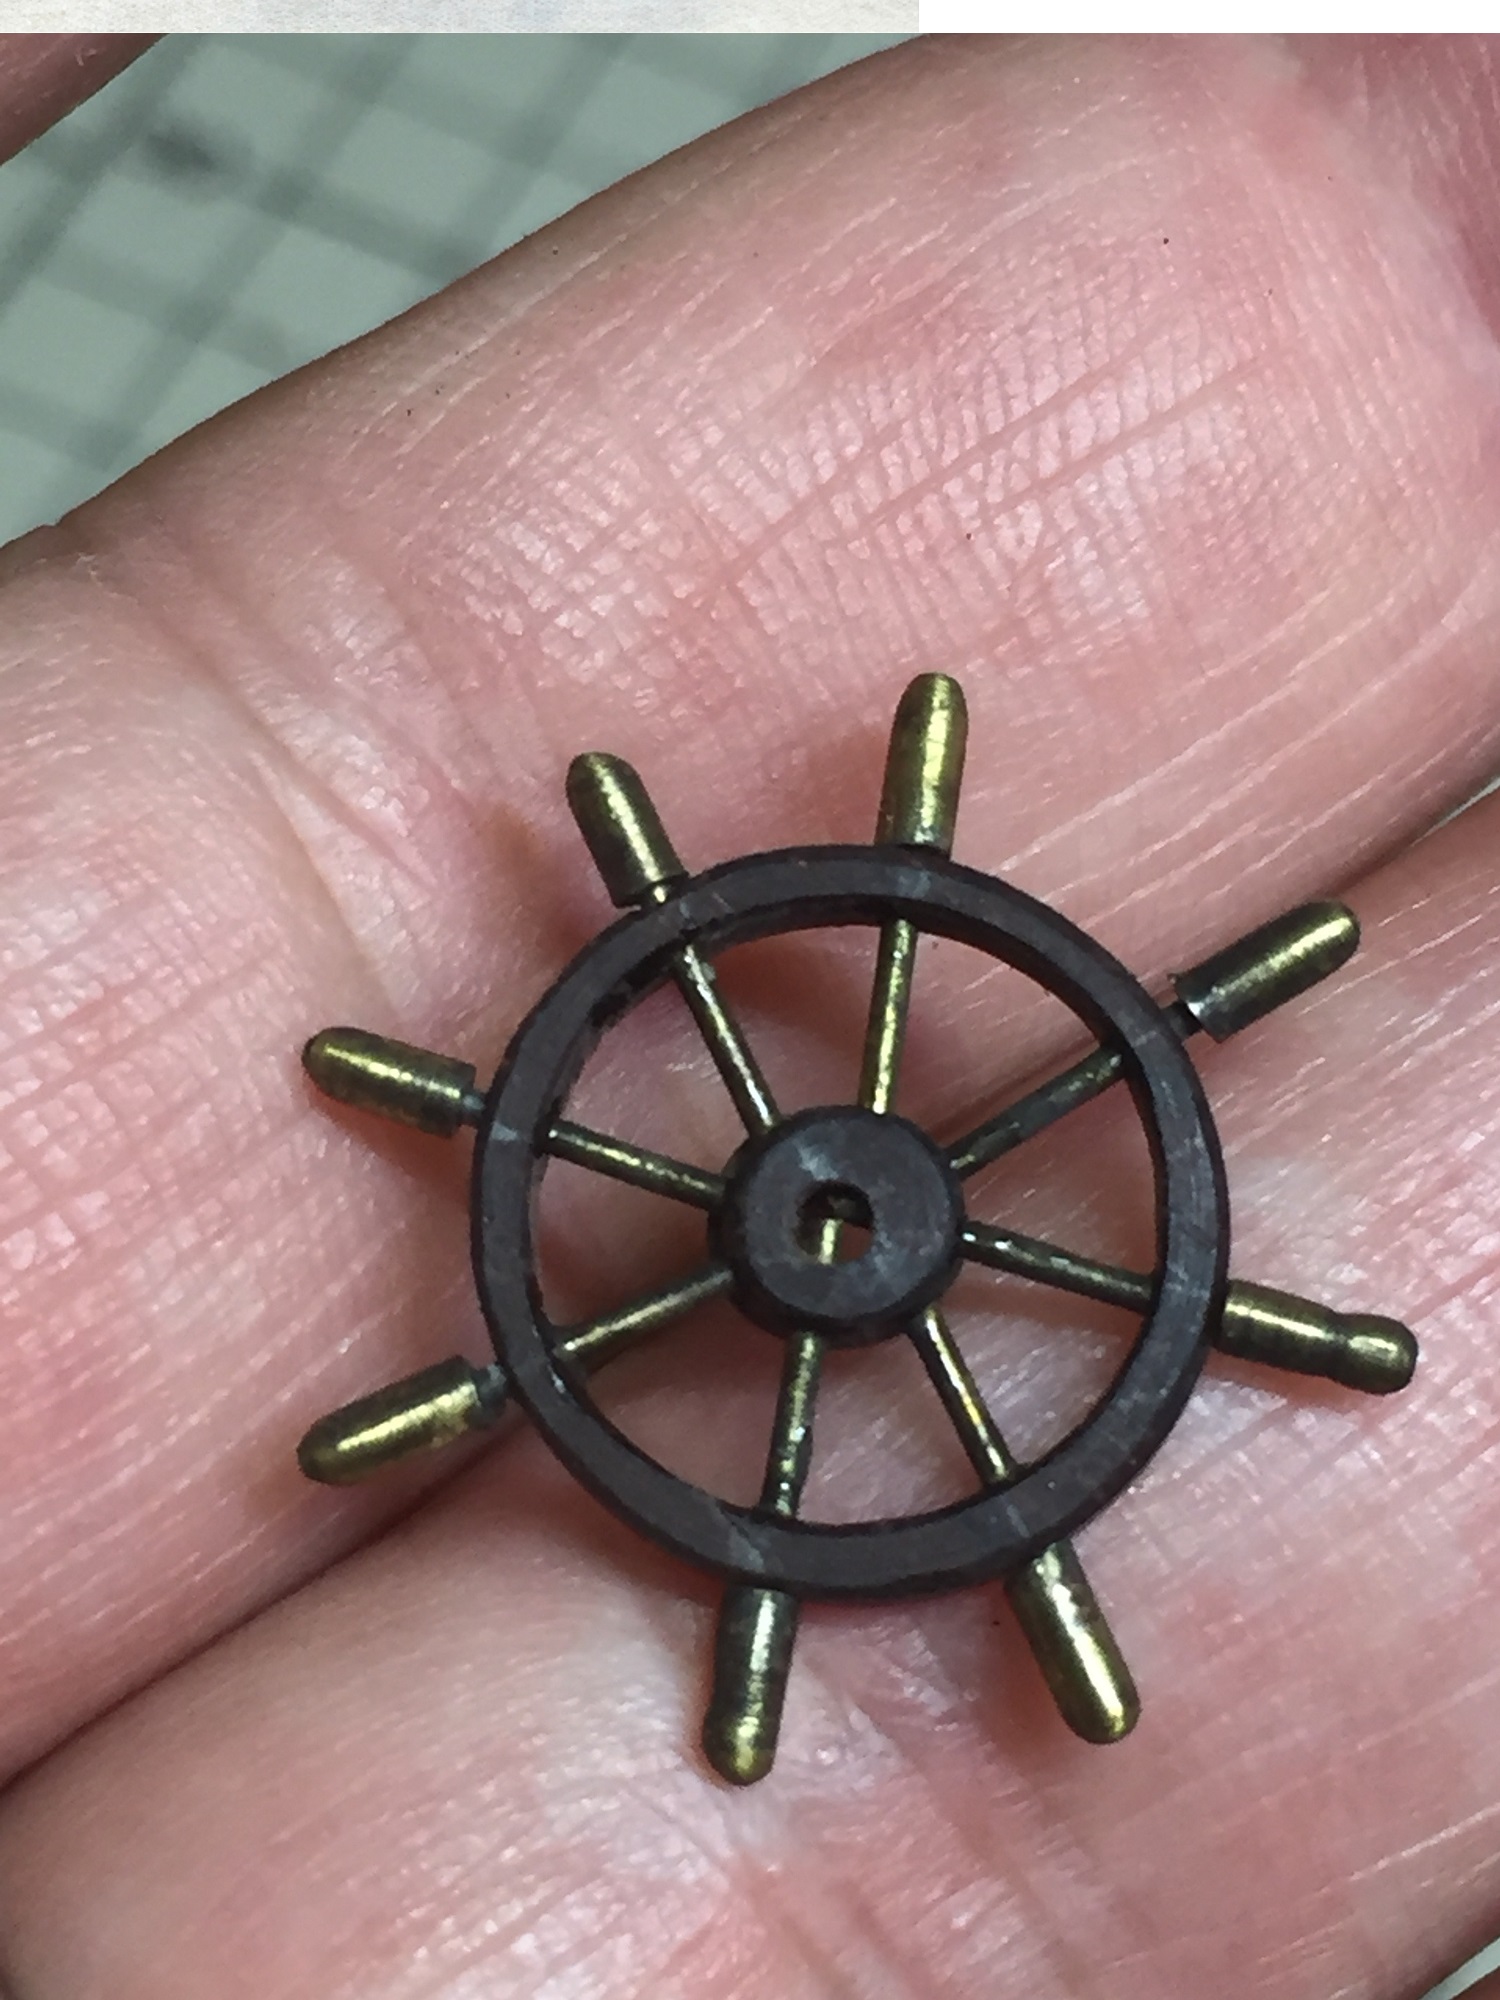 組み込むと、なんとなく穴がずれている
作り方は今後の課題か
でもまあ、それらしくなったか
A hole slips off when I assemble a steering wheel.I became the form to leave a future problem unfinished in how to make.
ボックスを作りデッキに設置
図面にはボックスの中のギア−とリンク機構でラダーを動かす様に描いているが
私の技能では到底無理なのでこれも今後の課題
今回の舵輪は回転だけはすることでご勘弁
It is set up a box by a deck made.In a drawing, I come to move a ladder with a gear and a linkwork in the box.However, it is absolutely impossible by my skill.I assume this a future problem and make a steering wheel only a turn this time.
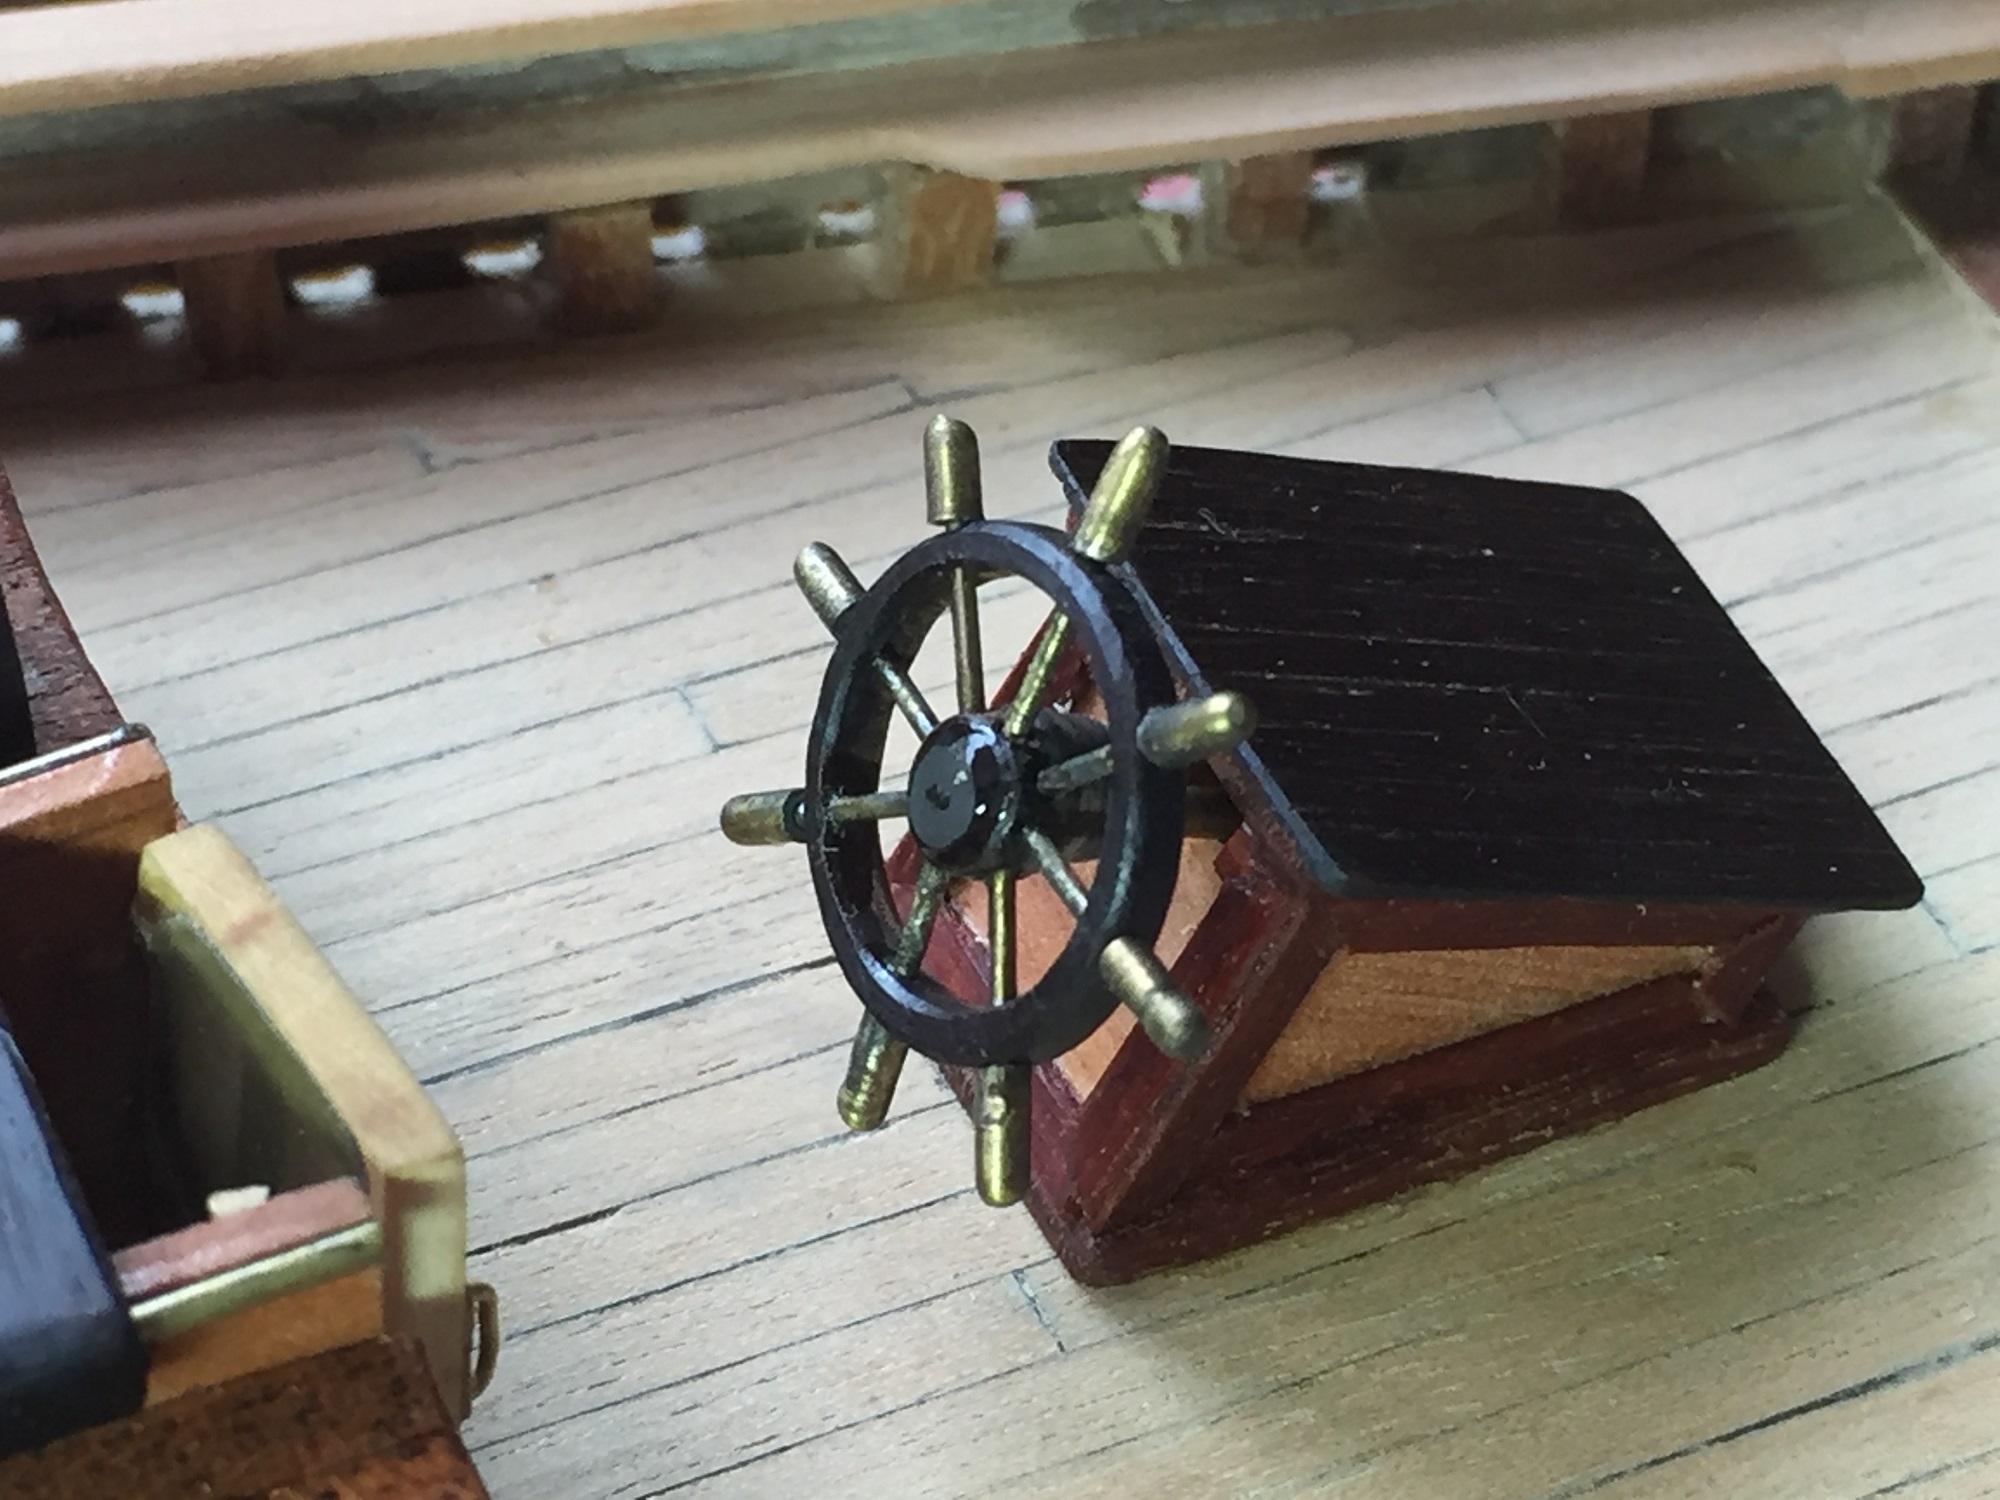 キャビンと操舵BOXをつけるといい感じになってきた
I felt like I should have soaked cabin and steerage BOX.

 デッキ板に釘跡をつける
0.3ミリのシャープペンシルの先を少し削りパイプの肉厚を薄くする
スタンプインクを先端につけ、それをスタンプ
I attach a nail trace to the deck board.
I sharpen some points of the mechanical pencil of a diameter of 0.3 millimeter and thin the wall thickness of the pipe.It is a stamp in reckoning, it with stamp ink on the tip.
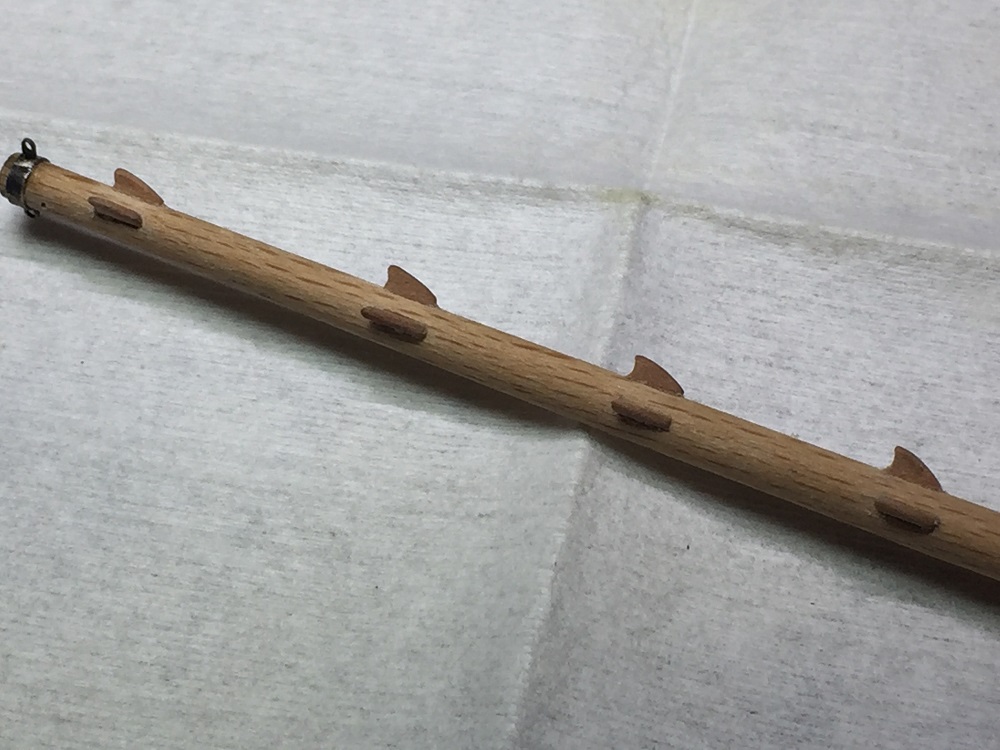
 船の後部が少しずつリアルに船らしくなってきた。
The rear of the ship seems to have become a ship slightly realistically.
Ich installiere eine Kabine auf einem Deck.In Verfolgung der Wirklichkeit installierte ich Treppe in einem Schiff.Deshalb schnitt ich ein Deck und eine Markentreppe und installiere es.Die nächsten Herausforderungen die Produktion des Lenkrades.Natürlich ist es die erste Sache.Ich verlasse einen äußeren Ring und eine konservative Schätzung und schnitze Ebenholz mit einer Drehbank und werde gedrängt.Die Speiche geht dort; Bohrmaschine es.Ich lege eine Leitung in die Messingstrecke eines Durchmessers von 0.8 Millimetern ein, und acht Speichen machen ein silbernes niedriges laufendes Konto.Ich habe orthopädische Behandlung mit einem Kopf.Ein Loch herunterrutscht, wenn ich ein Lenkrad zusammensetze.Ich wurde die Form, wie zu machen ist, unfertig ein künftiges Problem zurückzulassen.
Es wird auf eine Kiste neben einem Deck, das gemacht wird, gesetzt.In einer Zeichnung komme ich eine Leiter mit einer Ausrüstung und einem linkwork in der Kiste zu Umzug.Aber es ist durch meine Fähigkeit völlig unmöglich.Ich nehme an dieses ein künftiges Problem und macht ein Lenkrad zu nur einer Drehung dieses Mal.Ich fühlte wie es, daß ich Kabine und Zwischendeck-KISTE durchnäßt haben sollte.Ich befestige eine Nagelspur am Deckausschuß.Ich schärfe einige Punkte des mechanischen Bleistiftes eines Durchmessers von 0.3 Millimetern und verdünne die Mauerdicke von der Leitung.Es ist eine Briefmarke in Berechnung, es mit Briefmarkentinte auf der Spitze.Der Hintern des Schiffes scheint etwas realistisch ein Schiff geworden zu sein.
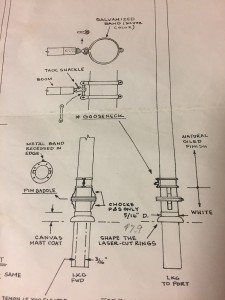
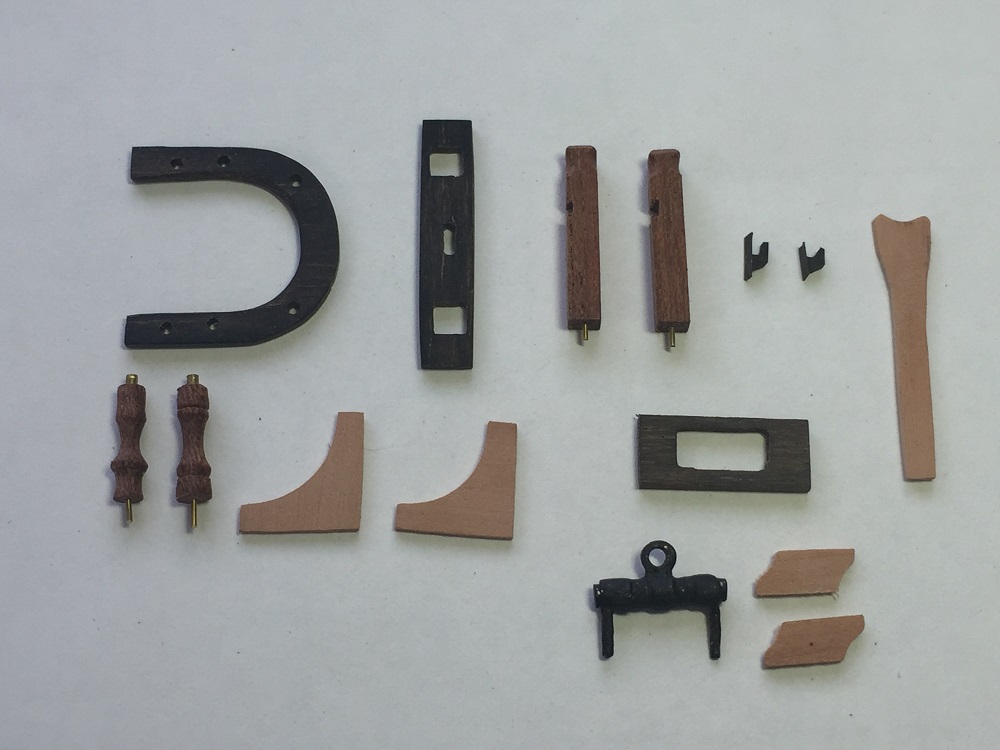
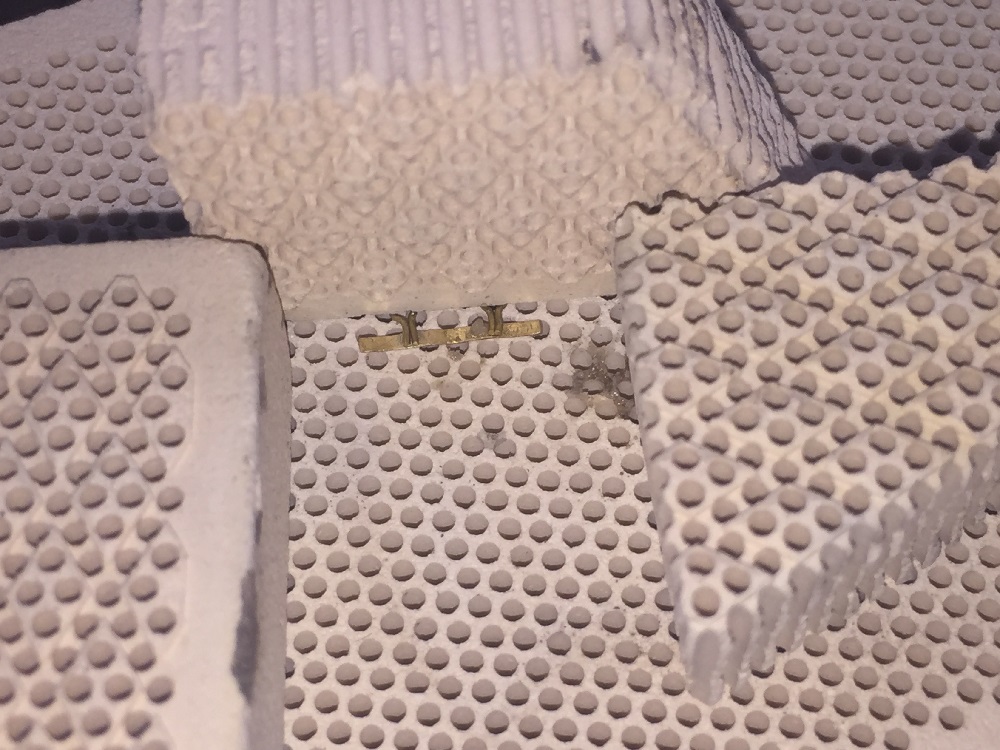
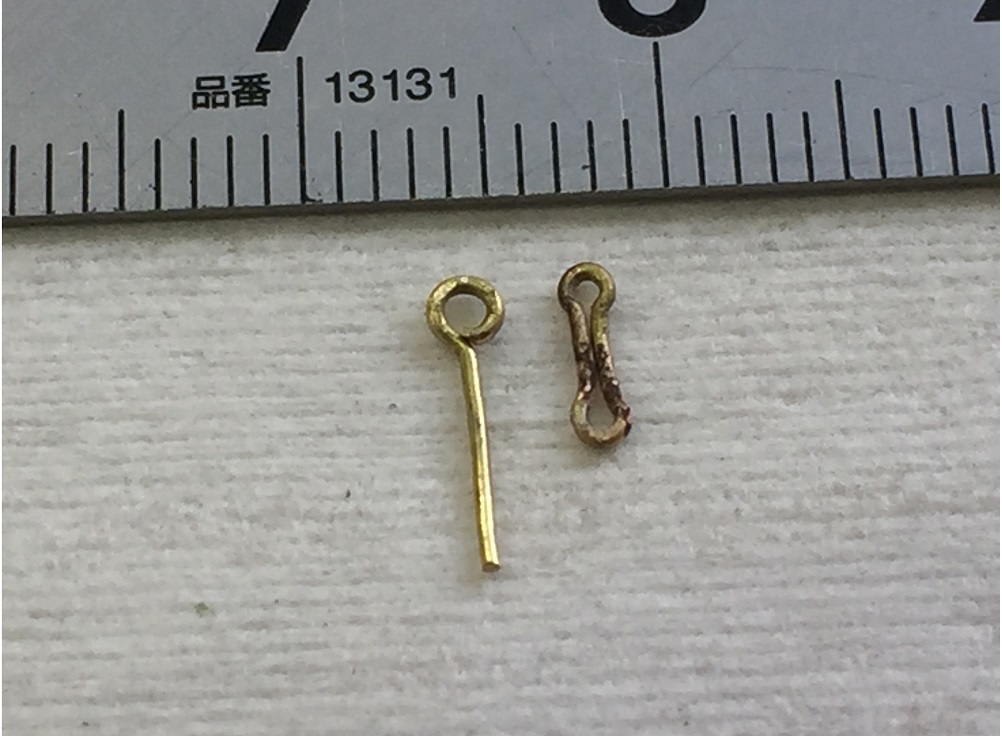
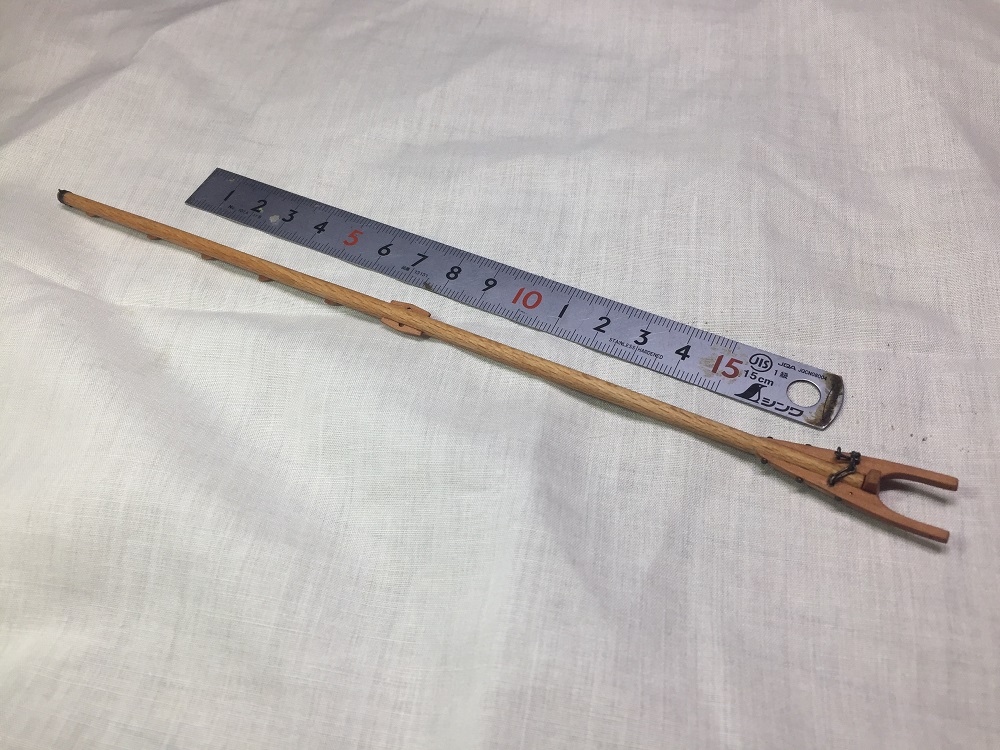
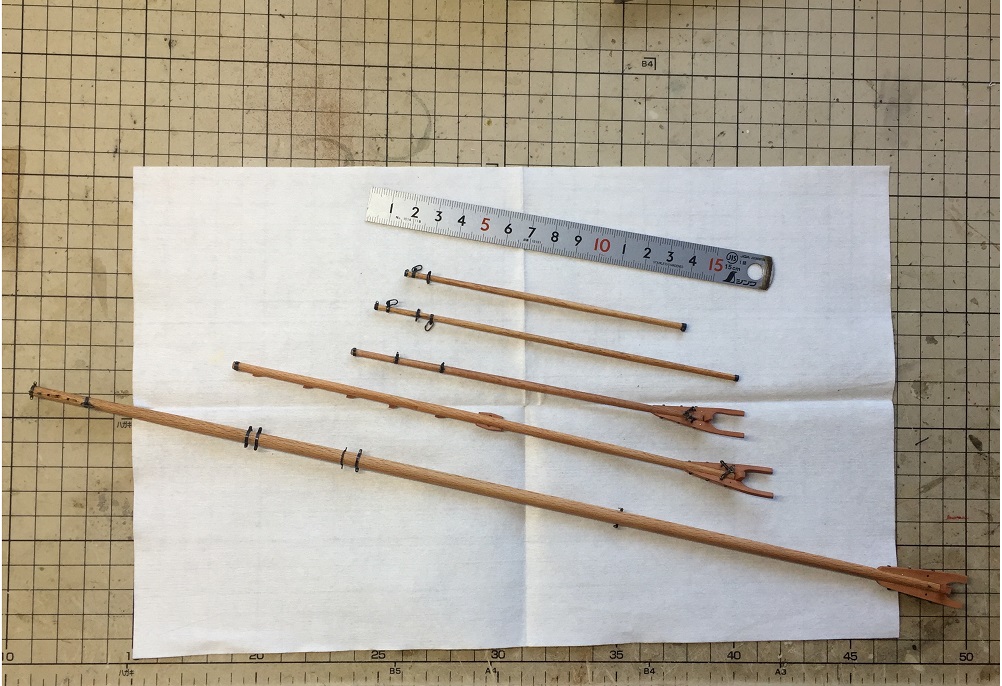
バウスプリット(船首斜檣)とシュラウド(横静索)のデッドアイ(三つ目滑車)の製作
The Building BowSprit & Shrouds &Deadeye
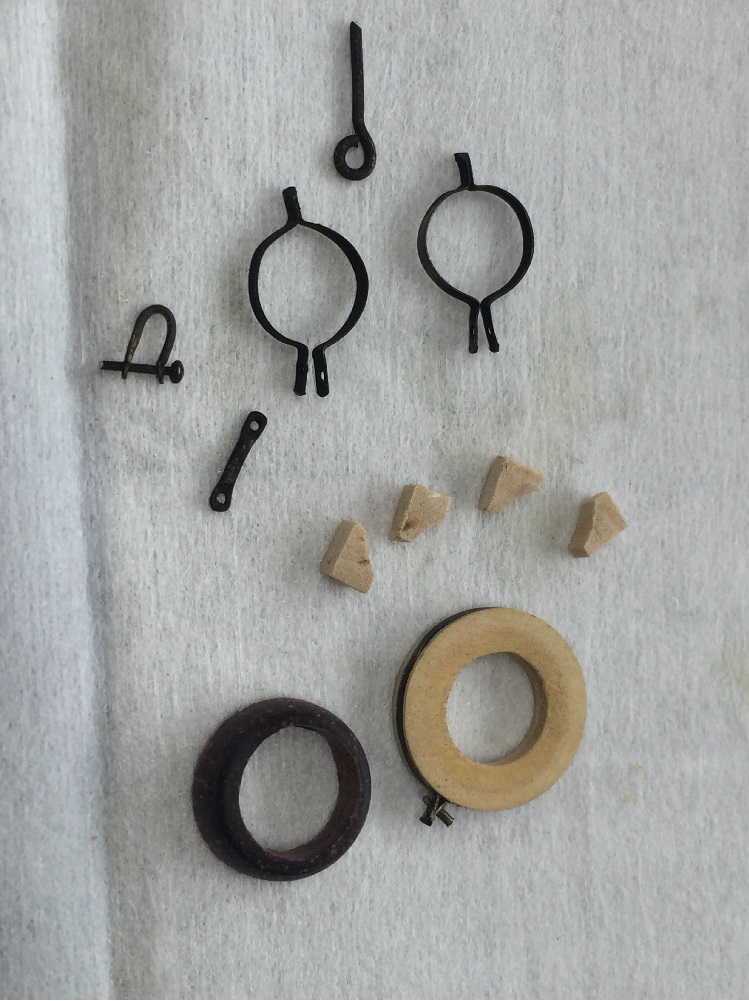
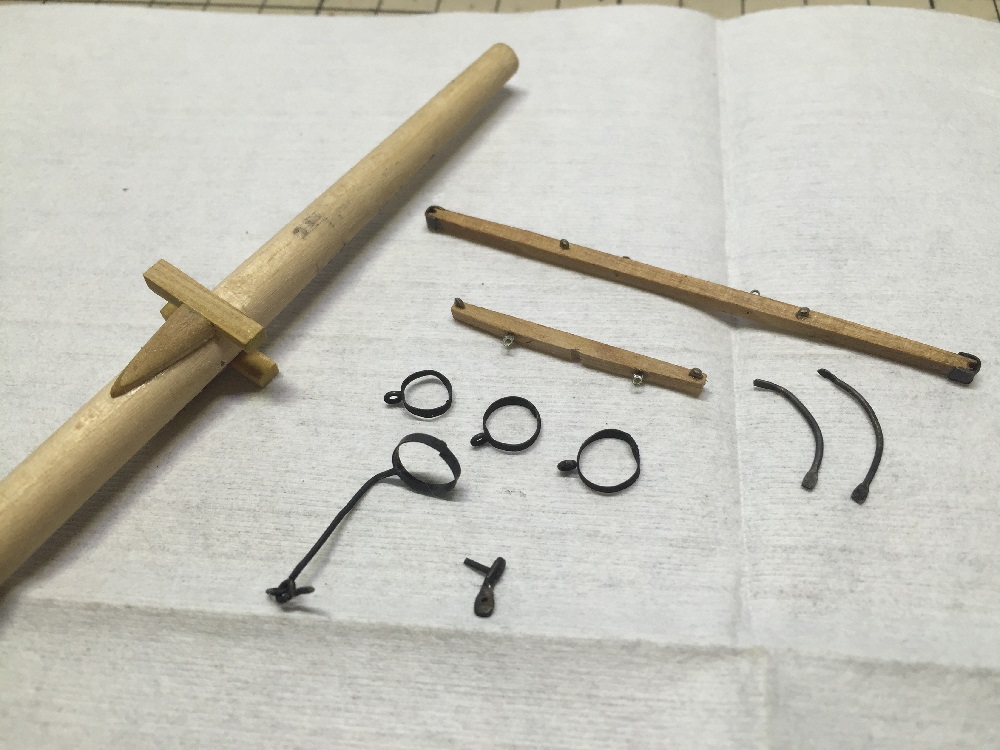
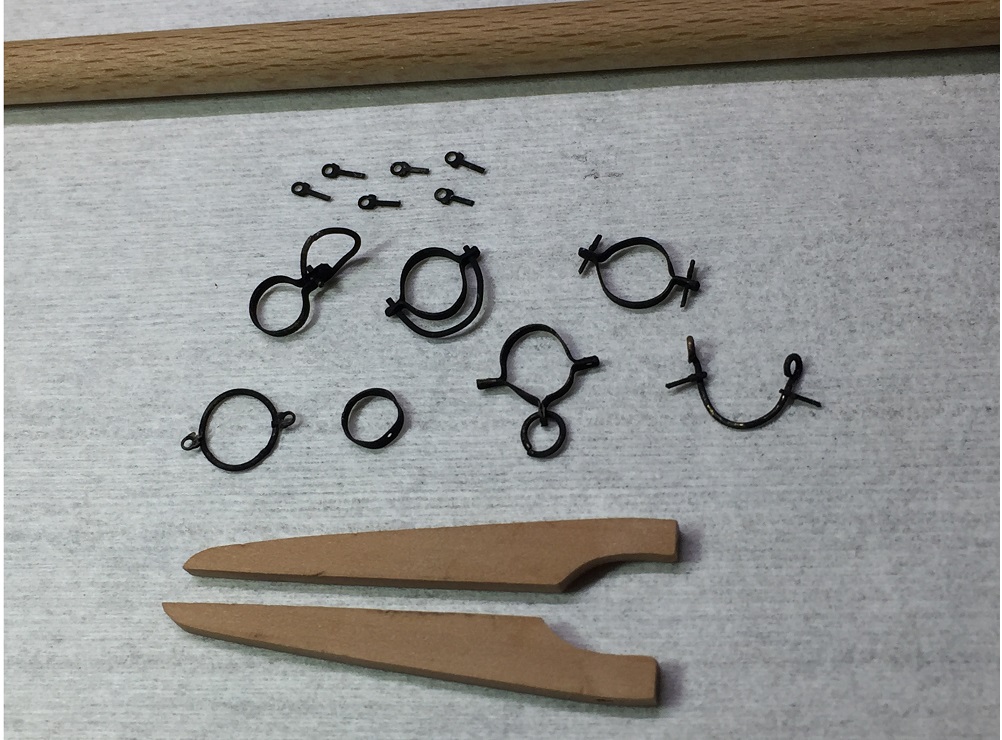
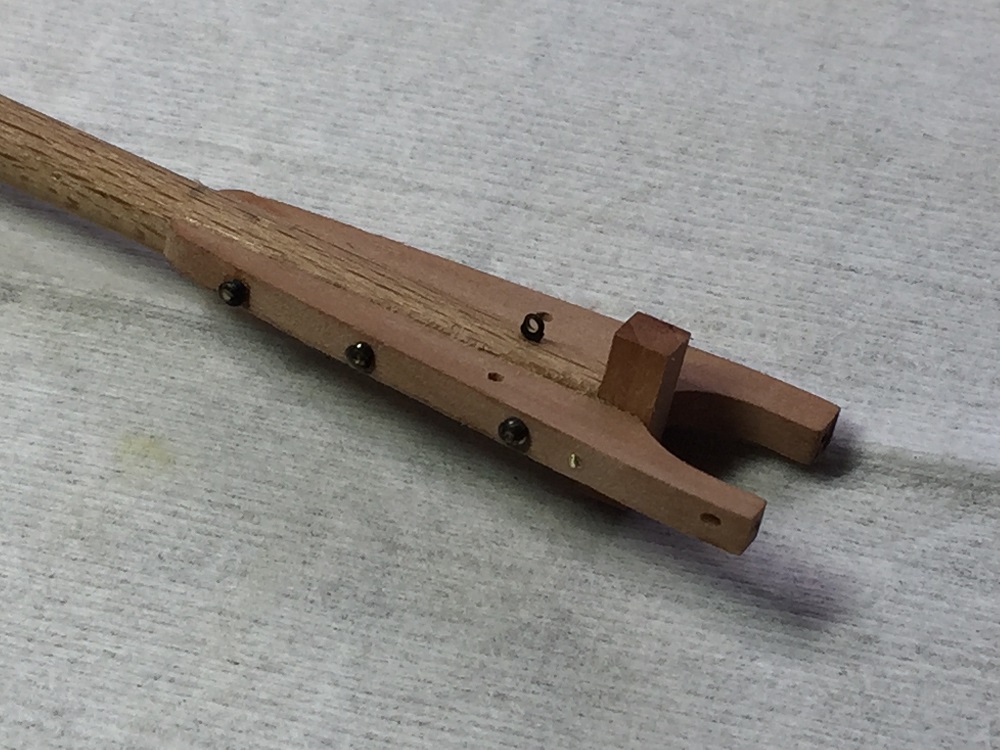
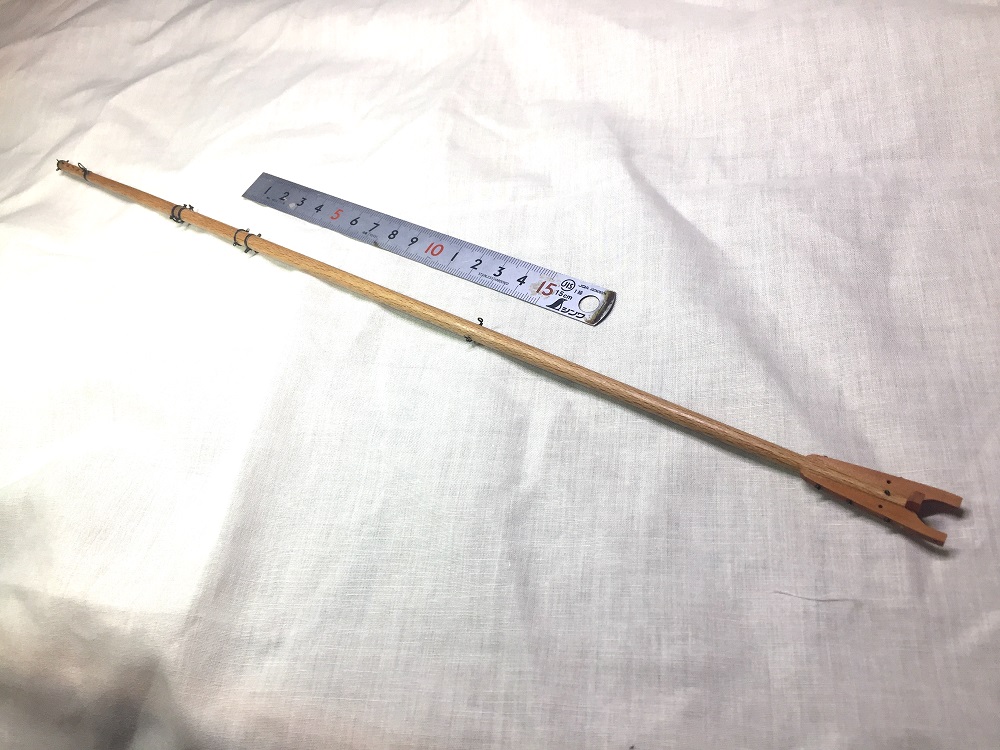
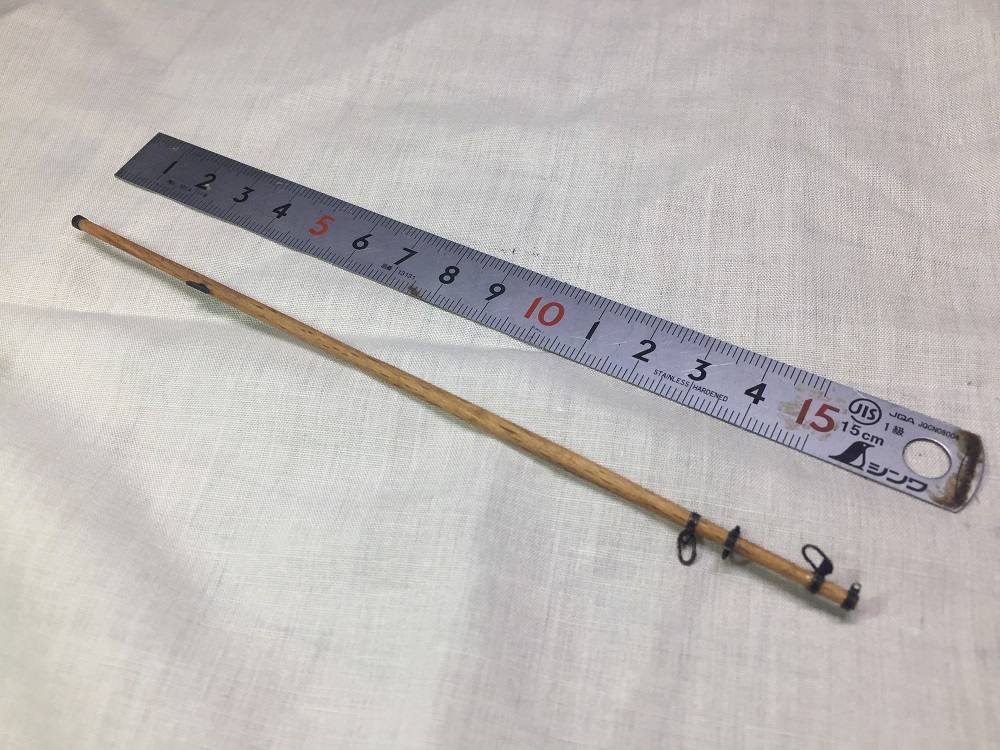
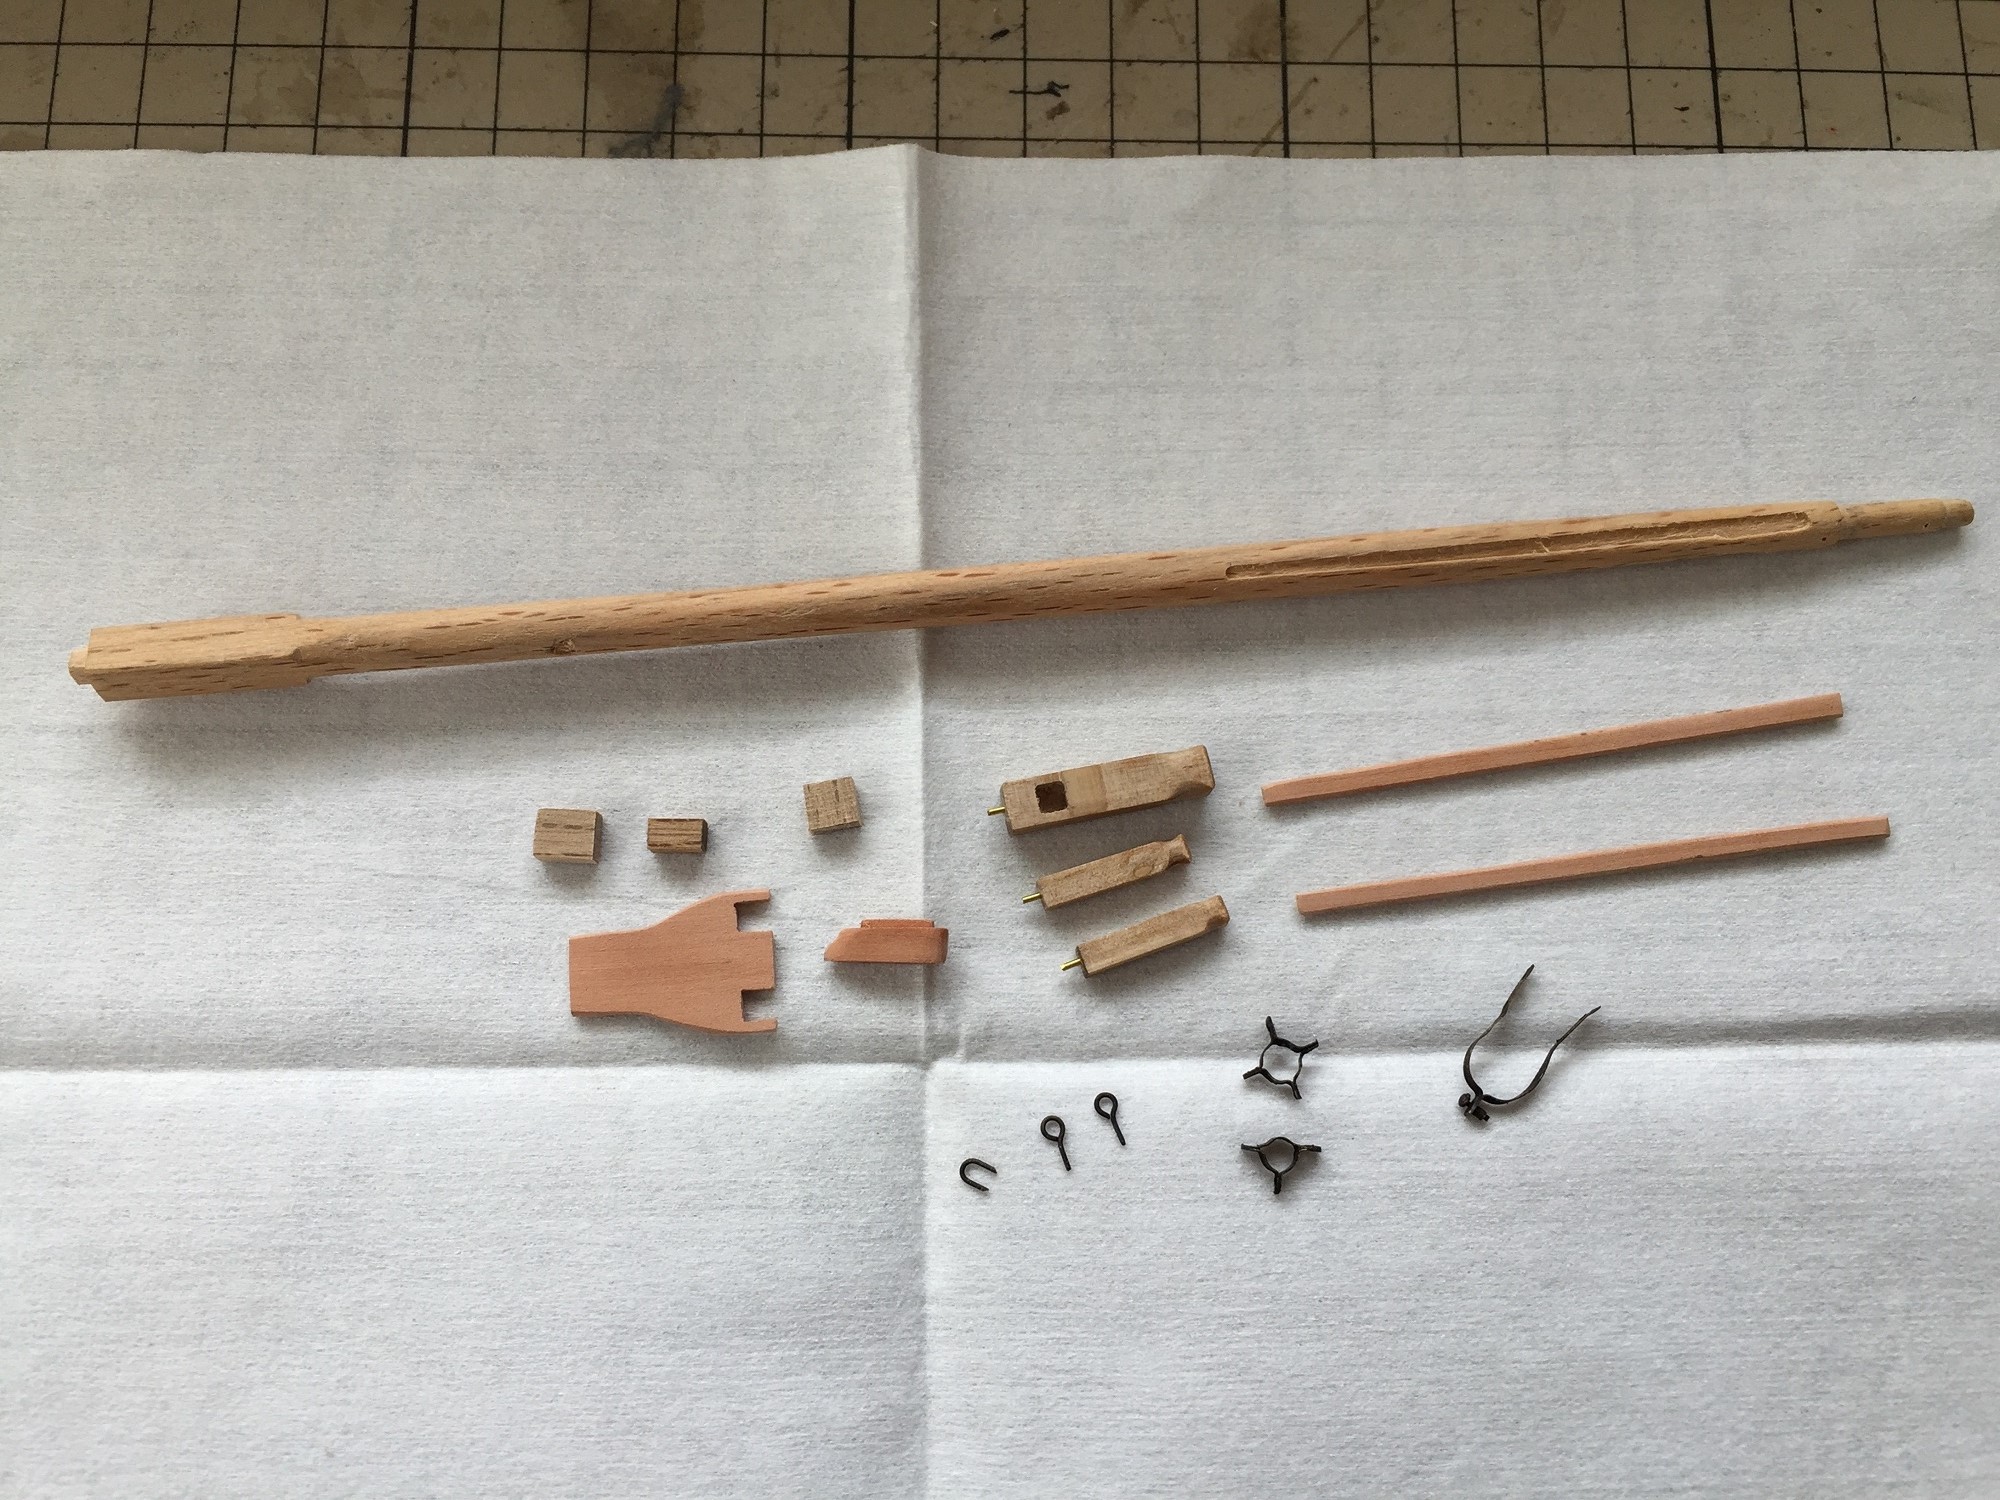 組立前に制作したものを揃えたバウスプリットの部品
The thing which I produced before assembling.The part of the bowsprit.
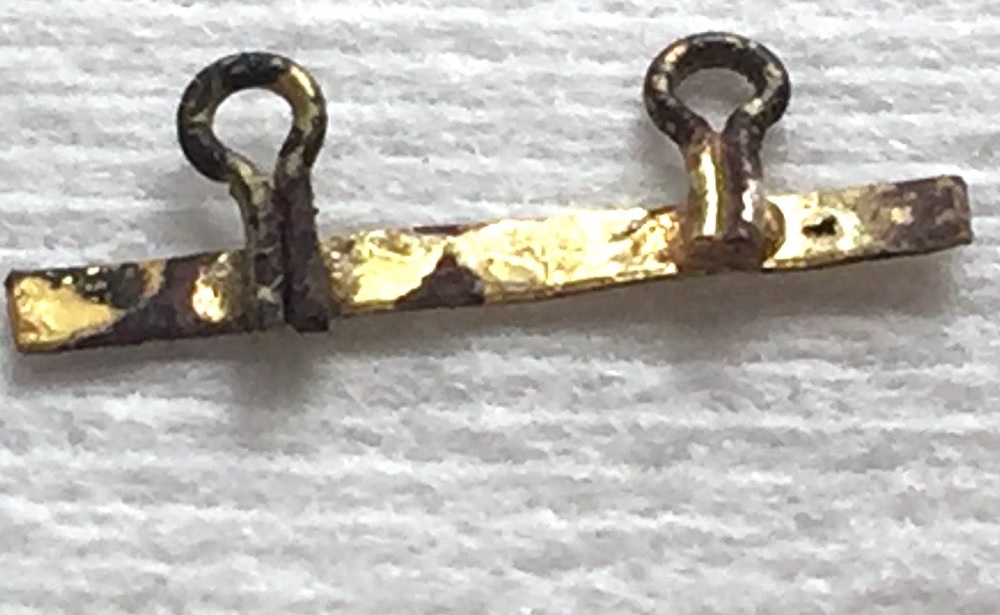
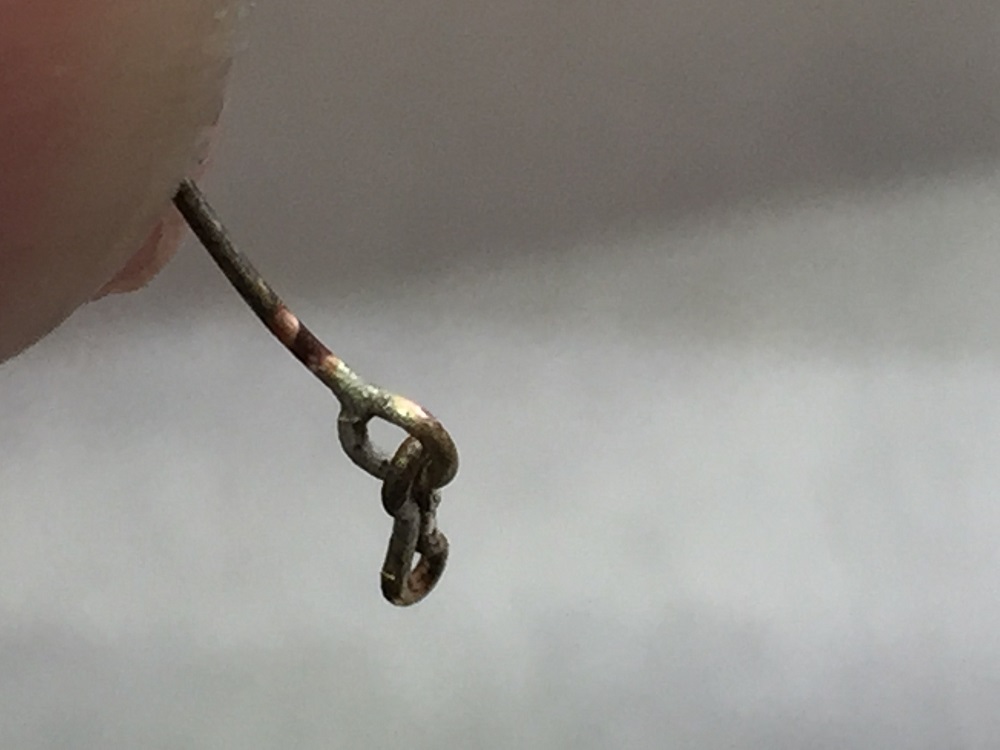
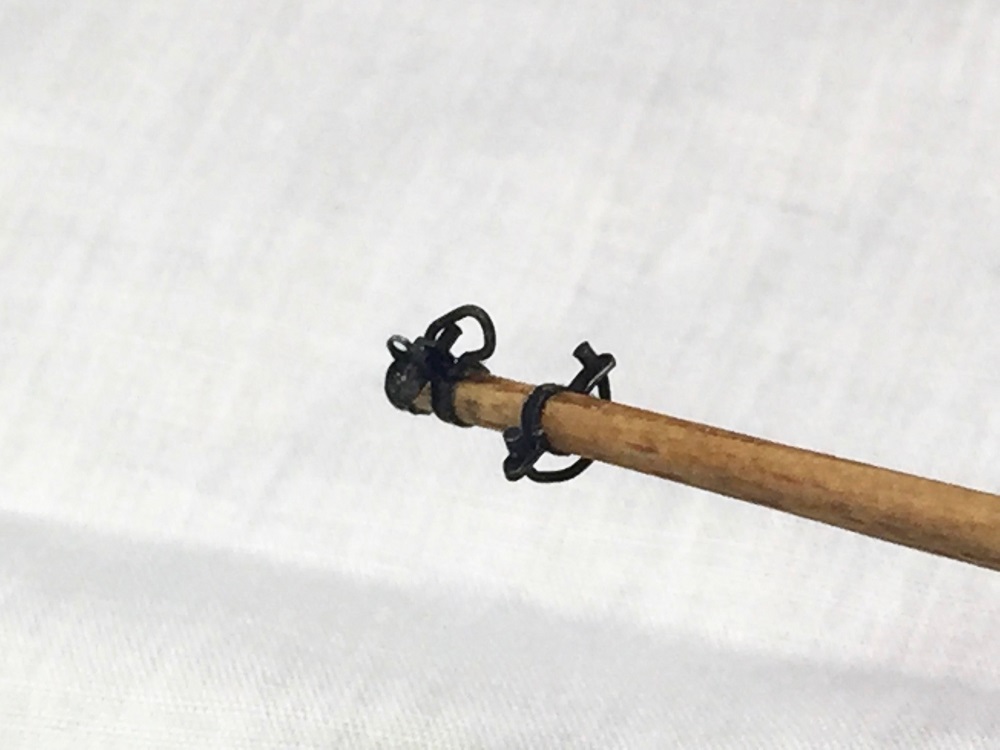
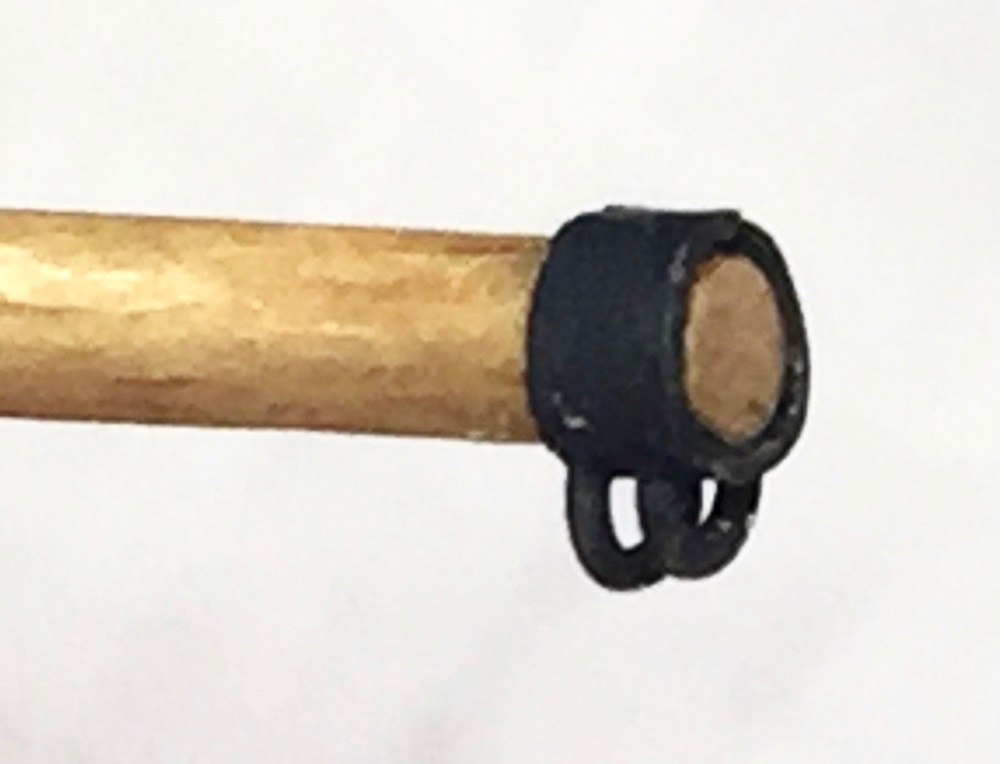
 バウスプリットの先端にロープを縛る2つのリングがあり、そのリングには穴の空いた出っ張りが3箇所と4箇所それぞれついている。
どういう作り方をすべきか、考えた挙句、出っ張りも含めて一筆書きの要領で出っ張りの部分は折り返してリングにしてロー付け
There are two rings tying up a rope on the tip of the bowsprit.
Three things and four things have the projecting that the hole became vacant in the ring.
I considered how I made it well.
There are two rings tying up a rope on the tip of the bowsprit.Three things and four things have the projecting that the hole became vacant in the ring.I considered how I made it well.I include the projecting and process it with the point of the picture drawn with a single stroke of the brush.The part of the projection turned it down and made it a ring and was accompanied and did silver-soldering.
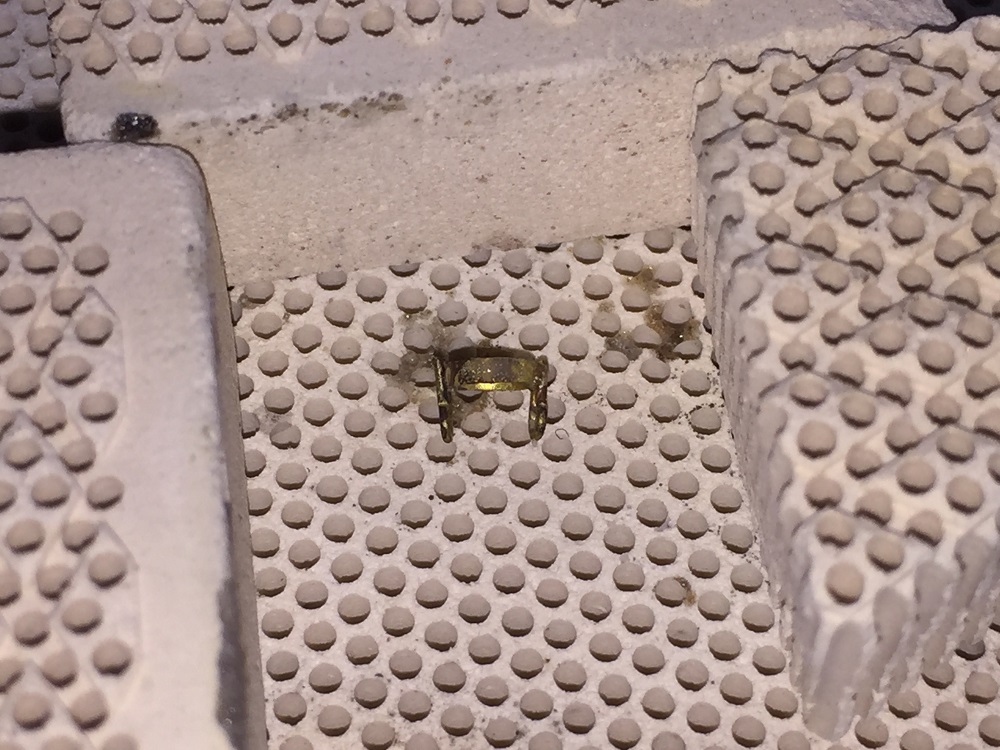
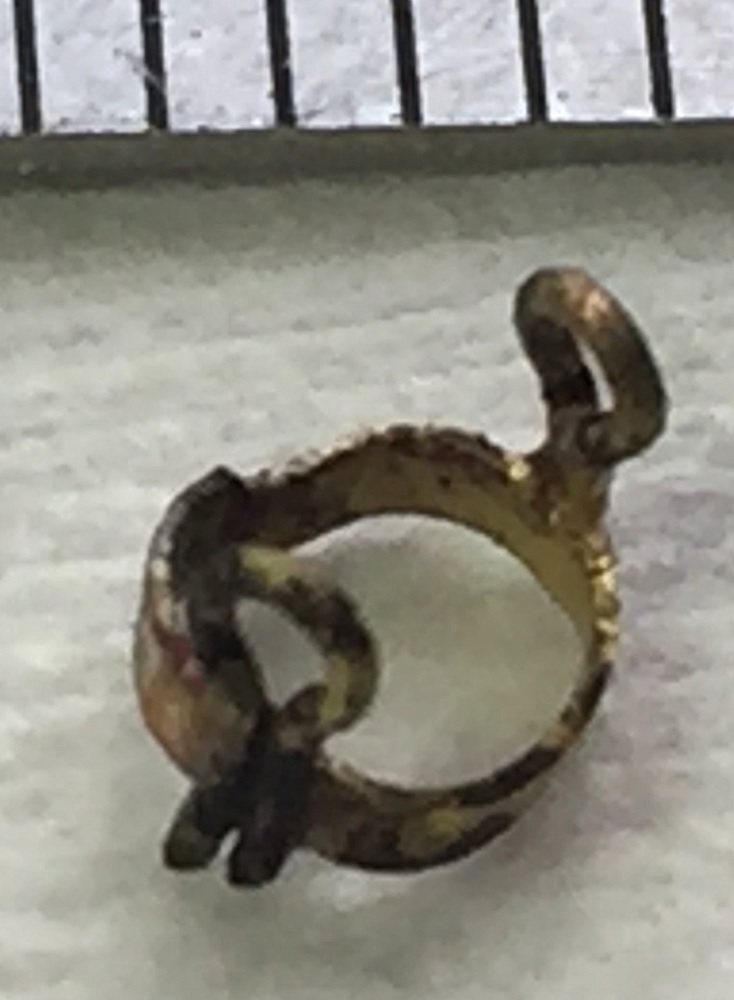
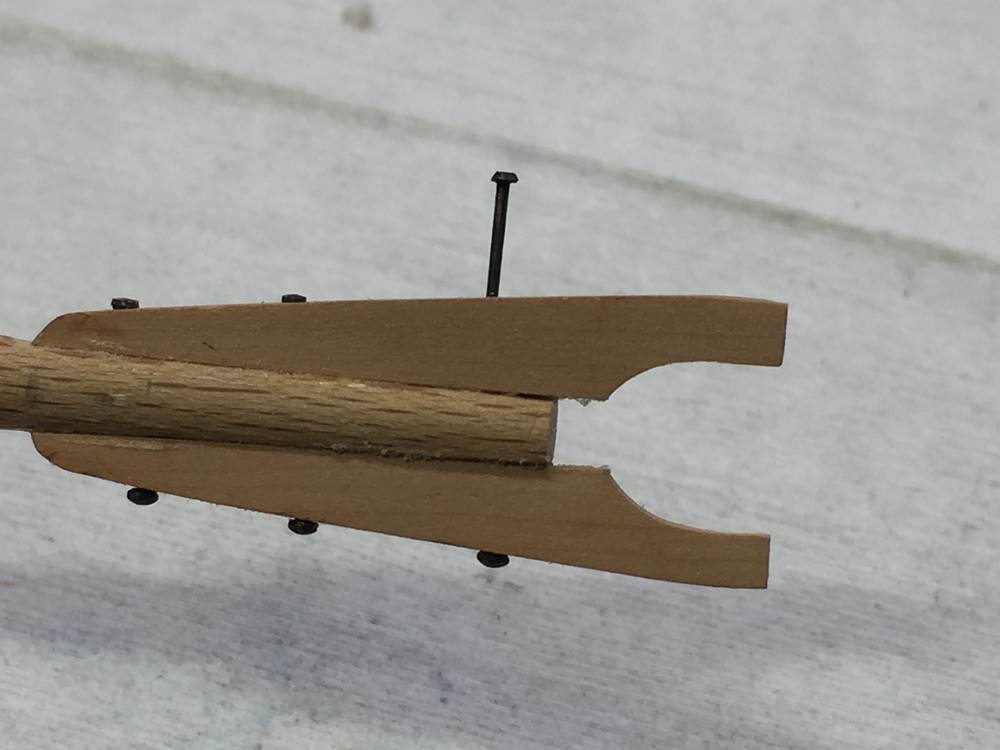
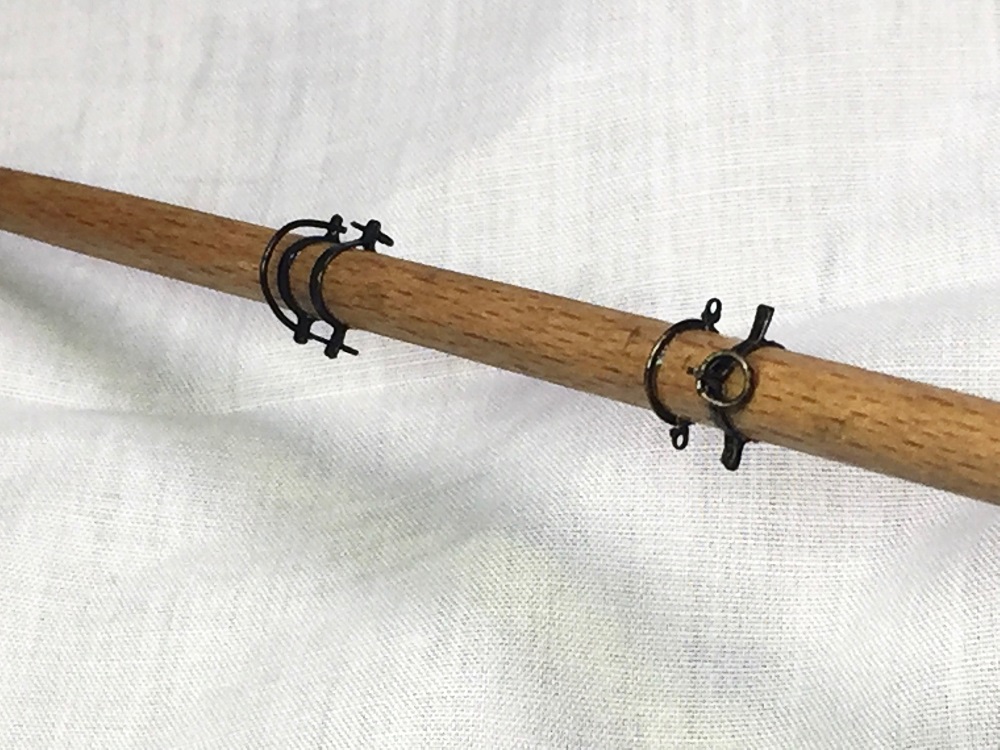
 バウスプリットの先端にリングを嵌めてみる。
なんとなく、そんな感じに見えるか?
I try to fit a ring in the tip of the bowsprit.
I see it in such a feeling somehow.
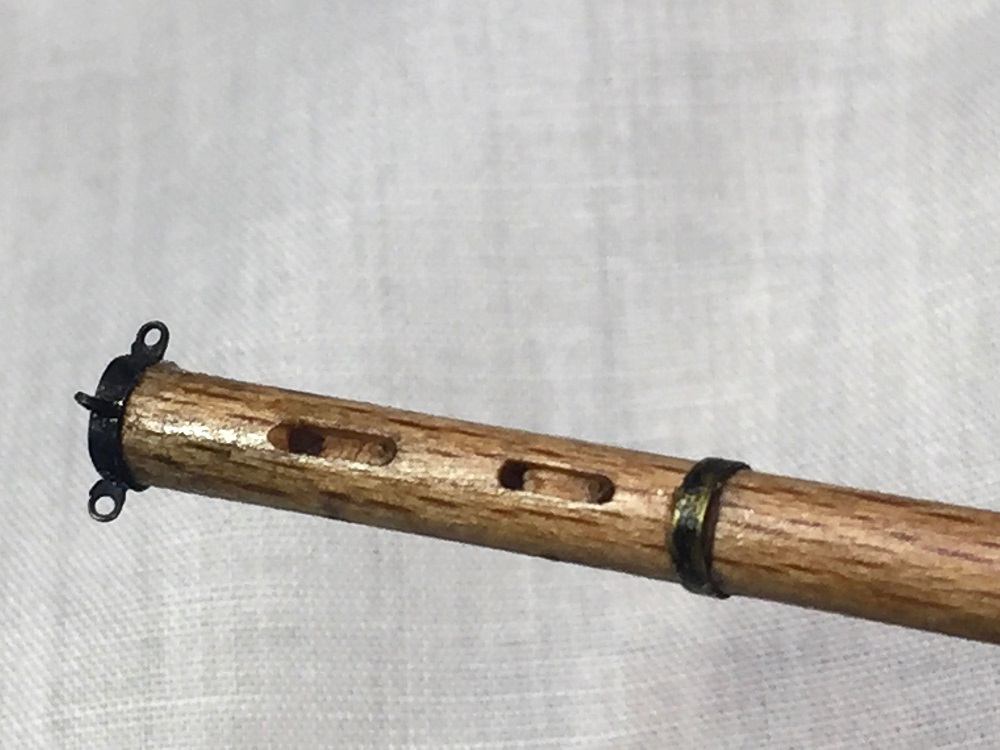
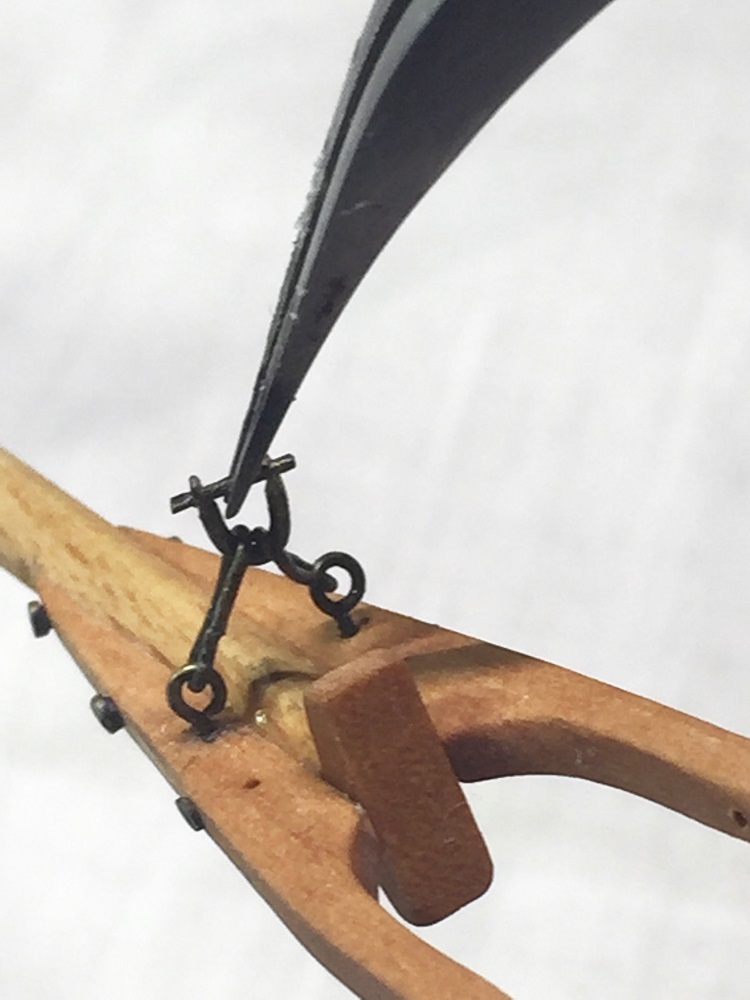
 バウスプリットのデッキへの取付部の組立
Assembling of the installation department to the deck of the bowsprit.
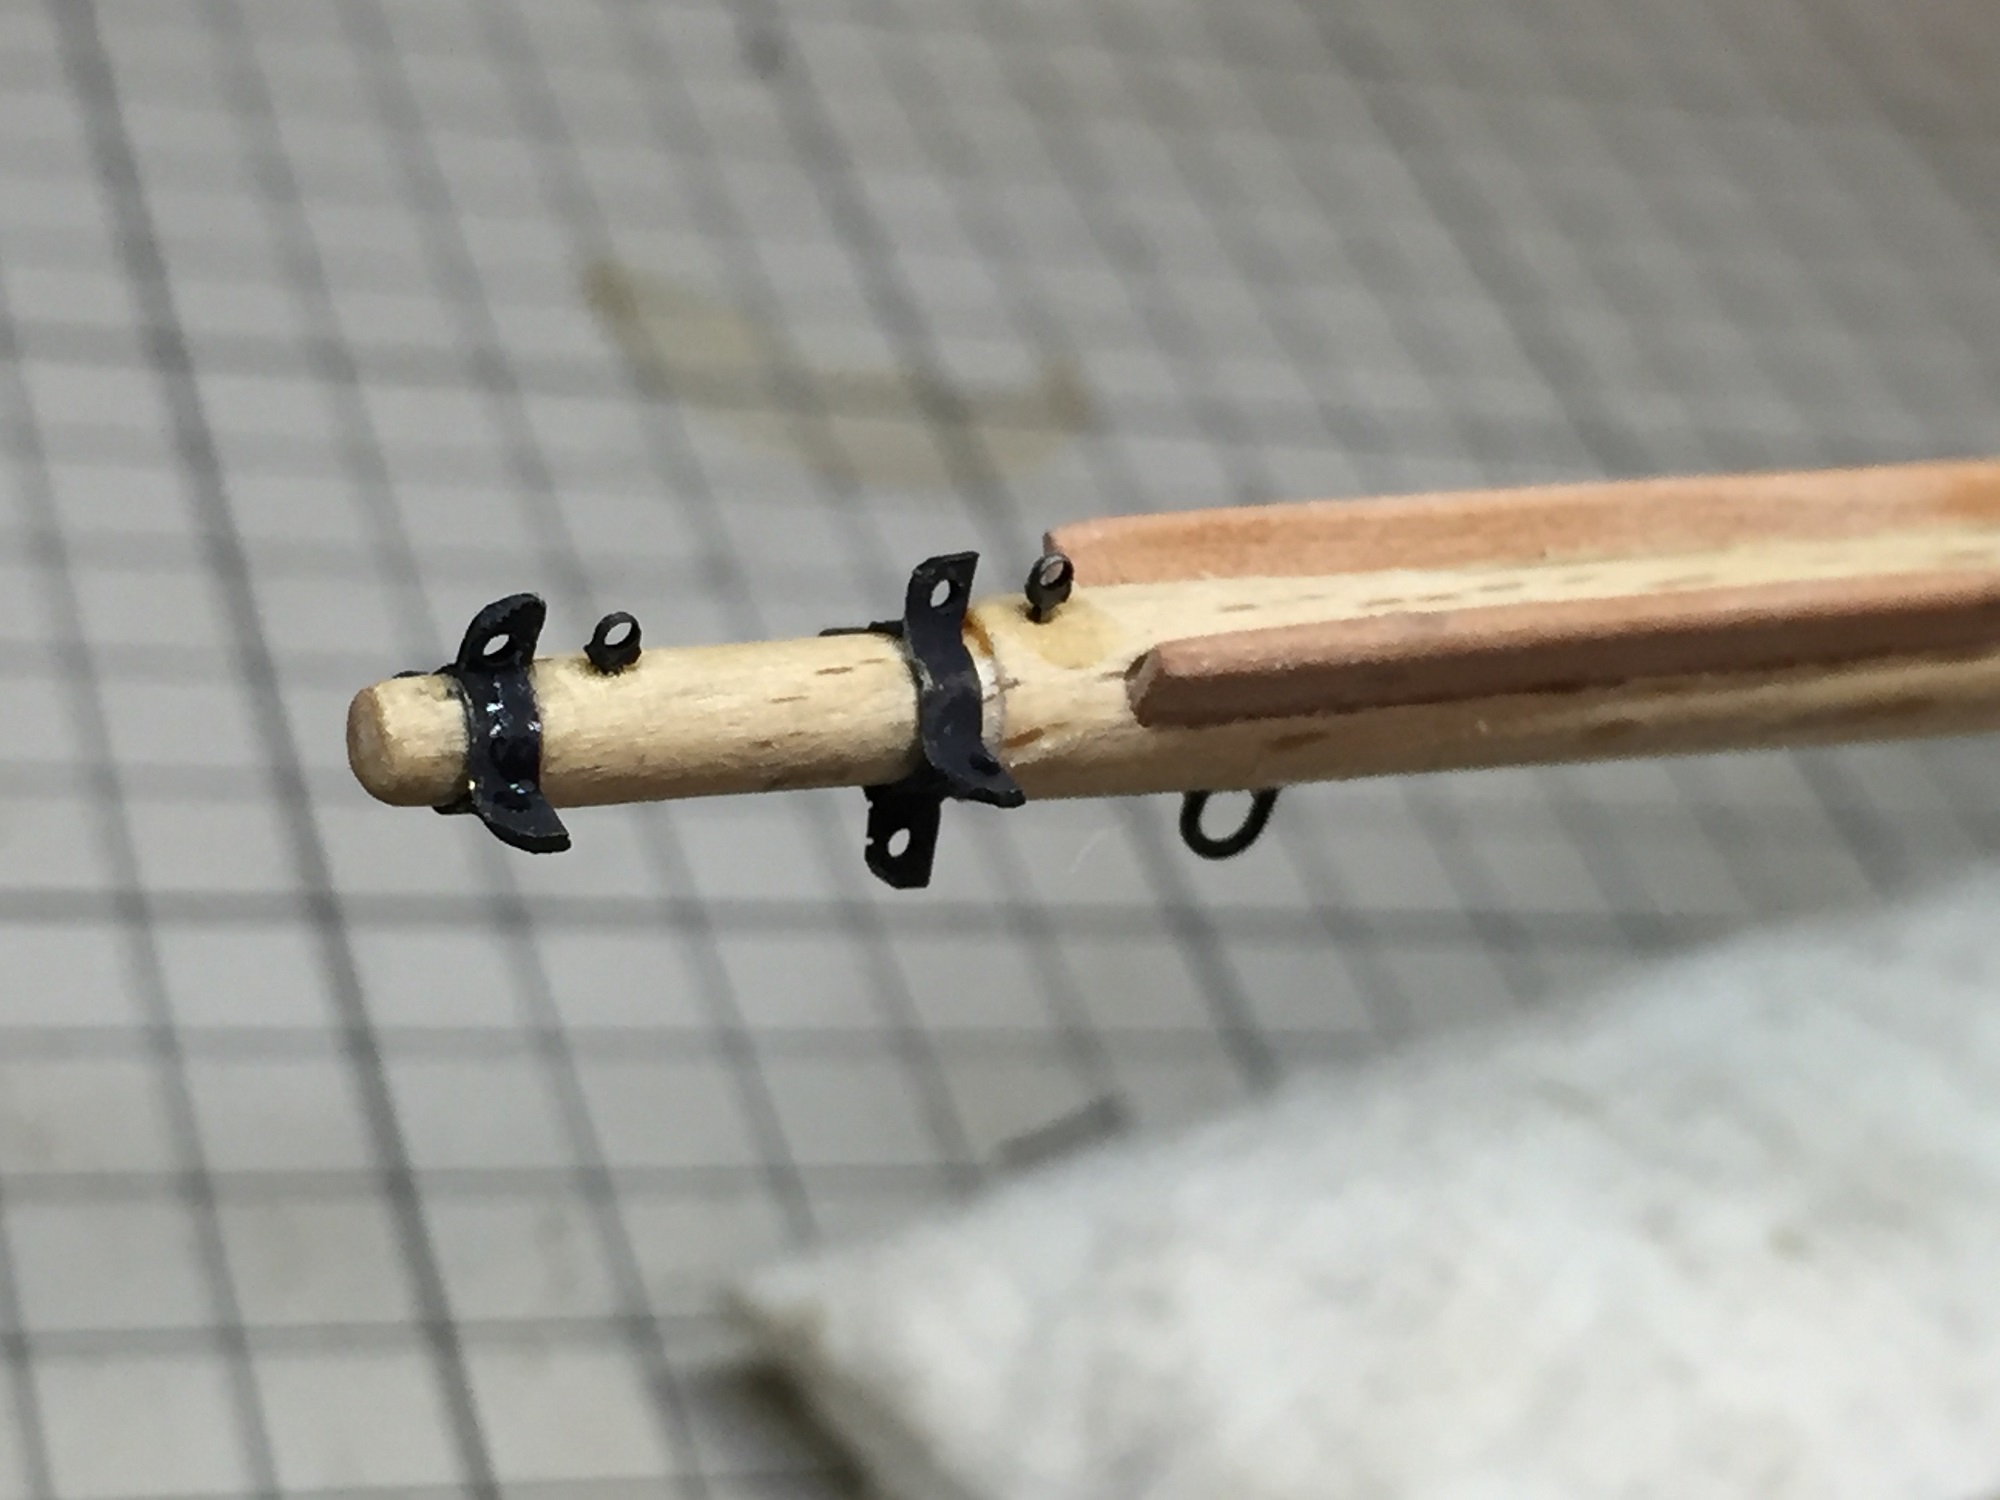 先端部に他の部品も取付
一つ穴の金具は下記の市販のエッチング部品を利用
I install the other parts in a leader.The metal fittings of the living in the same place use the following commercial etching part
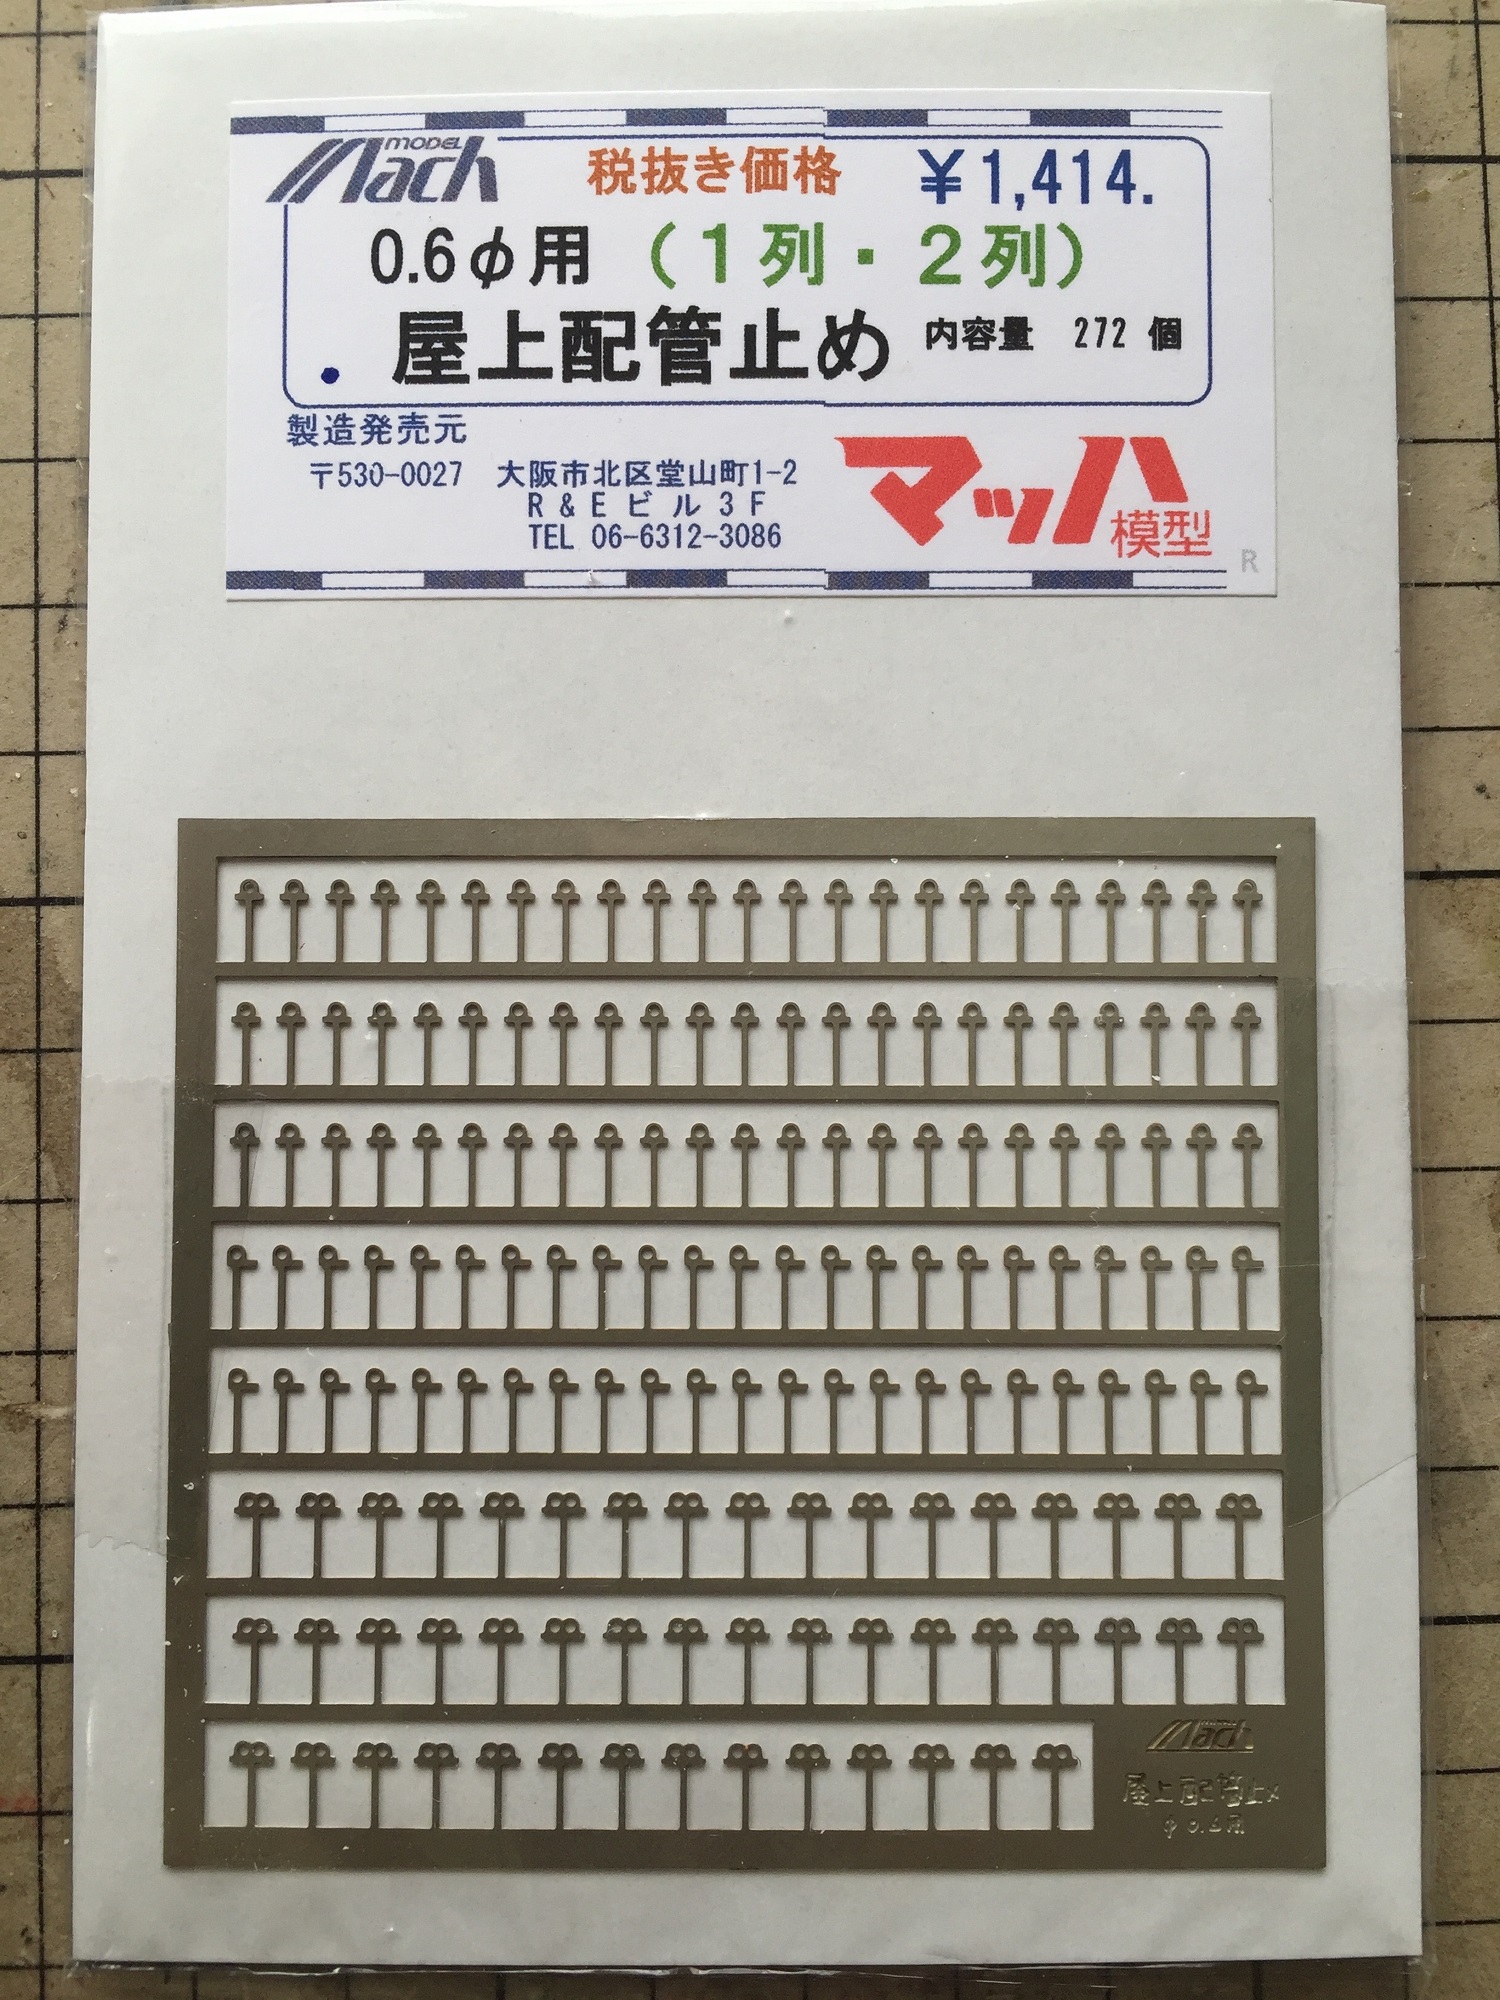 大阪の鉄道模型店のマッハ模型さんの屋上配管止が結構使える
Holdfast of the plumbing on a roof sold with a Mach number model of the railroad model shop of Osaka is convenient.
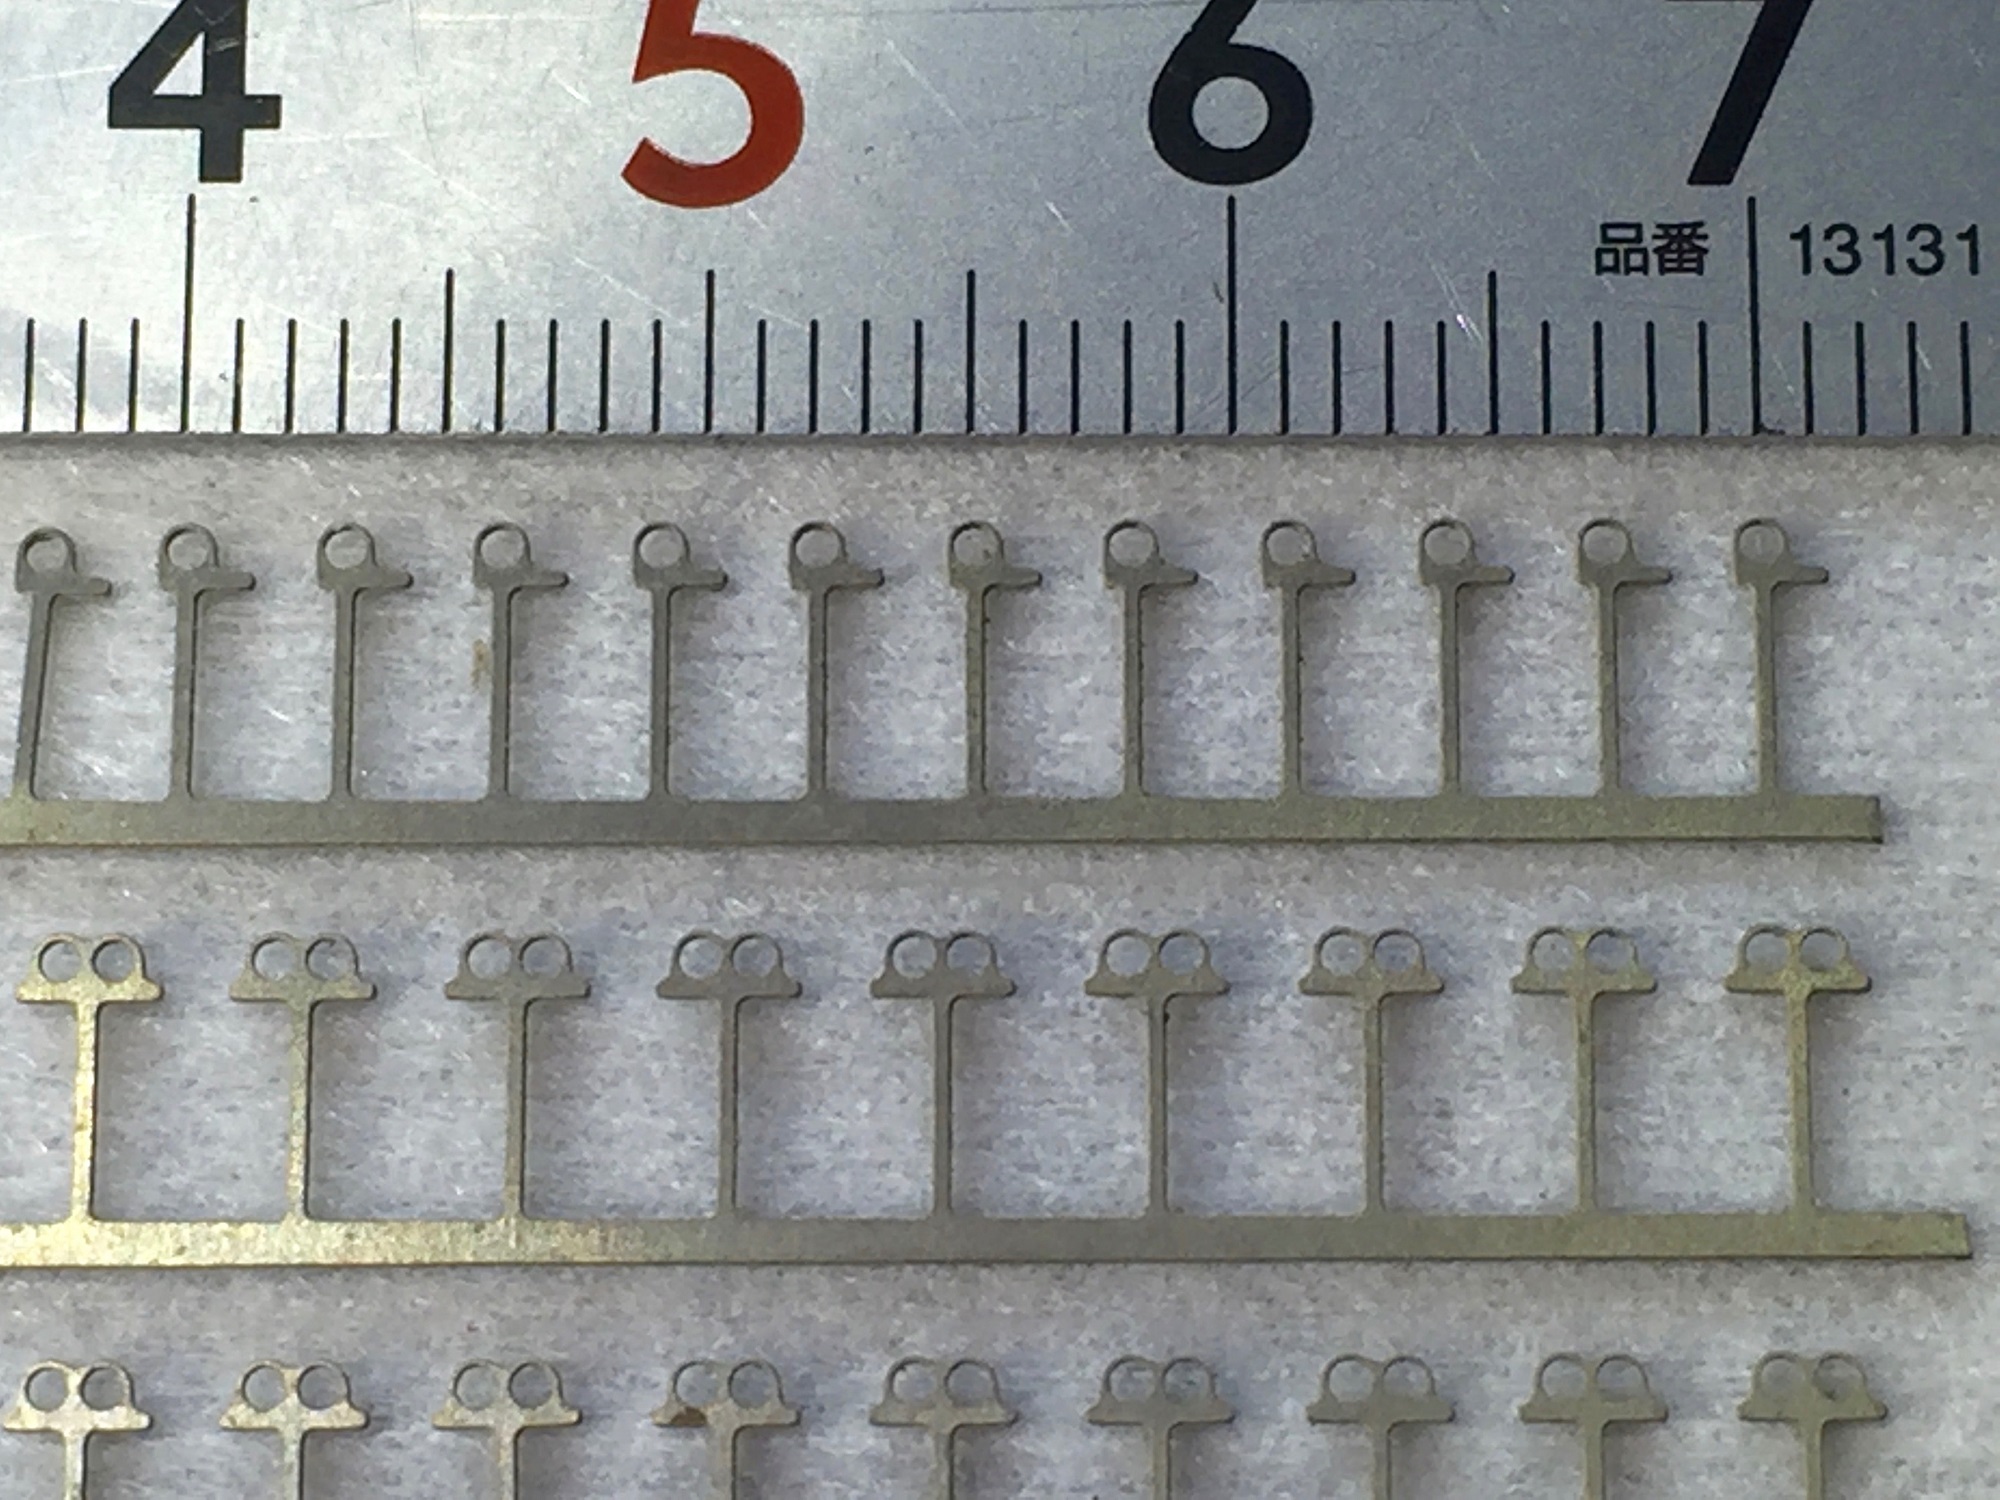 一つ穴の部品の右側の出っ張りは削り取って使用
I scrape off the projection of the right side of the part of the living in the same place and use it.
 デッドアイはキットのものを使用、真鍮線でリングを作りロー付け
ロー付け部がデッドアイの下の部分の絞ったところに来るように成形
Deadeye I used the thing of the kit.I bent brass route and made it a ring state and was accompanied and did silver-soldering.
 船の手摺の部分に真鍮線が通る長穴を開ける
かなりギリギリの部分なので割れないように慎重に
I molded it so that the point that did a silver-soldering charge account came to the place that the part under the dead eye squeezed.I can open the long hole which brass line goes along on the part of the handrail of the ship.I work carefully not to be broken.
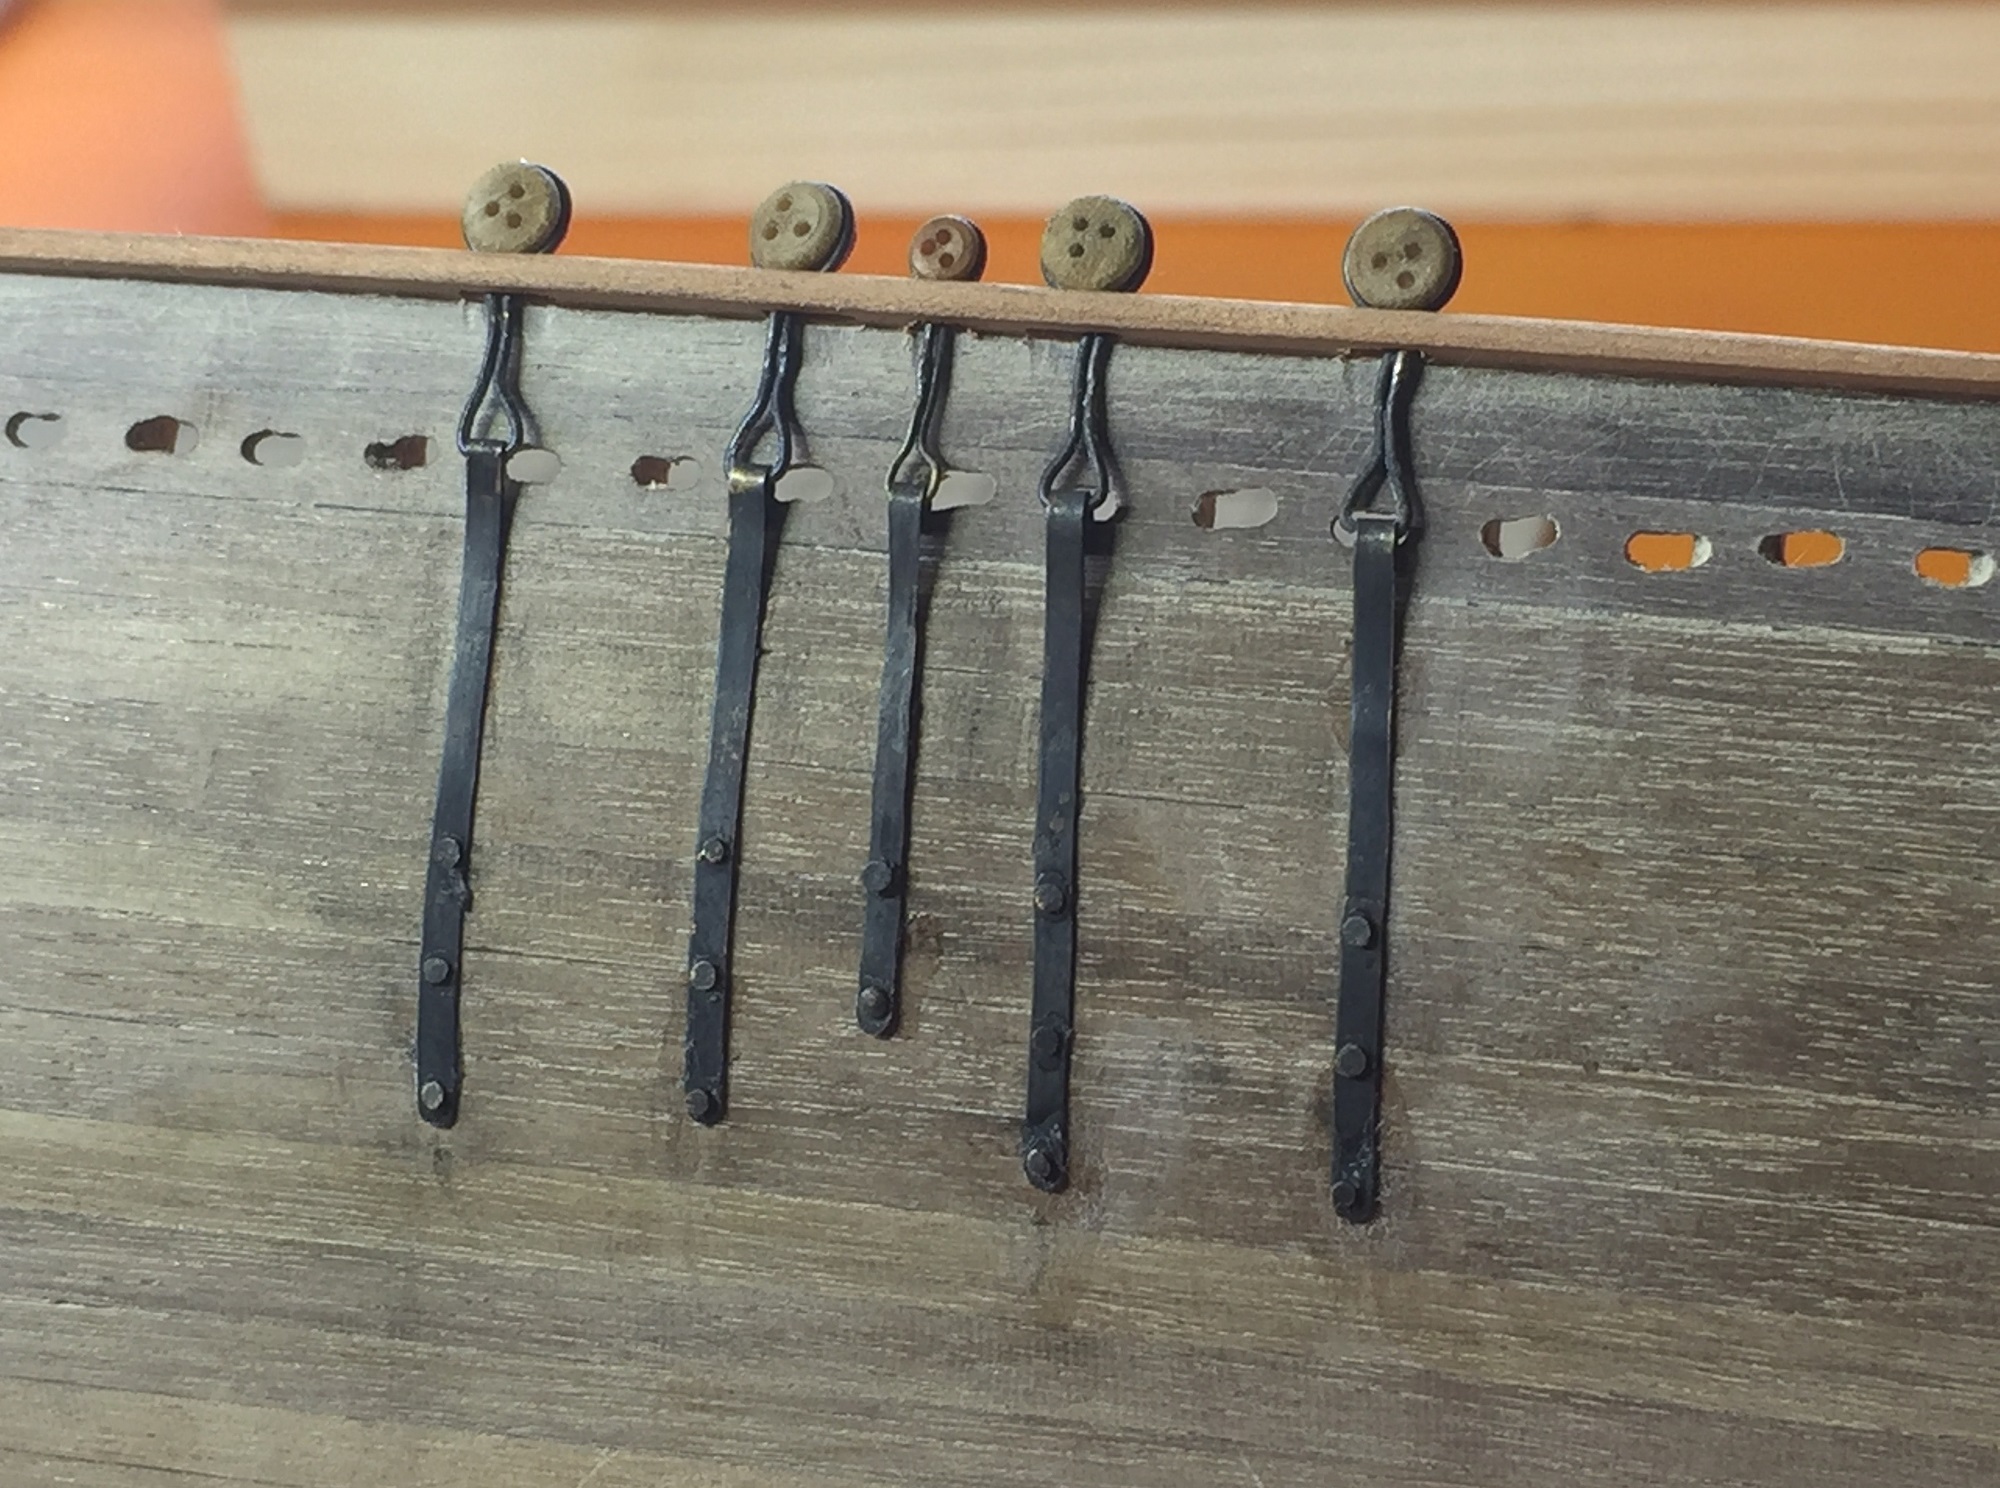 デッドアイを通して真鍮の帯板で作った止板をつける
I attach the end board which I prepared into the dead eye with a board of the brass.
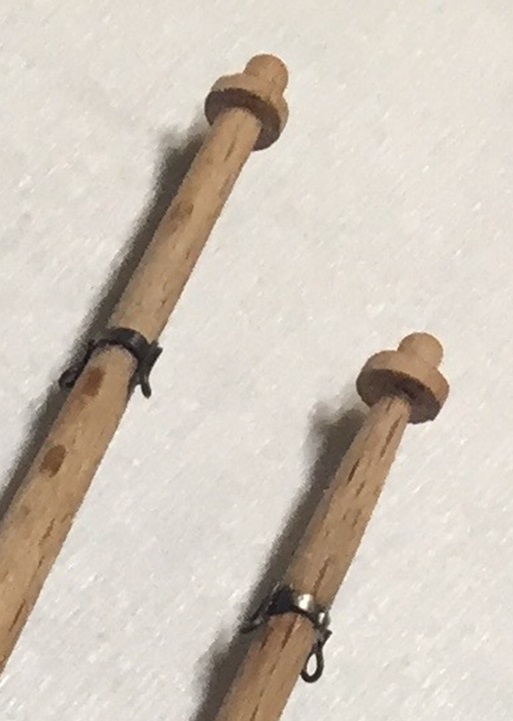
 留め釘はキットに付属していたものを頭の部分を小さく、低くする
釘をピンバイスに掴み、ルーターに取り付けた砥石で削る
The nail uses the thing of the kit.I carry out a revision to lower the part of the head small.I catch a nail in pin vice and sharpen it in the whetstone that was able to possess a router.
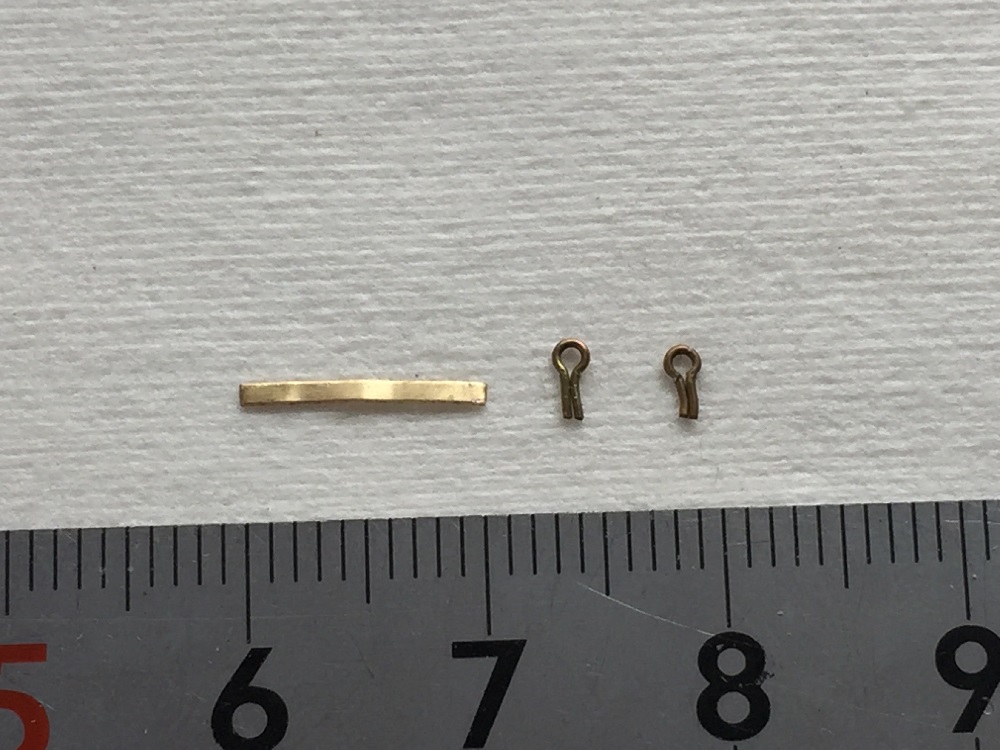
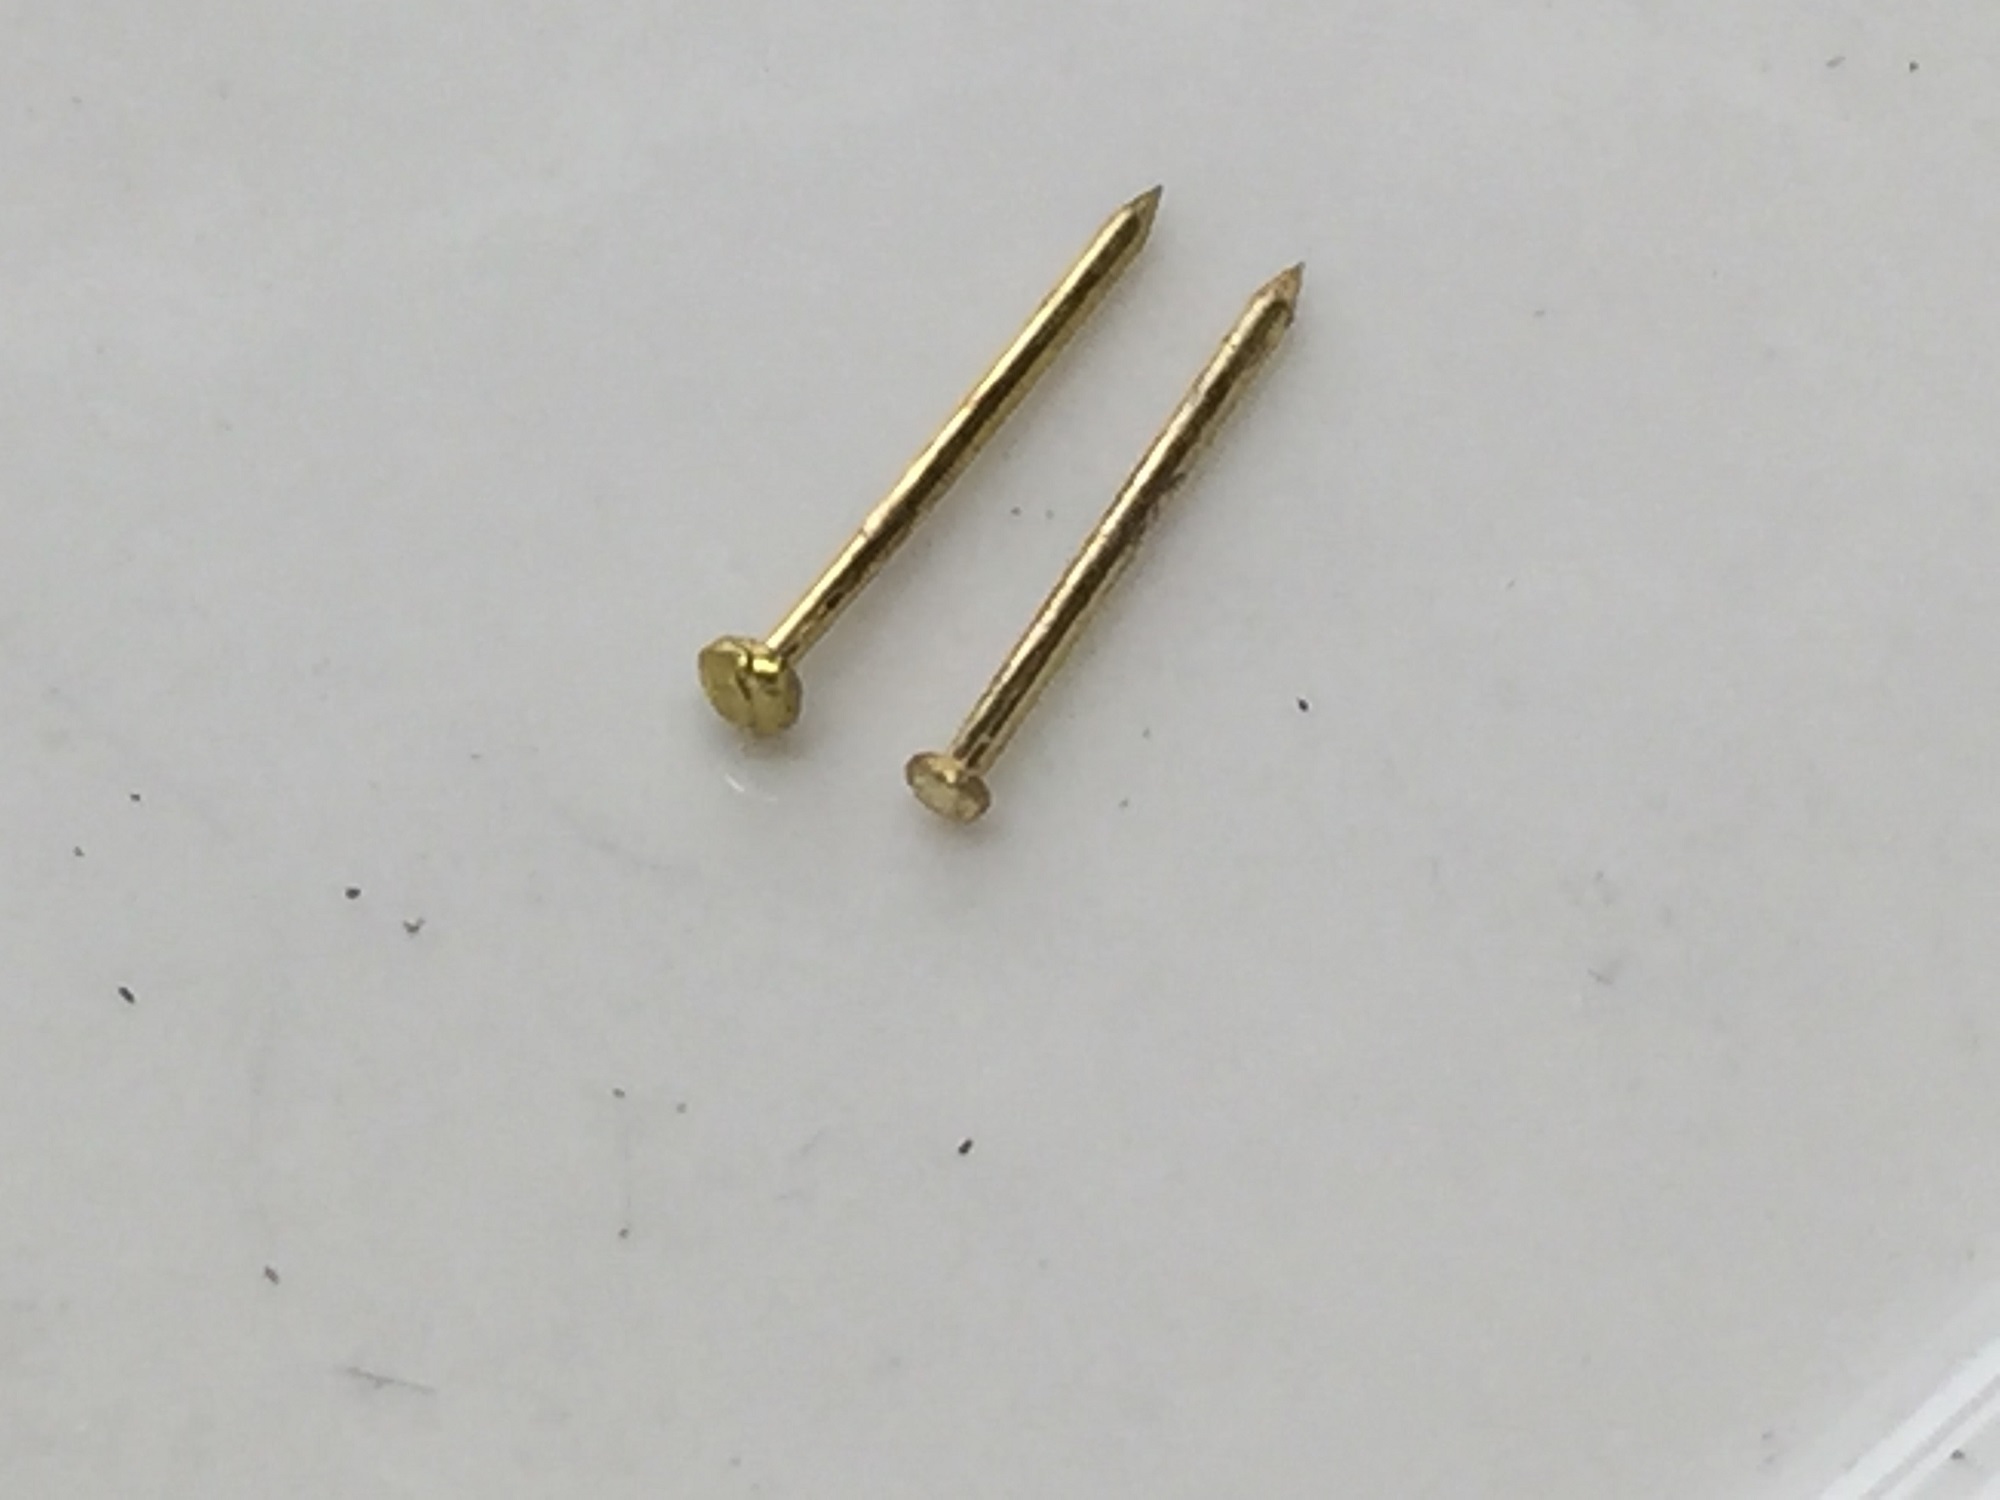 左がそのままの釘、右が頭を小さくした釘
The nail that a nail as is, the right made a head small the left.
 デッドアイの取付完了
The installation completion of the dead eye.
Die Sache, die ich vor dem Versammeln produzierte.
Der Teil des bowsprit.
Dort binden zwei Ringe auf die Spitze des bowsprit ein Seil fest.
Drei Sachen und vier Sachen haben das Vorspringen, daß das Loch im Ring frei wurde.
Ich betrachtete, wie ich es gesund machte.
Ich schließe das Vorspringen ein und verarbeite es mit dem Punkt des Bildes, der mit einem einzelnen Schlag der Bürste gezeichnet wird.
Der Teil der Projektion schlug es um und machte es zu einem Ring und wurde begleitet und machte das Silber-löten.
Ich bemühe mich, einen Ring in die Spitze des bowsprit einzufügen.
Ich sehe es irgendwie in so einem Gefühl.
Das Versammeln von der Installationsabteilung zum Deck des bowsprit.
Ich installiere die anderen Teile in einem Leiter.
Die Metallanproben des Lebensunterhaltes in der gleichen Stelle benutzen den folgenden kommerziellen Radierungsteil
Holdfast der Installateurarbeit auf einem Dach verkaufte mit einem Mach von Zahlenmodell des Eisenbahnmodells, daß Geschäft von Osaka zweckmäßig ist.
Ich kratze von der Vorhersage der richtigen Seite des Teiles des Lebensunterhaltes in der gleichen Stelle und benutze es.
Deadeye, den ich die Sache vom Werkzeug benutzte.
Ich bog Messingstrecke und machte es zu einem Ringstaat und wurde begleitet und machte das Silber-löten.
Ich formte es, so daß der Punkt, der ein Silber-lötendes laufendes Konto machte, zur Stelle kam, die der Teil vom toten Auge drückte.
Ich kann das lange Loch eröffnen, das Messinglinie von seiten von des Geländers des Schiffes entlanggeht.
Ich arbeite, nicht vorsichtig gebrochen zu werden.
Ich befestige den Endausschuß, den ich mit einem Ausschuß des Messings ins tote Auge vorbereitete.
Der Nagel benutzt die Sache vom Werkzeug.
Ich führe eine Revision durch, um den Teil des Kopfes klein herunterzulassen.
Ich fange einen Nagel in Nadellaster und schärfe es im Schleifstein, der fähig war, einen Nuthobel zu besitzen.
Der Nagel der ein Nagel wie ist, das Recht machte der Linke klein einen Kopf.
Die Installationsvollendung des toten Auges.
 ウィンドラス(錨巻上機)の製作
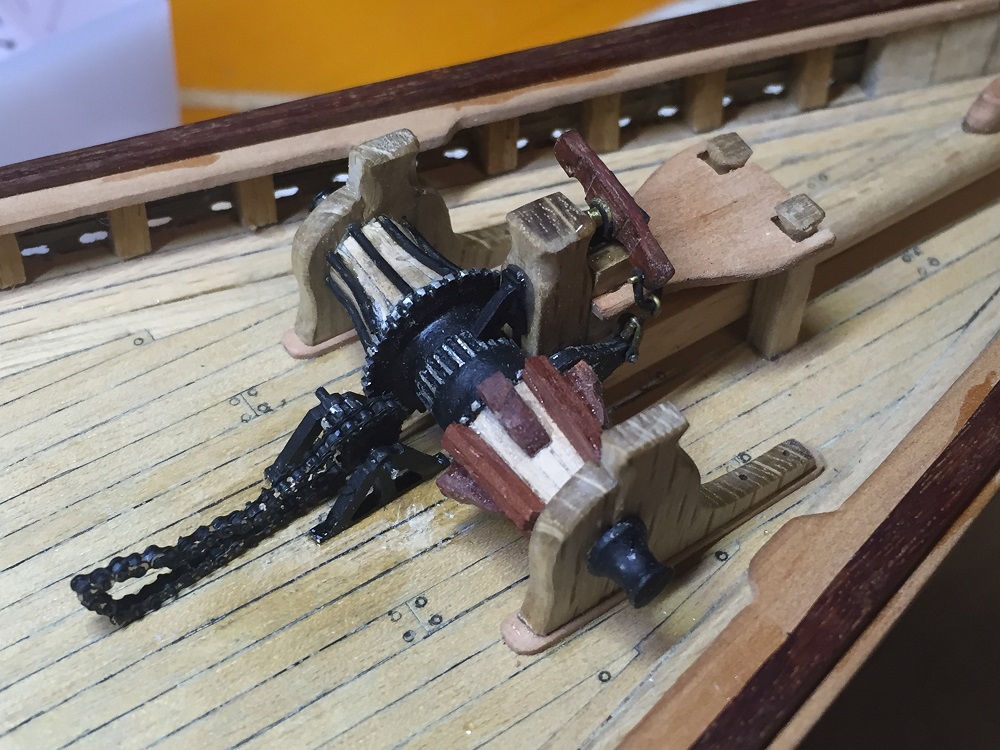
付属のギアーは黒く塗って歯の先端だけ剥がすとメリハリが付いてスプロケットらしく 見えるか、ドラムの周囲は木材を貼り付けるという図面なのでその通りに貼り付けたがこんなものか?
I paint the gear of the kit black.When only the tip of the gear tears off the painting, I gain an accent.
I see it like a sprocket.
According to a drawing, I stick wood around a drum
 両側のドラムにラチエットがはまり込み陽動するリンクで繋いであるのだが、今ひとつ 動きが解らぬまま製作。
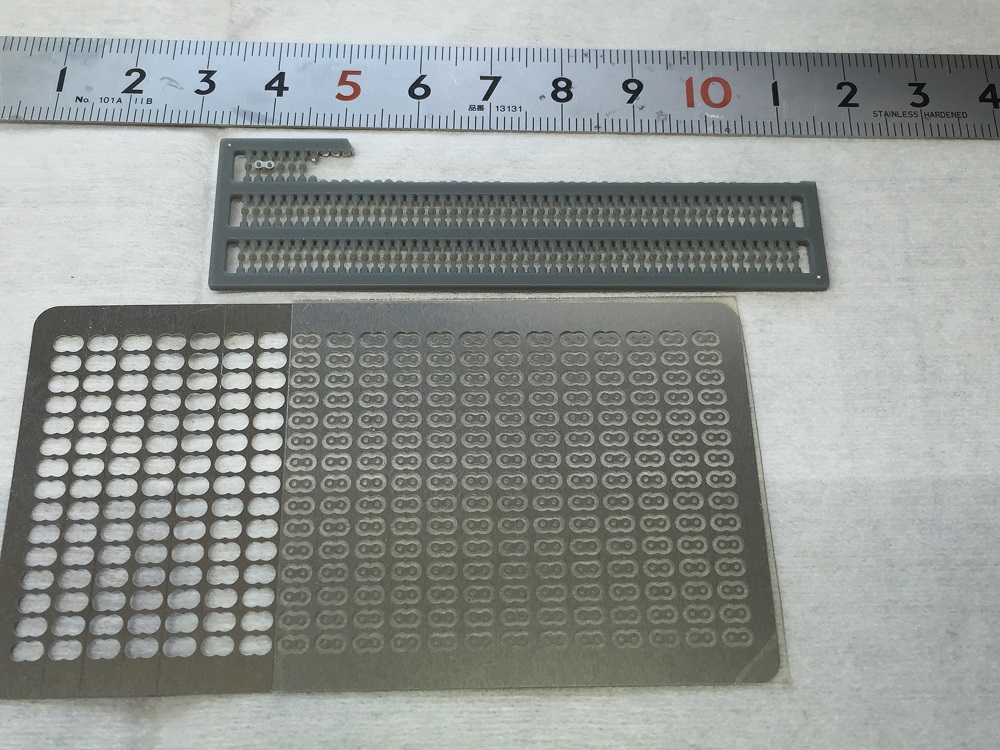 ウィンドラスを回転させる駆動チェーンは付属しておらず、ワイヤー等で制作するとなっているが
作り方が解らず適当なものが無いかとネットで探すとオートバイの模型のグレードアップ用に
販売されている物があり、取り寄せるがリンクがバラバラで一つ一つ組み立てるもの
A drive chain turning windlass is not included to the kit.
I am to produce it with wires.
I do not understand how to make.
There was the chain which was sold for the upgrading of the model of the motorcycle when I looked for it in a net.
Chain links are scattered and assemble it one by one.
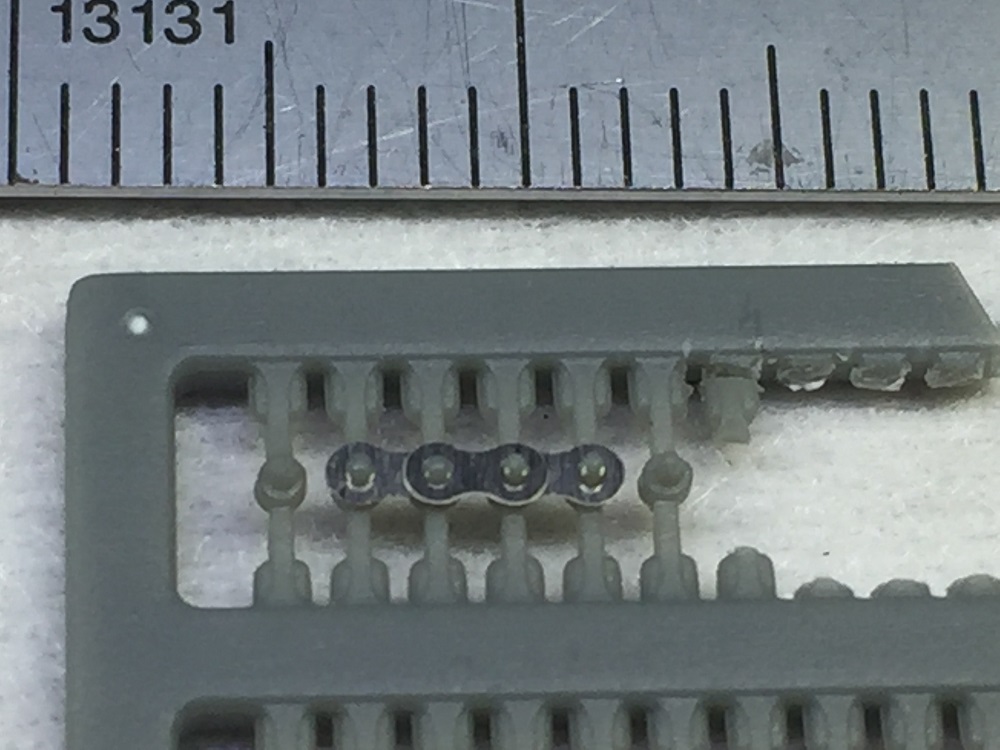 エッチングのリンクをテープ状のものから剥がし樹脂の突起部にはめ込みハンダゴテで突起部を溶かしリンクが抜けないようにし、それを両側同じように組立て上下のつなぎ部を切り離すと チェーンが出来るというもの。 細かい作業でコツを会得する必要があり、わかってきた頃には作業は終わり
Dissolve a tang in next tear off a link of the etching from a tape-shaped thing, and to fit in a resinous tang with soldering iron, and cannot outrun a link; need it.
Both sides assemble it in the same way and separate the liaison moiety of the top and bottom.
A just good feeling.
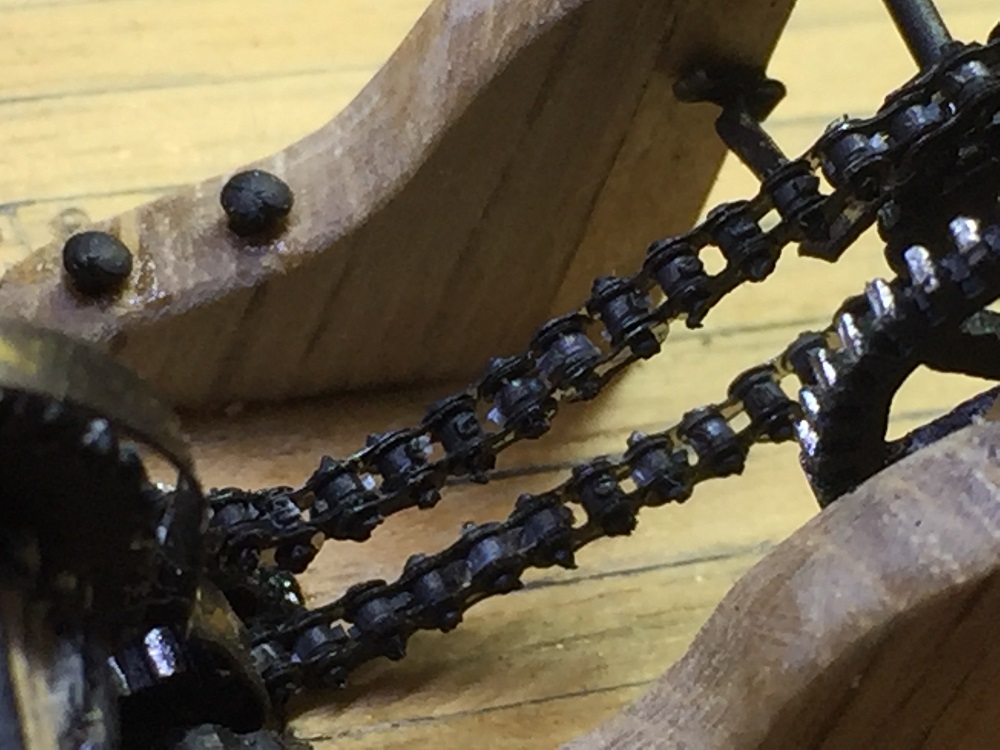 スケール的に丁度いい感じで黒く塗って取り付けると本物のチェーンみたいで満足
I look like a genuine chain when I paint it black.I am satisfied with this workmanship.
 駆動部のスプロケットも組み付けデッキに取付る
The sprocket of the drive department is installation ru on an installation deck, too
 ブルーノーズⅠは船の帆走はセールのみであるが(ブルーノーズⅡはスクリューが付いている)
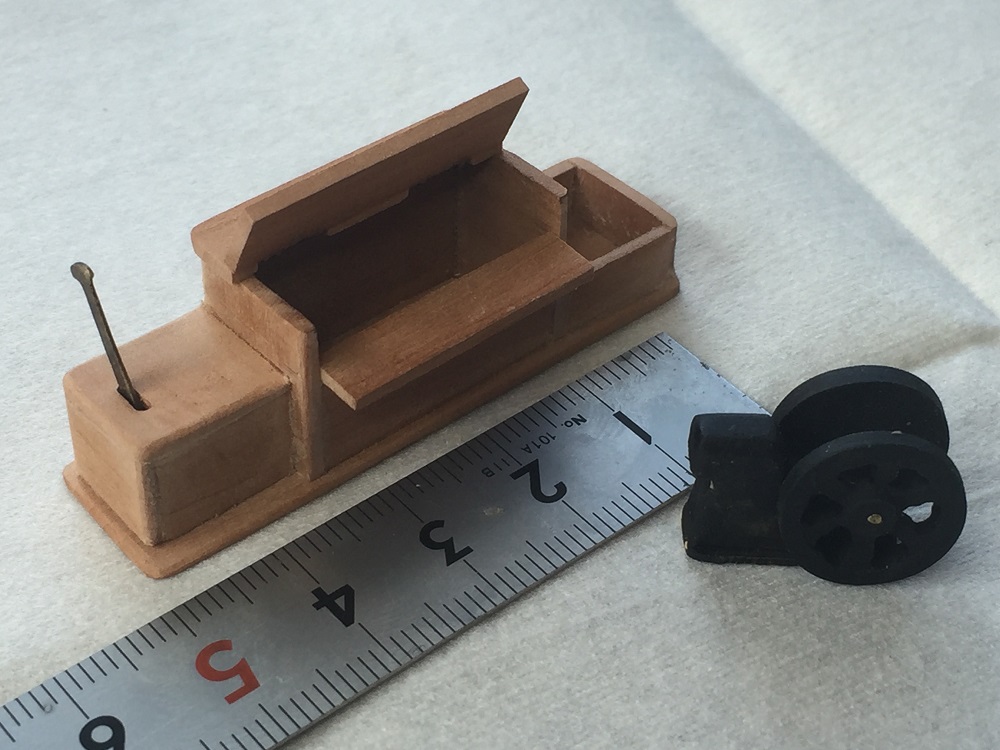
ウィンドラスの駆動はディーゼルエンジンでの駆動となり動力BOXを作る、中に入るエンジンも 一応図面に明記しているので木製で製作し黒く塗る、フライホイールも丁寧に作ったつもりだが 黒く塗ると写真では解りづらい
The sailing of the ship is only a sale, but, as for blue nose 1, blue nose 2 is equipped with screw propeller.
Drive of the windlass is drive with the diesel engines.I make winch engine housing.
I make the engine entering inside.I produce it with a tree according to a drawing and paint.
I made the flywheel carefully.It is hard to understand that I paint it black with the photograph
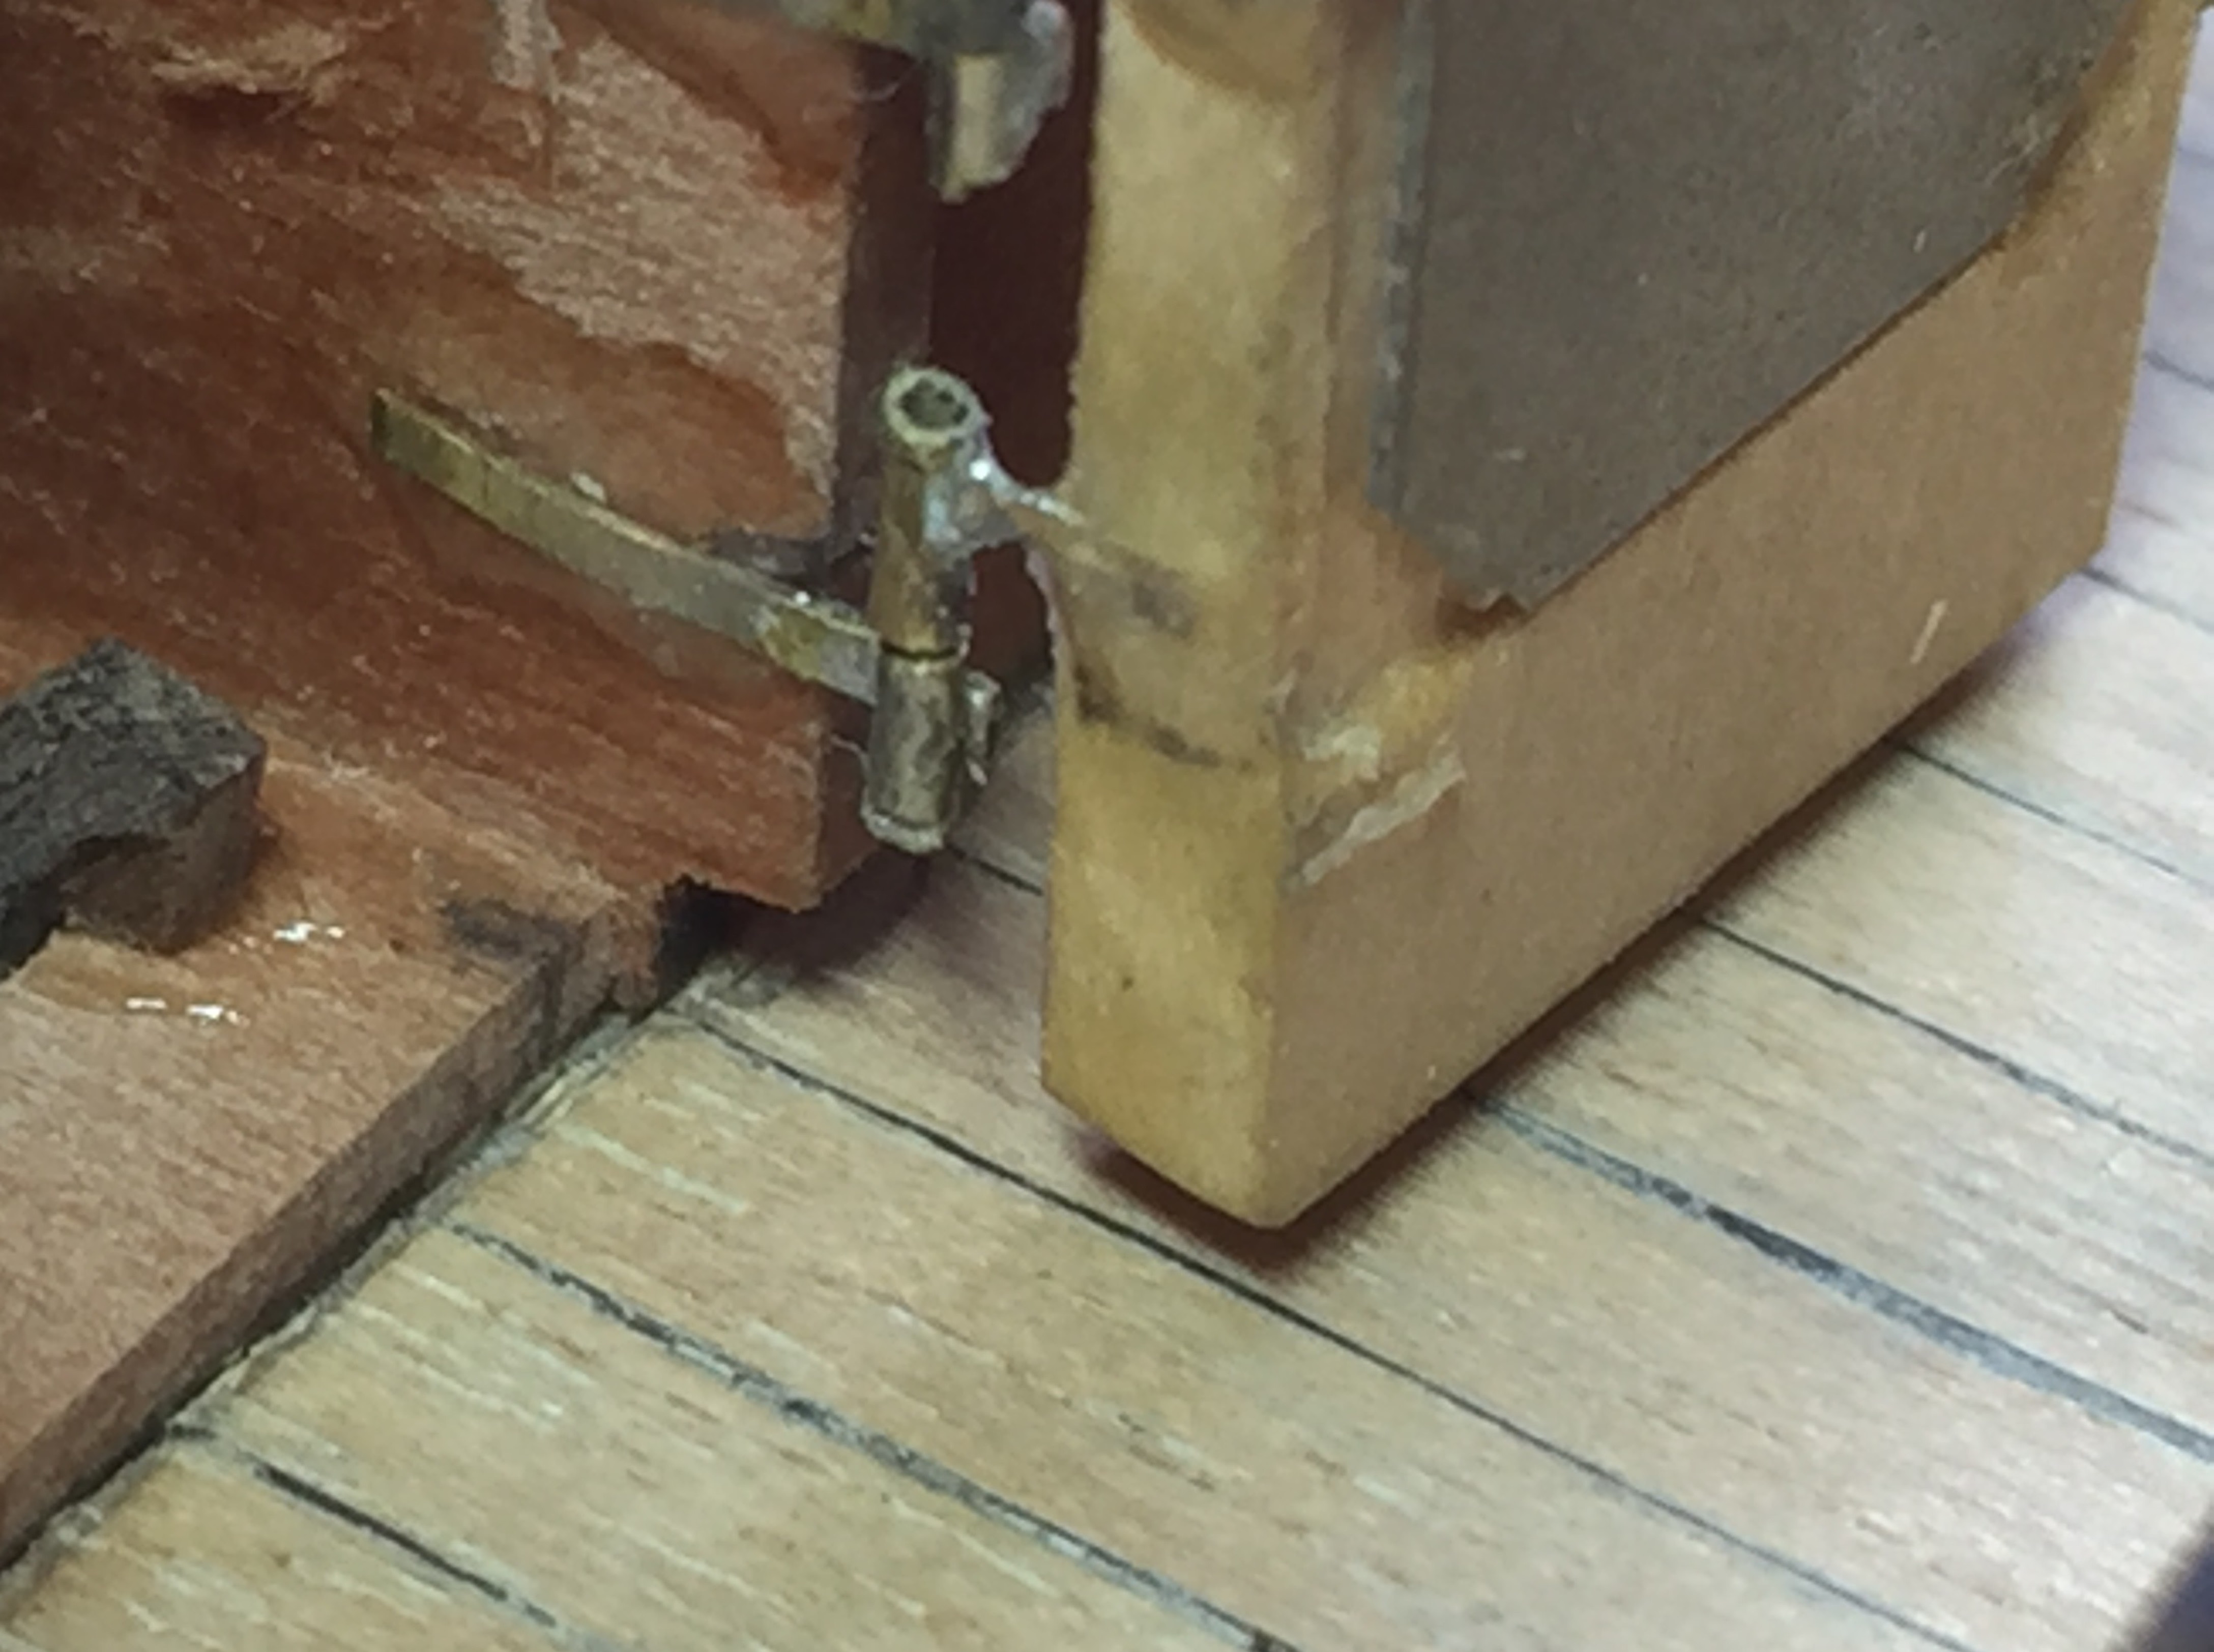
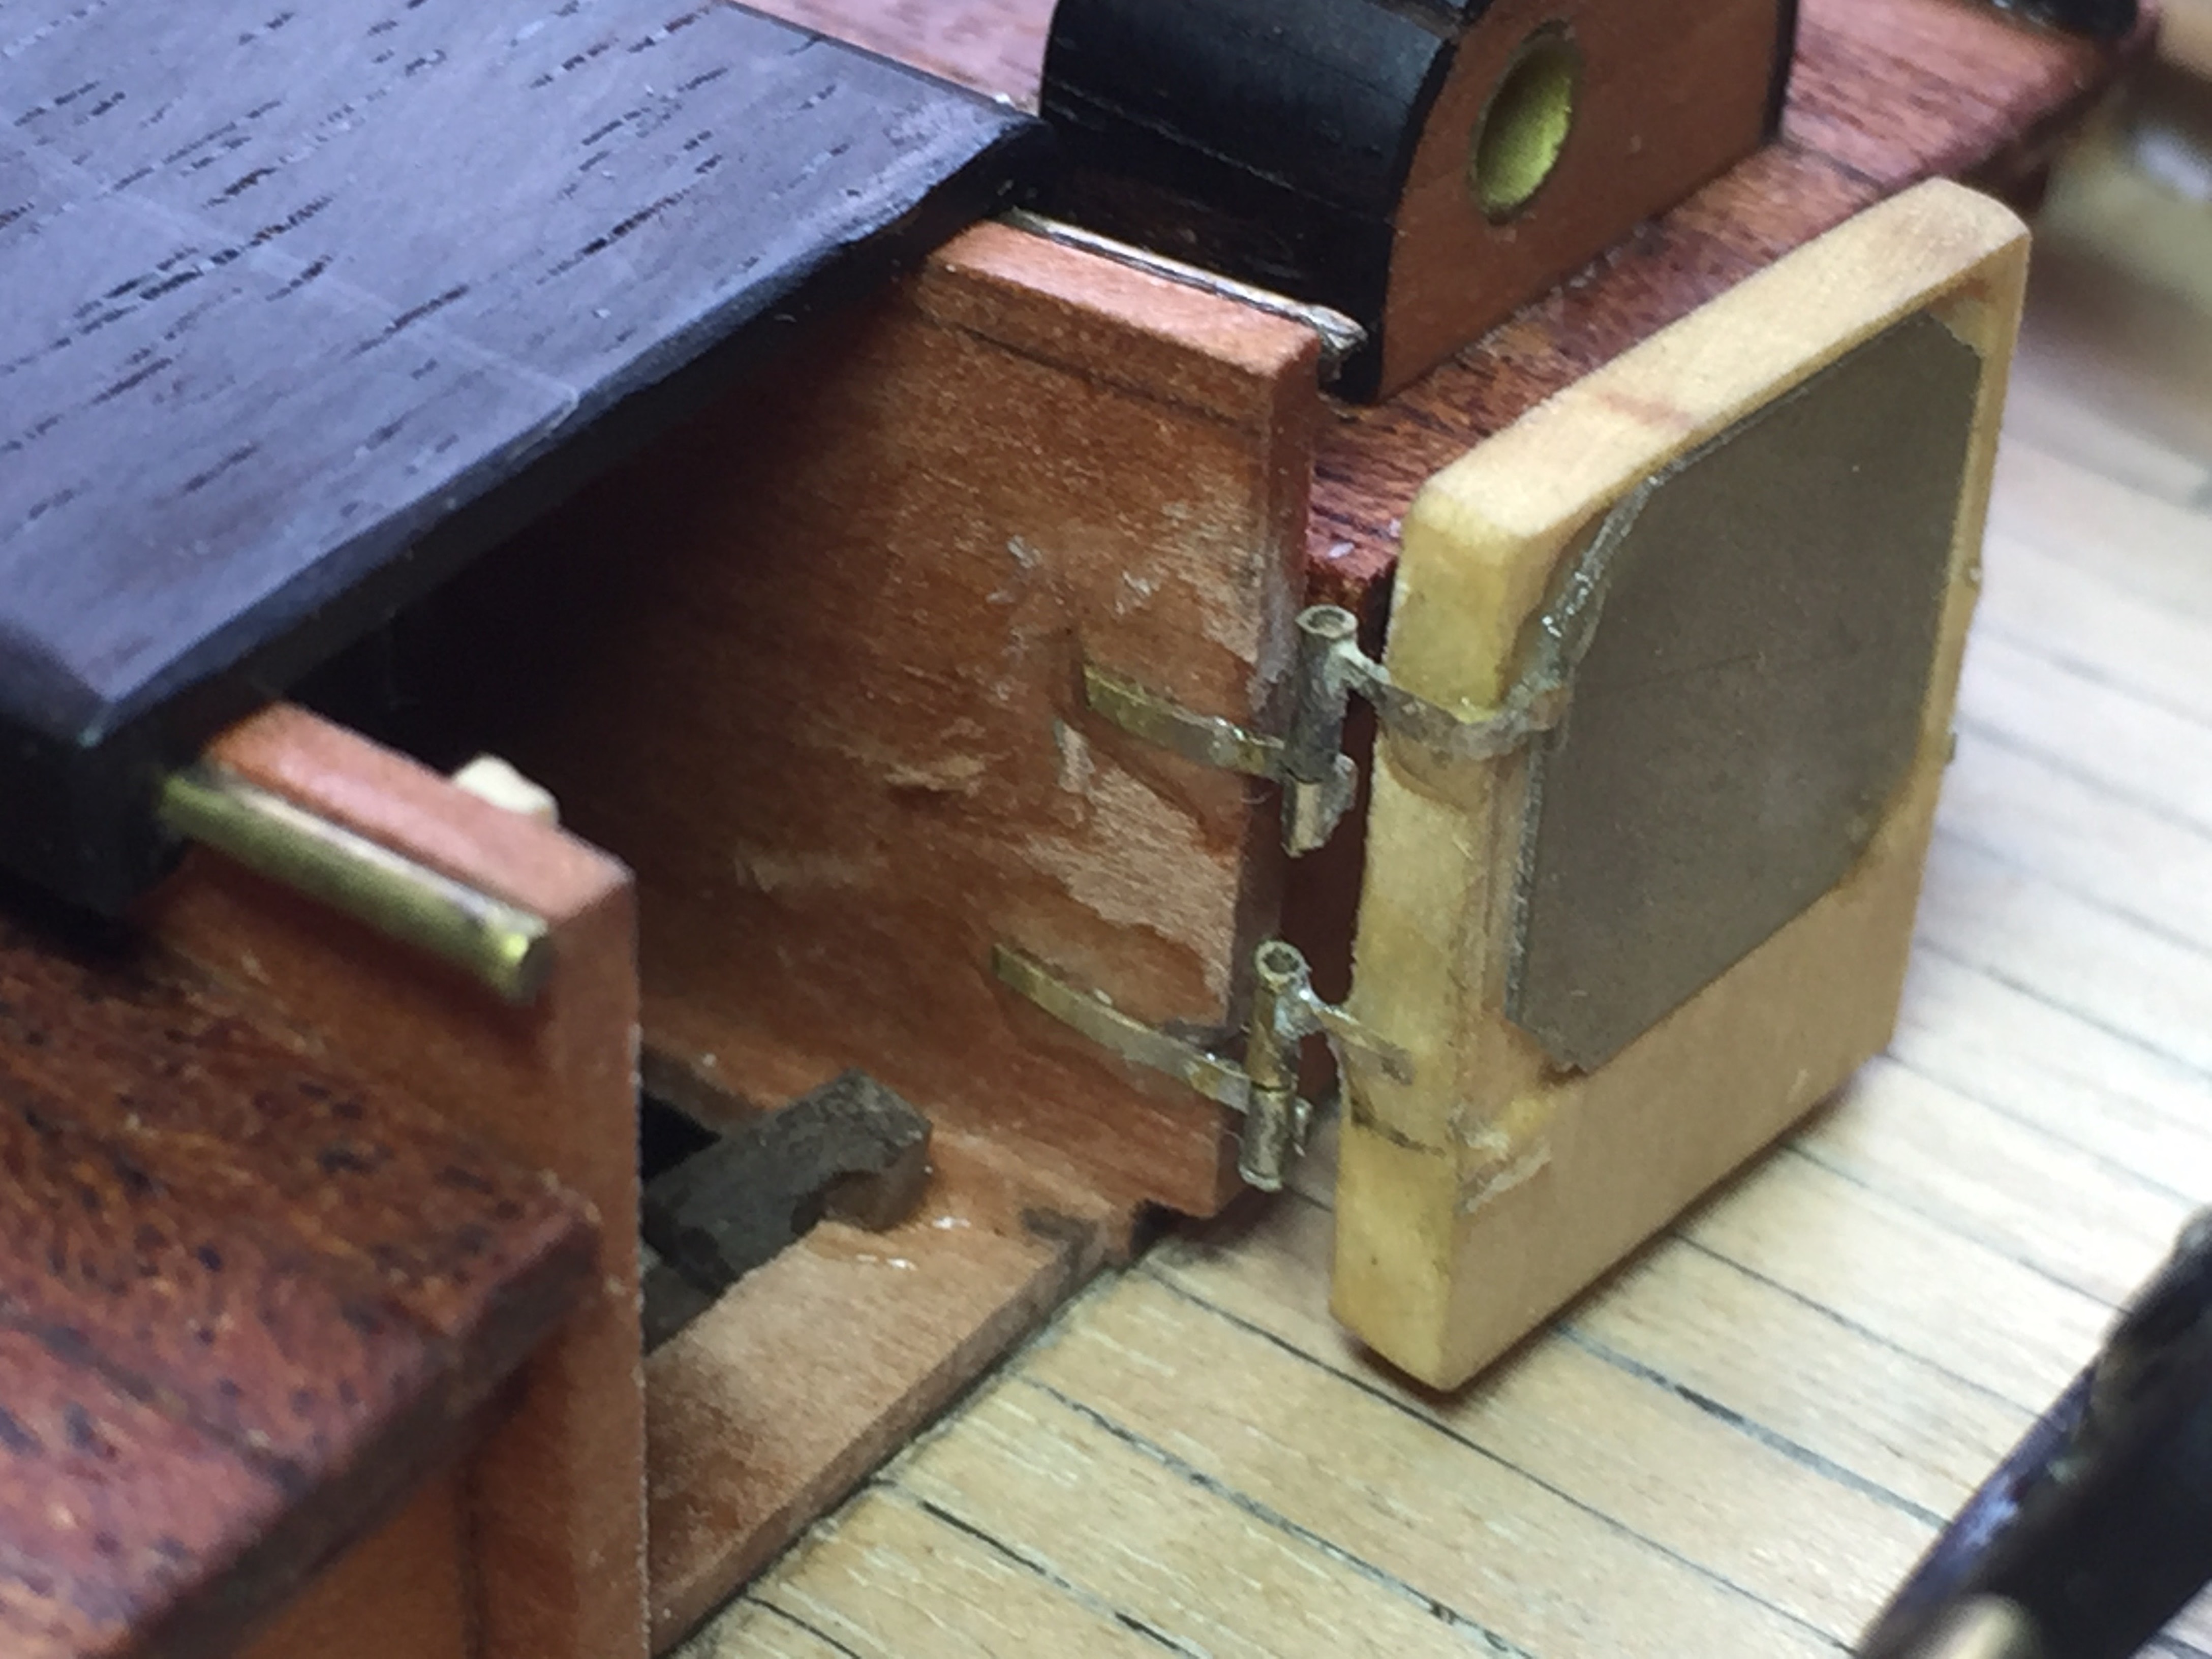
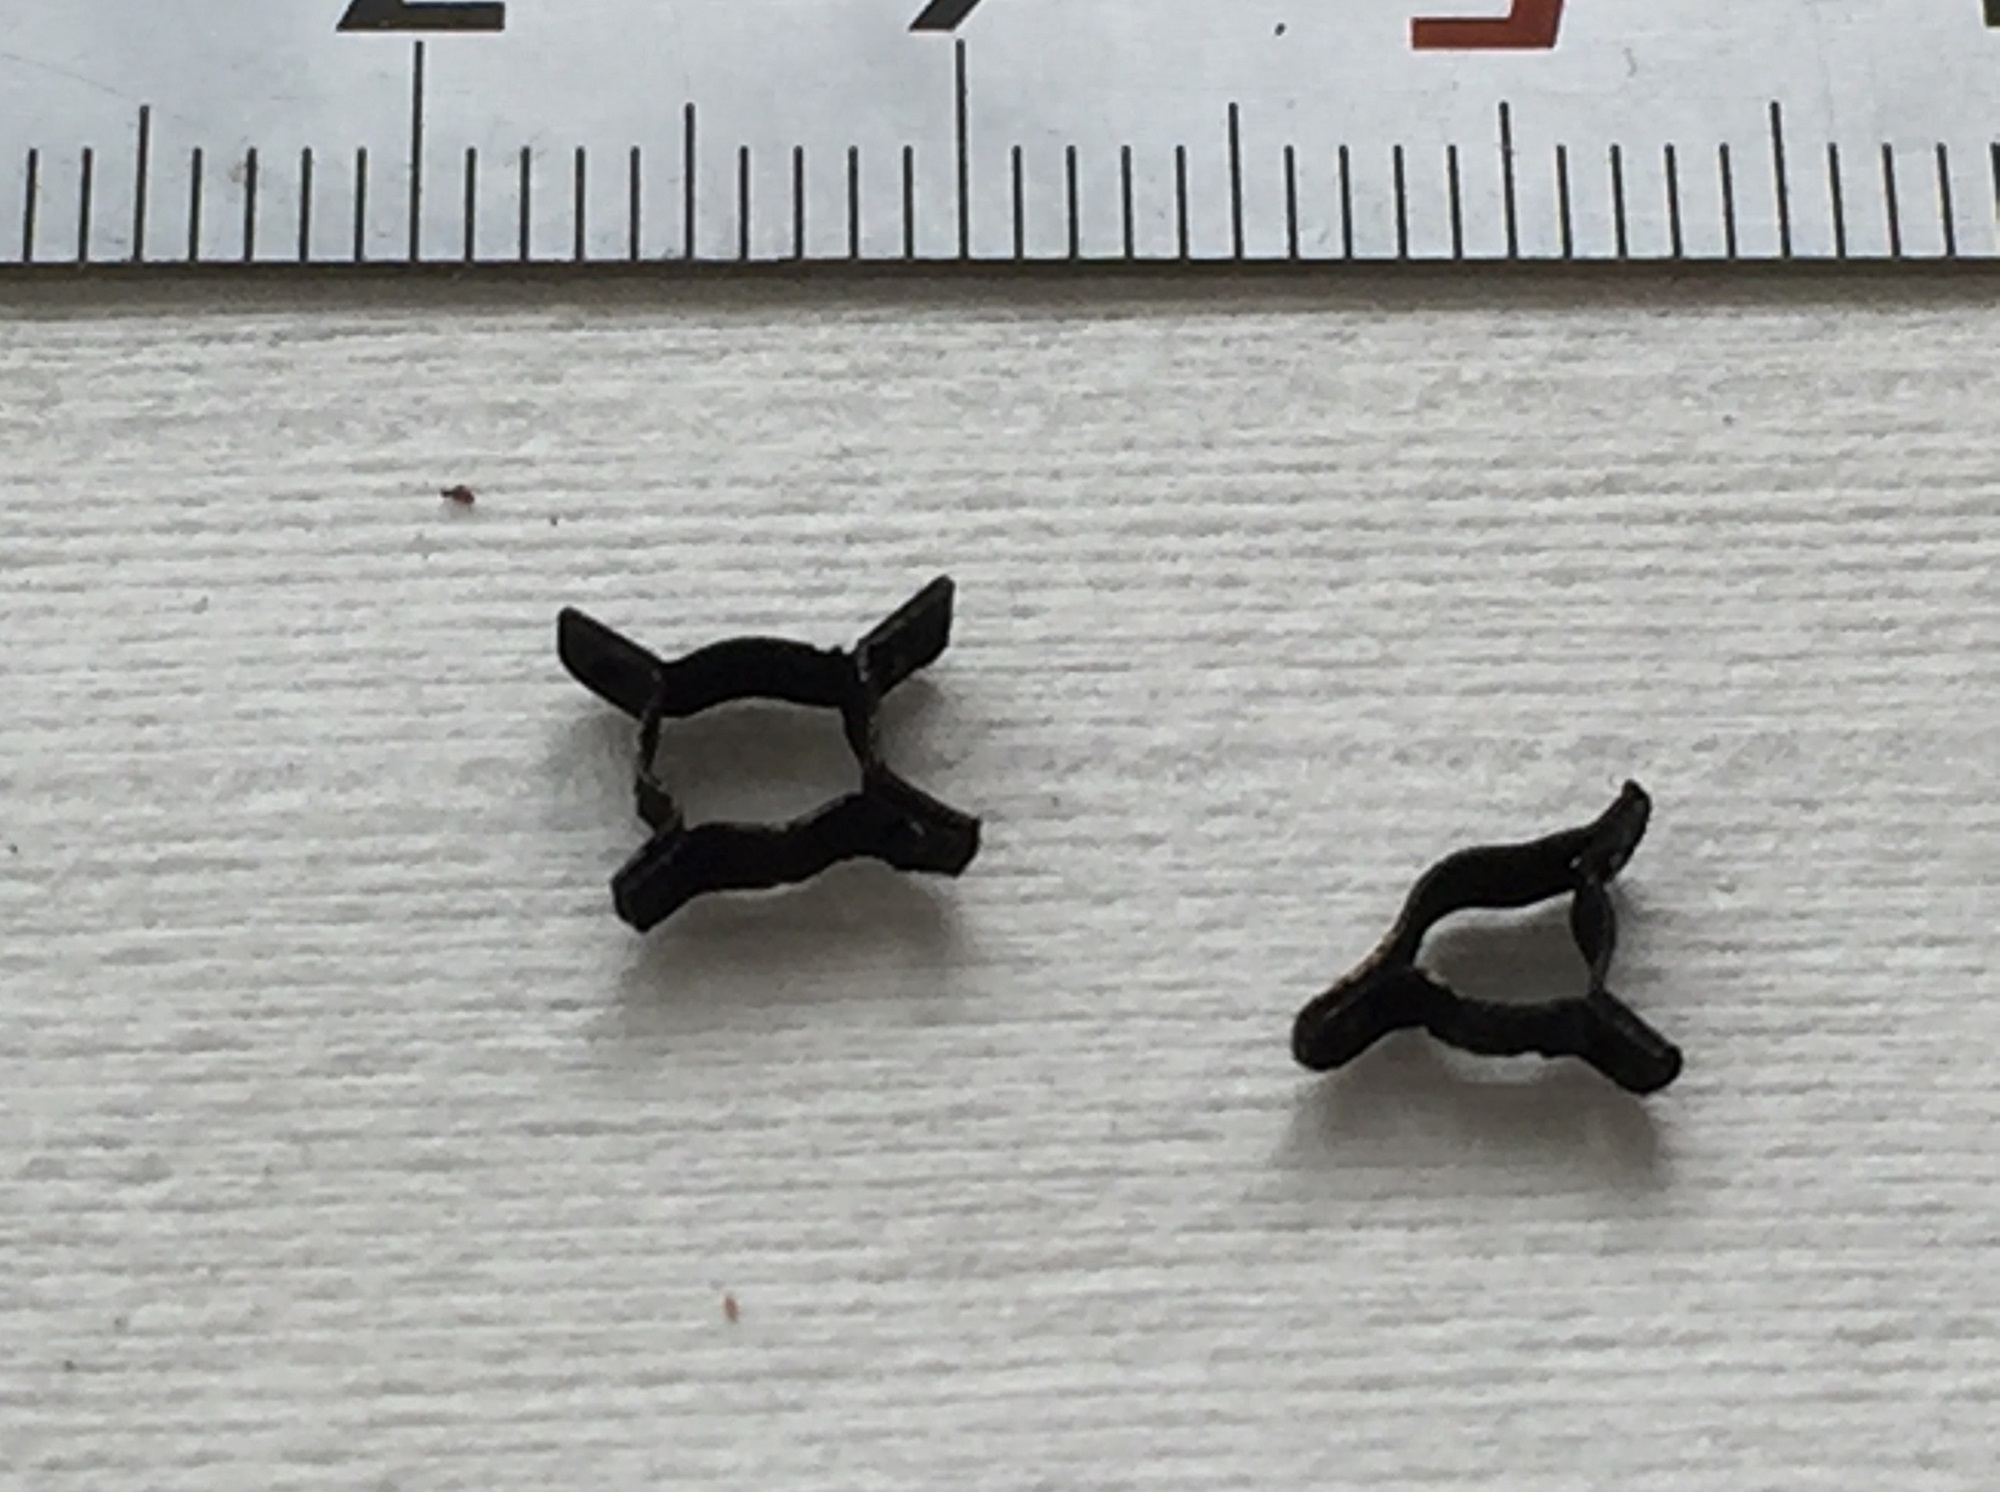
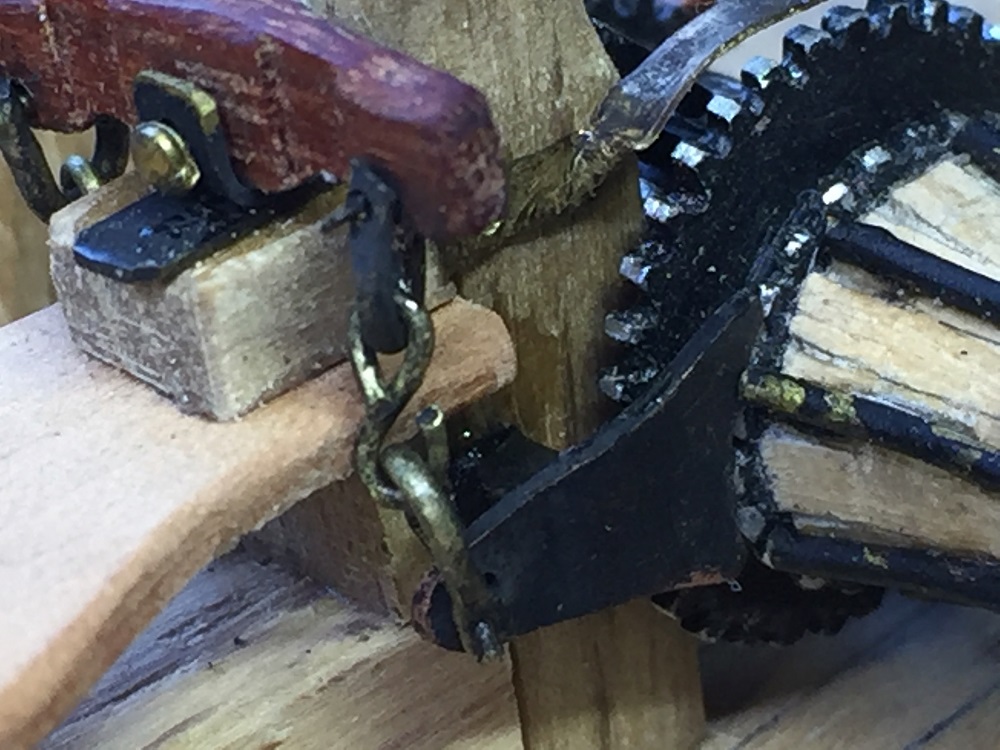
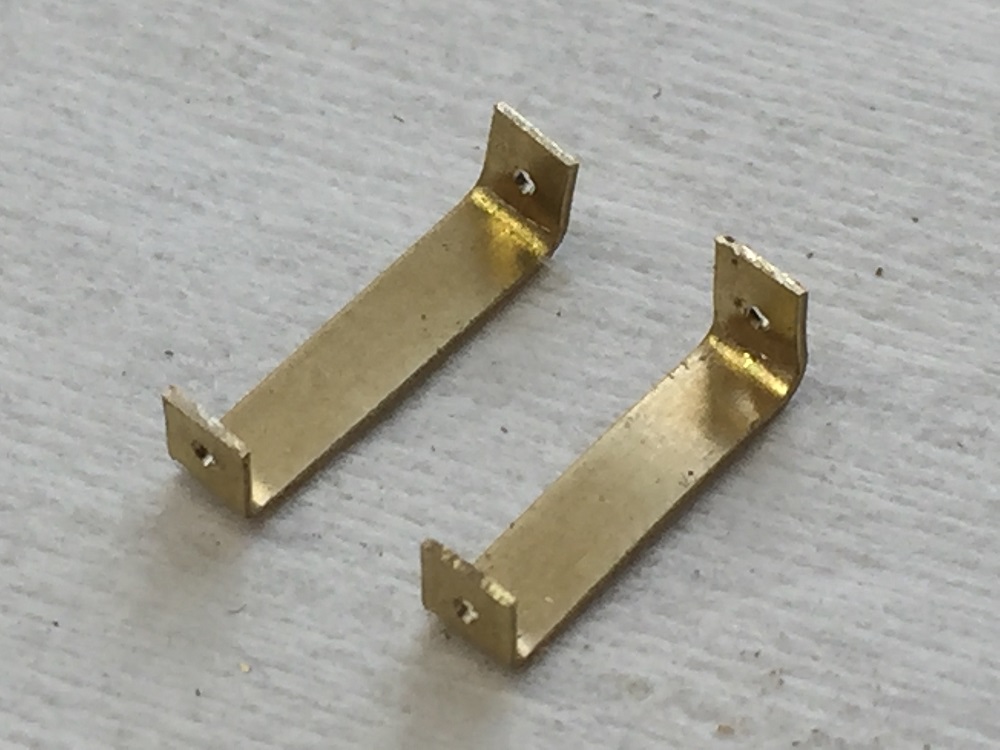
蓋も開閉できるように蝶番をつくる、 キャビンのドアの丁番がもう一つ上手くいかなかったので 細いパイプを止め金具にロー付けし真鍮線を通して両側を先に紹介した電線管止めで 支える方式とした。
止め金具を見せたかったのでこの形にしたが、まあ上手く行った方かな
I make a hinge to be able to open and close the cover.The hinge of the door of the cabin did not go well one more.
I made a thin pipe end metal fittings, and was accompanied by silver-soldering and did it and was able to support it by the wireway end that I introduced both sides to through brass line earlier.
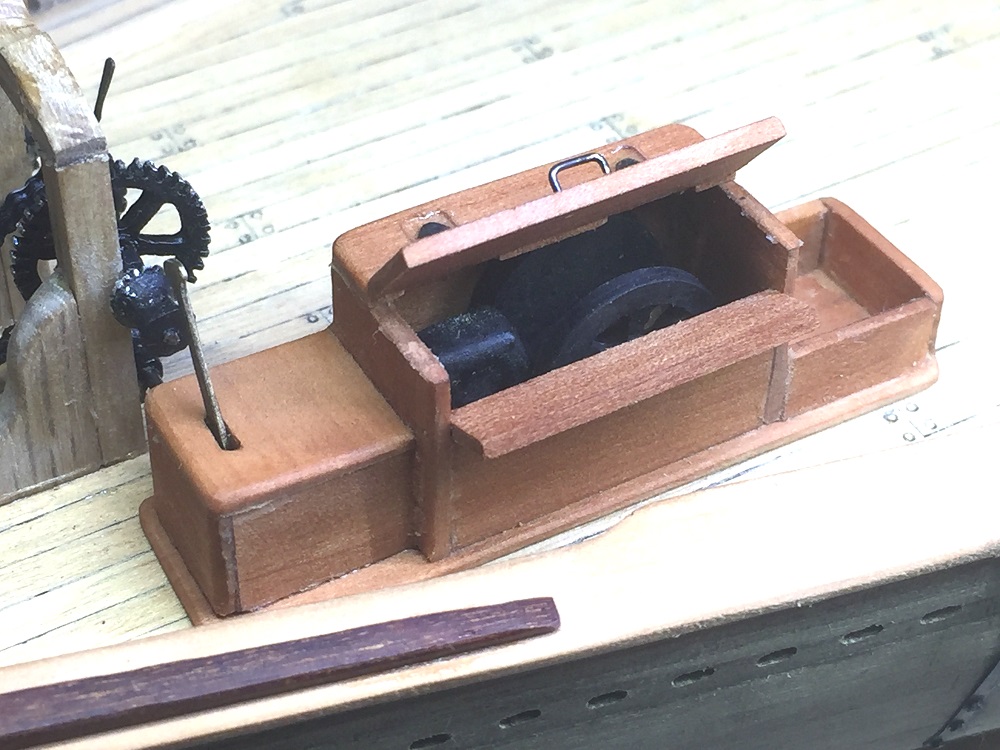 デッキに取付けて動力BOXの蓋を開けるとディーゼルエンジンが見えるが色が黒いとやはり 見えにくい、もう少しリアルな色が良かったか?只プラモじゃあるまいにという思いがあるので 、このあたりはまだまだ勉強していかねばと思う
Because I wanted to show end metal fittings, I made it this form.
When I can possess a deck and open a cover of wheel engune housing, I see a diesel engine.
 ウィンドラスの全貌、アンカーは両側でロープとチェーンで左右異なり、それぞれ別々に昇降 されるらしい、実際のドラムの駆動方法が解らずまま組み立てたが、観た感じはそれらしく
なったように思う 
he total picture of the wind lass.It is a chain, and an anchor is different from a rope in right and left at both sides, and it is gone up and down separately each.
I assembled it without knowing the drive method of the real drum.
Ich male die Ausrüstung vom Werkzeugschwarzen.Wenn nur die Spitze der Ausrüstung vom Gemälde reißt, gewinne ich einen Akzent.Ich sehe es wie einen Zahn.Einer Zeichnung zufolge stecke ich Holz um eine TrommelEine Antriebskette Drehungswinde wird nicht zum Werkzeug eingeschlossen.Ich sollte es mit Drähten produzieren.Ich verstehe nicht, wie zu machen ist.Es gab die Kette, die für die Verbesserung des Modells des Motorrades verkauft wurde, als ich es in einem Netz suchte.Kettenverbindungen werden zerstreut und setzen es einer um einen zusammen.Lösen Sie einen starken Geschmack von einer Verbindung der Radierung von einer kleben-geformten Sache, und mit lötendem Eisen in einen harzigen starken Geschmack zu passen, in nächster Träne auf und können Sie hinter sich keine Verbindung lassen; brauchen Sie es.Beide Seiten setzen es auf die gleiche Weise zusammen und trennen den Verbindung moiety von der Spitze und dem Boden.Ein einfach gutes Fühlen.Ich sehe wie eine echte Kette aus, wenn ich ihm Schwarzen male.Ich werde mit dieser Arbeitsqualität zufriedengestellt.Der Zahn der Antriebsabteilung ist auch Installations ru auf einem Installationsdeck.Das Segeln des Schiffes ist nur ein Verkauf, aber, wie für blaue Nase .T, blaue Nase, die .U eine Schraube gewinnt,Antrieb der Winde ist Antrieb mit den Dieselmotoren.Ich mache Windenmotorunterbringung.Ich mache den Motor, der innen hineingeht.Ich produziere es mit einem Baum eine Zeichnung und eine Farbe zufolge.Ich machte das Schwungrad vorsichtig.Es ist schwierig, zu verstehen, daß ich es mit dem Foto schwarz male.Ich mache ein Scharnier, fähig zu sein, die Decke zu eröffnen und zu schließen.Das Scharnier der Tür der Kabine ging mehr man nicht gesund.Ich machte ein dünne Leitung Endmetall Anproben und wurde vom Silber-löten begleitet und machte es und war fähig, es bis zum wireway-Ende zu unterstützen, daß ich einführte, unterstützen beide früher zu durch Messinglinie.Weil ich Endmetallanproben zeigen wollte, machte ich es zu dieser Form.Wenn ich ein Deck besitzen kann und eine Decke der Radmotorunterbringung eröffnen, sehe ich einen Dieselmotor.Das totale Bild des Windmädchens.Es ist eine Kette, und ein Anker ist in Recht und Linke bei beiden Seiten als ein Seil anders, und es hat jedes auf und ab getrennt erstrebt.Ich setzte es ohne die Antriebsmethode der wirklichen Trommel zu wissen zusammen.
フォアマストの根元部の製作
Production of the heel part of the fore mast
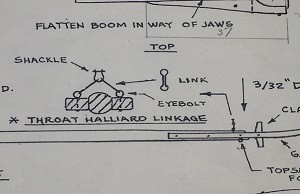
 デッキプレートのリングを黒檀で作り、ビレーピンを取り付けるリングはカステロを木工旋盤で成形、真鍮板で金具のリングを作成
I make the ring of the deck plate with ebony.The ring installing a belay pin uses refuse castero.Mold it with a woodwork lathe; is making mashita with a brass board at the ring of metal fittings.
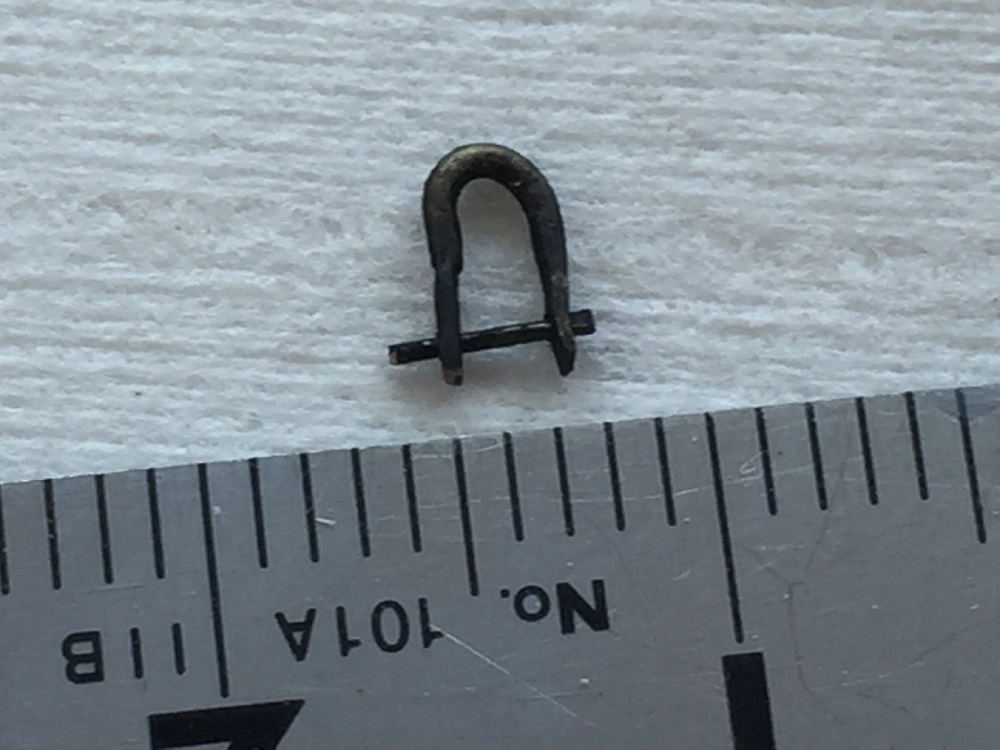 シャックルは真鍮線を曲げ、両側を叩き潰しその部分に0.5ミリのドリルで穴を開け、0.5の真鍮線の片側を潰したものを差し込みこれで何となくシャックルに見えるか、ちょっと歪な形
これだけ小さいとやはり難しい
The processing of the shackle bent brass route and smashed up both sides next.Cut a hole open with a drill of 0.5 millimeter and inserted the thing which smashed one side of 0.5 brass line in the part.
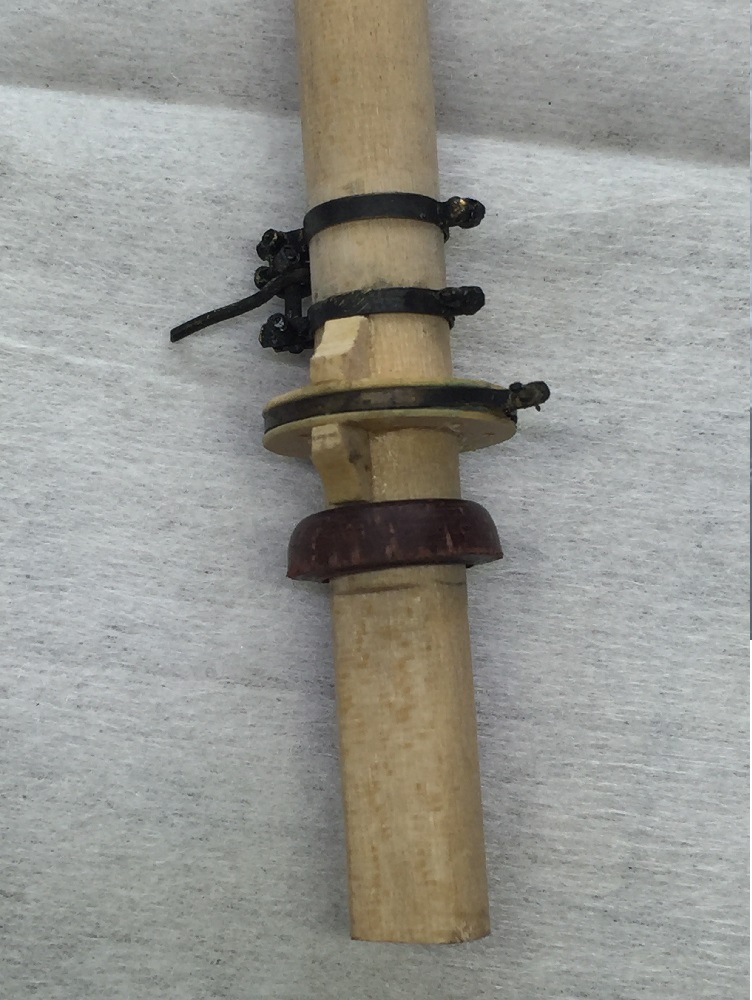 マストに取り付ける、図面の雰囲気は出てるか?
The atmosphere of the drawing to get on a mast comes out.
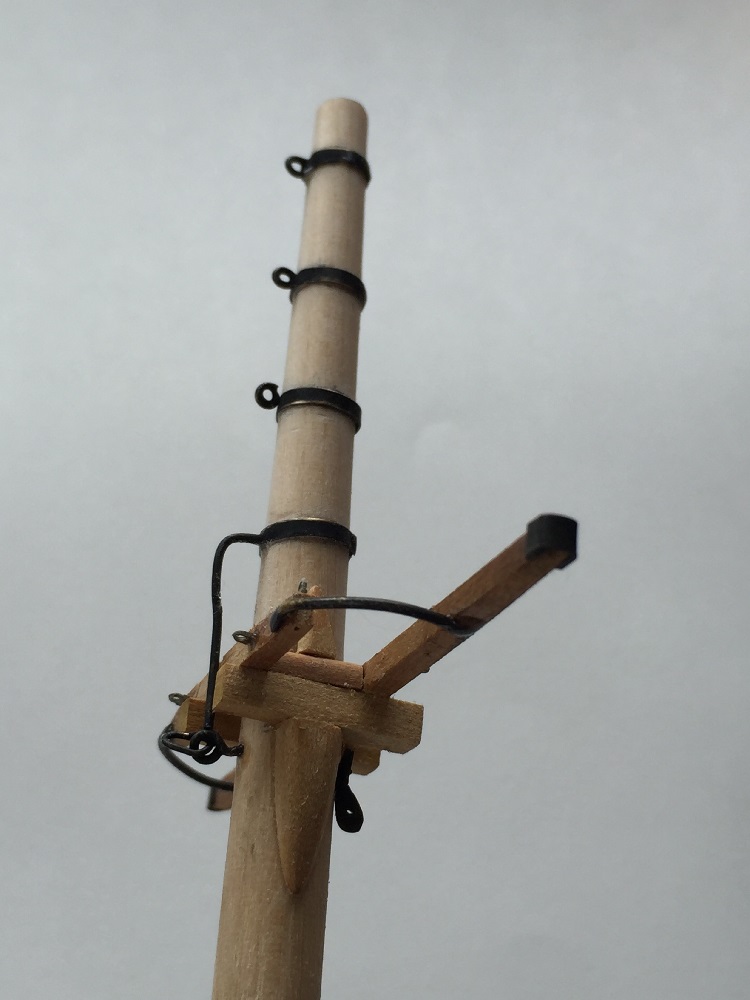
ロアーマストの上部に取り掛かる
ここも難しい金具だらけだ
I start the upper part of the lower mast.
Here is full of metal fittings hard to please, too
 まず、マストに巻き付く輪っかに小さなリングを取り付ける
双方のリングが直交すること
At first I install a small ring in circle to coil itself around a mast.
Both rings be perpendicular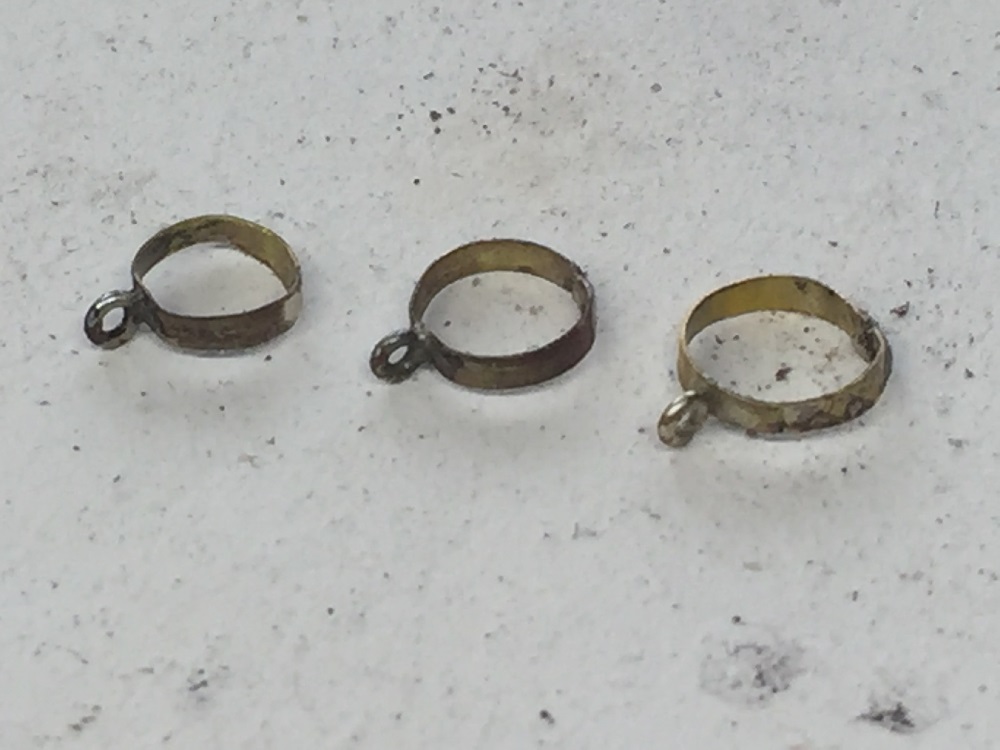
まず、真鍮の平板を耐火レンガの穴に入れ垂直に立てる
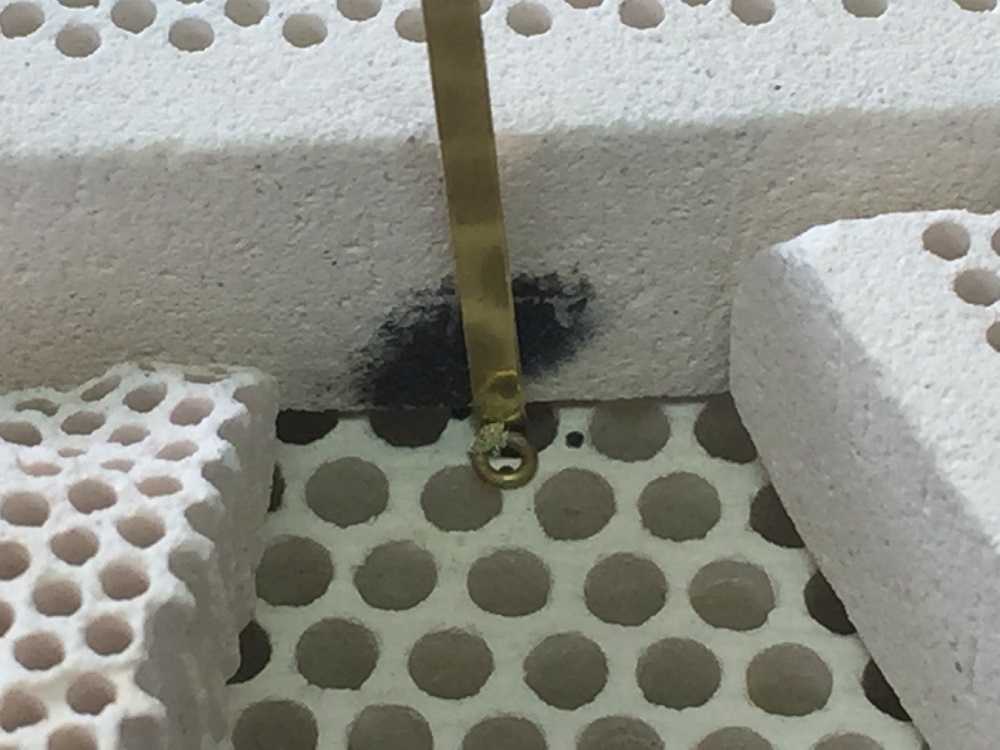 小さなリングを作り、レンガの上で密着させる
そうすることで直交の関係を作る
Begin the loss of the firebrick and make a flat board of the brass perpendicularly next.
I make a small ring and let you adhere on a brick.
I put on silver-soldering in the right angle and was made delicious.
うまく直角にロー着け出来ました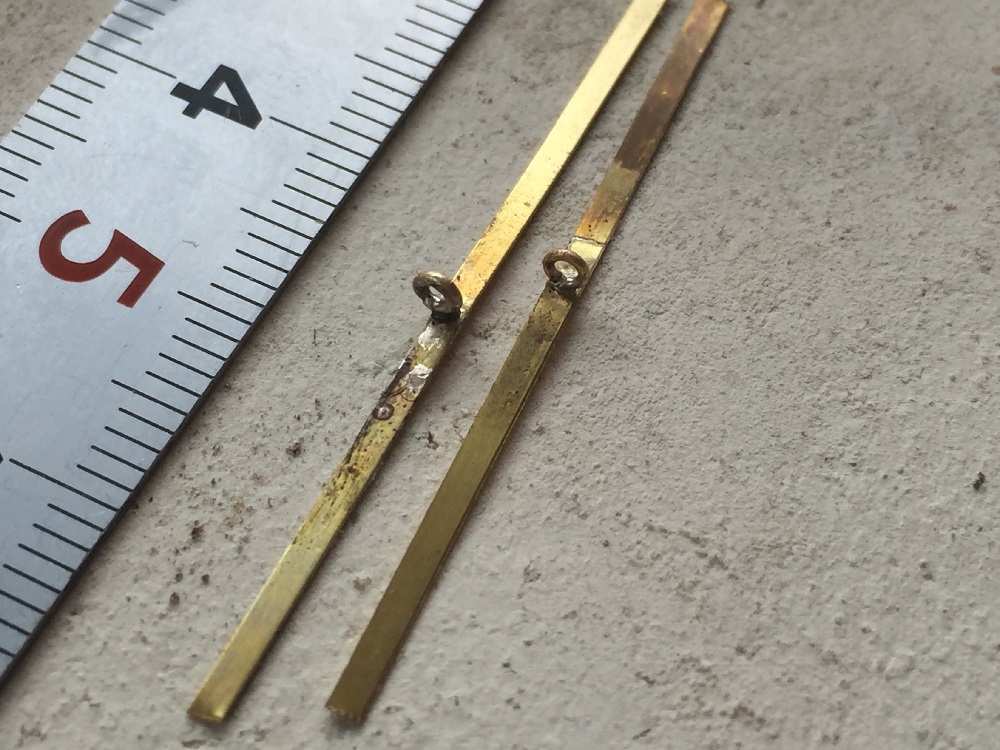
これをマストに巻きつけてニッパで切断した部分を再度ロー付け、これで上記のリングが完成
Gain silver-soldering again and do the part which I can coil myself around a mast and cut with a nipa.
The ring mentioned above is completed in this.I produce the other parts.
 他の部品も製作、図面のマストを貫通した金具はそのままでは製作できないので、入口部、出口部を別々に作り貫通させたように
見せかけることにする
I cannot just make the metal fittings which penetrated the mast of the drawing.
 I decide to pretend that I let I make a case oral region, an exit part separately and penetrate it
I try to assemble it
組み立ててみる
何となく感じは出ているか? でもロー付けはやはり難しい
ノウハウを掴むまで暫く掛かりそうです。
Is the feeling given somehow?But after all the silver-soldering charge account is difficult.
It seems to take it for a while till I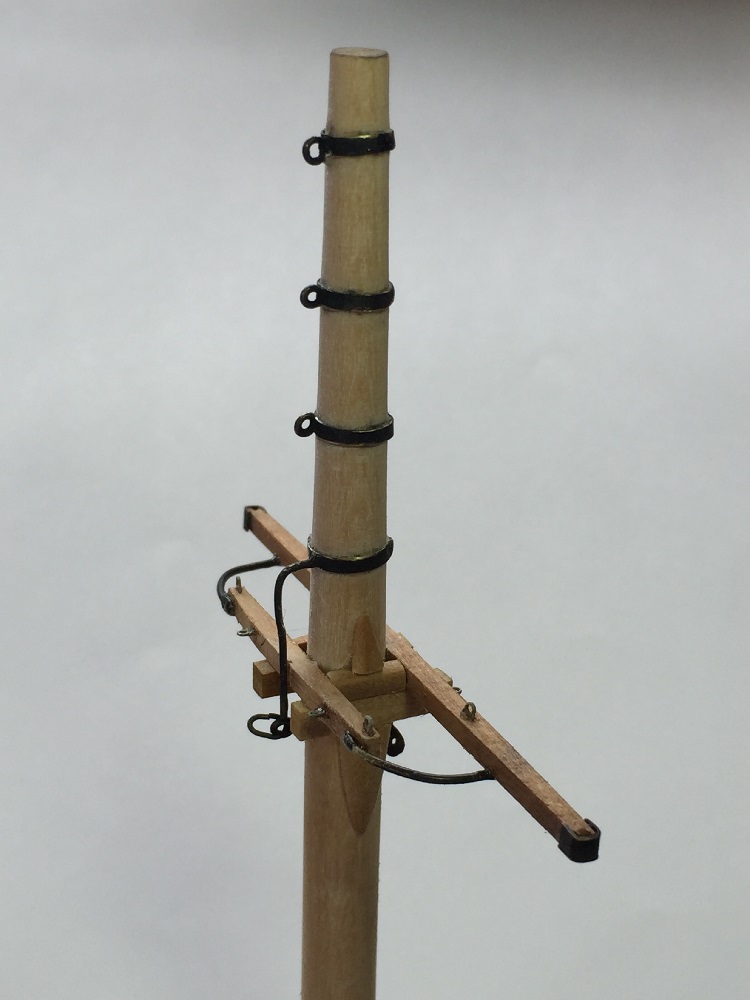 catch the know-how.
Produktion 1 von 14 #Vorhand Maste.Produktion des Quellenteiles des Vorhand Mastes.Ich mache den Ring vom Deckteller mit Ebenholz.Der Ring, der eine belay-Nadel installiert, benutzt Müll castero.Formen Sie es mit einer Holzwerkdrehbank; macht mashita beim Ring der Metallanproben mit einem Messingausschuß.Die Verarbeitung der Kette bog Messingstrecke und zerbrach auf beidem, unterstützt danach.Schnitt ein Loch offen für eine Bohrmaschine von 0.5 Millimetern und legte die Sache ein, die eine Seite von 0.5 Messingfalte im Teil zerschlug.Die Atmosphäre der Zeichnung, um einen Mast anzuziehen, kommt heraus.Ich beginne den oberen Teil des niedrigeren Mastes.Hier ist von Metallanproben voll, schwer auch zu gefallen.Zuerst installiere ich einen kleinen Ring in Kreis, um sich um einen Mast zu wickeln.Beide Ringe sind senkrecht.Fangen Sie den Verlust am firebrick an und machen Sie nächstem senkrecht aus dem Messing einen flachen Ausschuß.Ich mache einen kleinen Ring und ließ Sie auf einem Backstein haften.Ich setzte darauf Silber-soldering@in der rechte Winkel und wurde köstlich gemacht.Gewinn, der wieder Silber-lötet, und macht den Teil, den ich mich mit einem nipa um einen Mast und einen Schnitt wickeln kann.
Der oben erwähnte Ring wird darin vervollständigt.Ich produziere die anderen Teile.Ich kann nicht nur die Metallanproben machen, die den Mast von der Zeichnung durchdrangen.Ich entscheide mich vorzugeben, daß ich ließ, mache ich einen Fall zu mündlichem Gebiet, ein Ausgangsteil getrennt und dringt es durch
Ich bemühe mich, es zusammenzusetzen.Ist das Fühlen gegeben irgendwie?Aber nach dem ganzen Silber-lötenden laufenden Konto ist schwierig.Es scheint es für eine Weile zu nehmen, bis ich die Sachkenntnis fange.
 メインマストの製作
Main masts
メインマストの下部はフォアマストと少し異なりメタルが巻きつけてある
Metal is wound around the retainer of the main mast.
It’s slightly different from a fore mast.
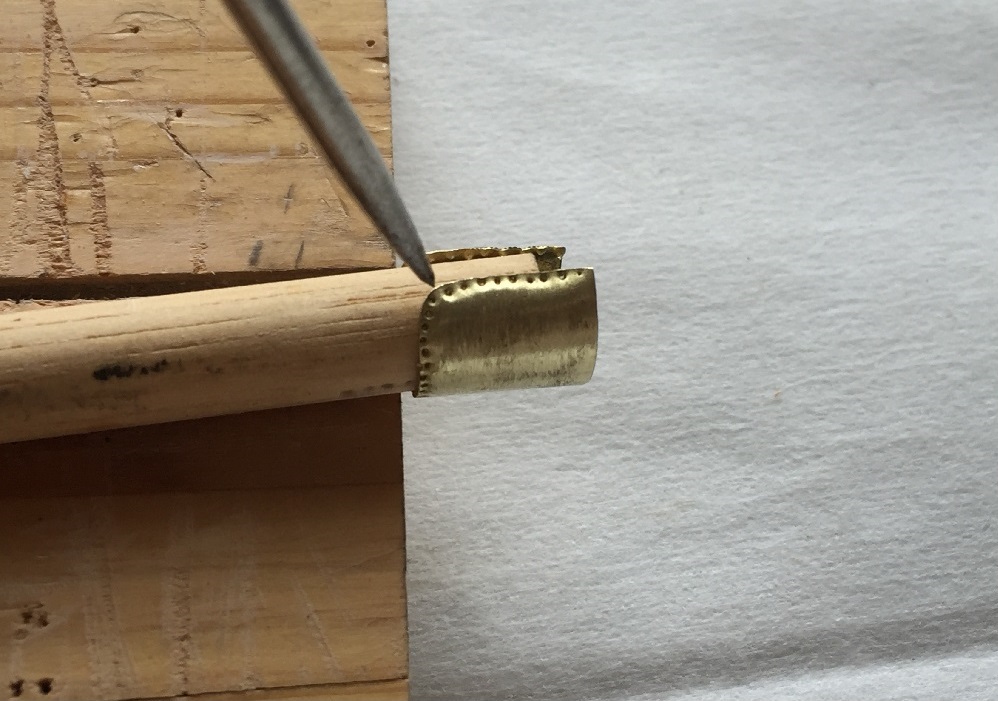 真鍮板を切り取りその縁に釘跡をポンチで打ち付け、それらしくした
I cut a brass board.
Hit the nail trace with a caricature to the edge for brass; masu dated.
It seems that I spread them.
 黒染めし、組み立てる、釘跡は凹んだ方を表側にしたが、ひょっとして凸側を表にした
方が良かったのかと思いながら組み立てたが
Be dyed and assemble it.
The nail trace did the one that became dented in a face.
Possibly you might make a convex side a list.
 上部はフォアマストと同じように製作
The upper part is produced in the same way as a fore mast
 デッキの差込部付近の部品を製作。材質は黒檀とペアウッド
丸い柱と四角い柱はマホガニーで製作
I produce a part of the neighborhood of gripes department of the deck.
The materials used ebony and pair Wood.
I produced the round pillar and the square pillar in mahogany.

デッキの部分が出来た
The part of the deck was made.
Produktionsprodukttagebuch Blauer NoseCanadian-Schoner #15
Es ist 1/64 BlueNose von MODELSHIPWAY.
Es ist dieses Mal die Verarbeitung 1 des Hauptmastes.
Es ist ein followup davon #14 (1 Mal) letztes Mal.
Mitglied bei Yonekawa-Produktion .
Eine Arbeit von Yonekawa
Metall wird um den Vorschuß des Hauptmastes gewickelt.Ich bin als ein Vorhand Mast etwas anders.Ich schnitt einen Messingausschuß.Treffen Sie die Nagelspur für Messing mit einer Karikatur zum Rand; masu datierte.Es scheint, daß ich sie ausbreitete.Wird gefärbt und macht Schwarzen und setzt es zusammen.Die Nagelspur machte den einen, der in einem Gesicht verbeult wurde.Möglicherweise könnten Sie eine konvexe Seite zu einer Liste machen.Der obere Teil wird auf die gleiche Weise wie einen Vor Mast produziert.Ich produziere einen Teil der Nachbarschaft der Bauchschmerzen-Abteilung des Deckes.Die Materialien benutzten Ebenholz und Paarholz.Ich produzierte den runden Pfeiler und den quadratischen Pfeiler in Mahagoni.Der Teil des Deckes wurde gemacht.
トップマストの製作
トップマストにはリギング用のプーリーが嵌め込んであるので
 その部分の製作。1ミリのエンドミルで長穴を貫通させる。
A pulley is done the internal organs of in a topmast.The production of the part.
I penetrate a long hole with an end mill of 1 mm.
 0.5ミリのドリルでプーリー中心の穴を貫通
I penetrate a pulley-centered hole with a drill of 0.5 mm .
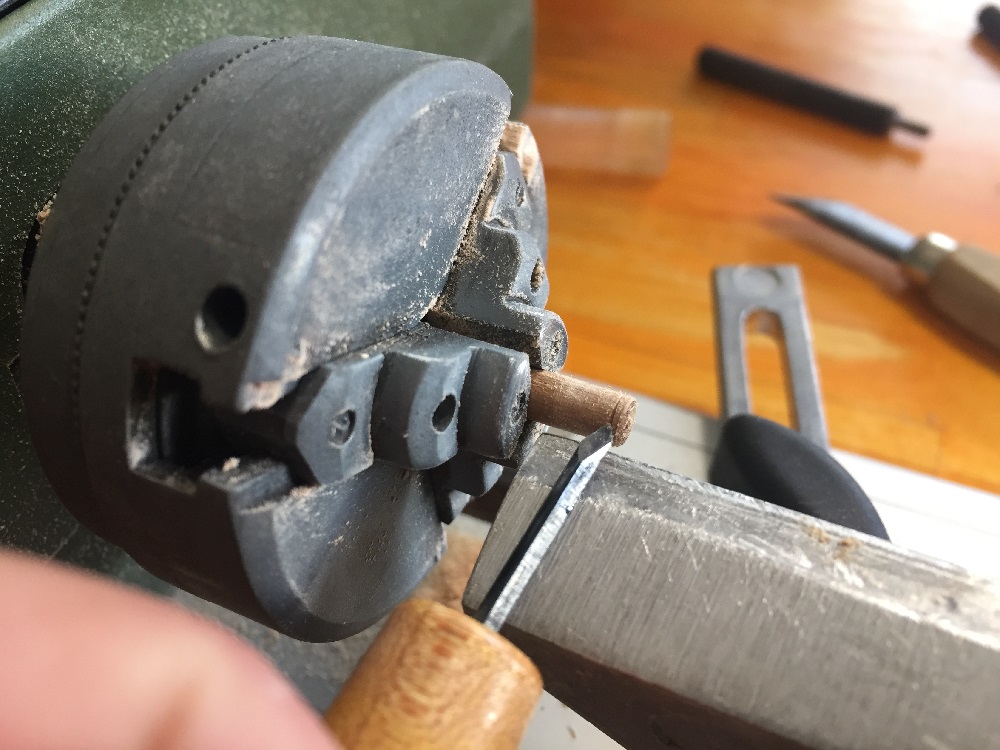 プーリーの製作。木工旋盤に丸材を把握し先の尖った彫刻刀でプーリーの溝を
彫り込み
The production of the pulley.
I set a log to a woodwork lathe.
I carve the ditch of the pulley with a former sharp chisel and am crowded.
 ゆっくり回転させながらノコを当てると綺麗に切断
I can cut it off neatly when I win a saw while turning it slowly.
0.5mm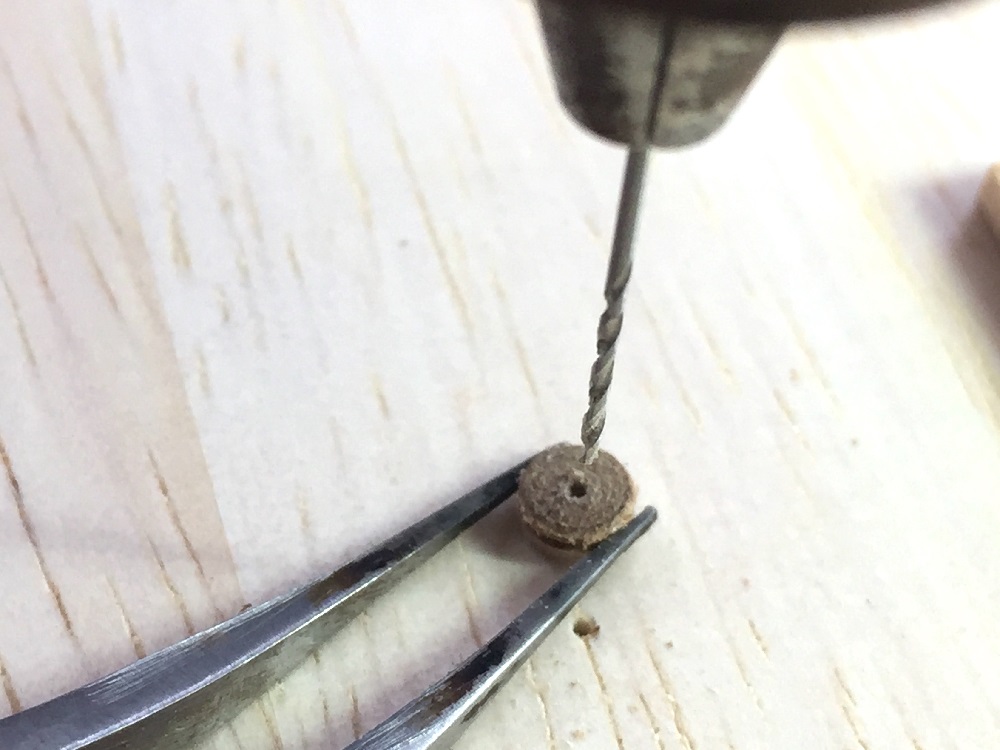 のドリルでプーリーの中心穴を貫通
I let you penetrate the central bore of the pulley with 0.5mm drill.
 0.5ミリの真鍮線を挿入し組立、一応それらしくなった
I am I insert brass line of 0.5mm, and have good assembling.
ト ップマストの先端近くに金属のバンドを取り付けるらしい
こういう小さい部品のロー付けは私のような初心者には非常に難しい
I install a metal band in the tip neighborhood of the topmast.
The Silver-Soldering account of a small part is very difficult for a beginner
 真鍮の1.2ミリの平板と真鍮線で部品の製作
It is produced the part in a flat board and a brass line of 1.2 mm of the brass
 耐火レンガの上に平板と真鍮線の部品を置き、ロー付け中に動かぬようレンガの破片で押さえる
バーナーの火は周りから熱してゆき、決して直接部品に当てないこと
こういう小さい部品は加熱しすぎると一瞬に溶 けてしまう
けてしまう
I put a flat board and a part of the brass line on a firebrick.
I control a part by the piece of the brick not to move duringSilver-Soldering account work.
The fire of the burner heats it from the circumference.
Never expose a direct part to flame.
When the small part heats too much, I melt in an instant.
 なんとか、くっついた
I was able to join it somehow.
 それを丸めて更にロー付け、先につけた真鍮線の部品が再度銀ローが溶けてはずれないことを祈りながら
I round it, and theSilver-Soldering is more dated it.
 I pray for I can dissolve a part of the brass line which I soaked earlier, and not coming.
I join it in a circle
I went well.
Some edges of the flat board melted.
 丸くくっついた、上手く行ったが平板の端が少し溶けたか?
まあ、修正出来る範囲
Oh, the range that I can revise.
Be dyed and do black and fit it in a mast.
 黒染めしてマストにはめ込む、なんとか図面の様になった
It seems to have become a drawing somehow.
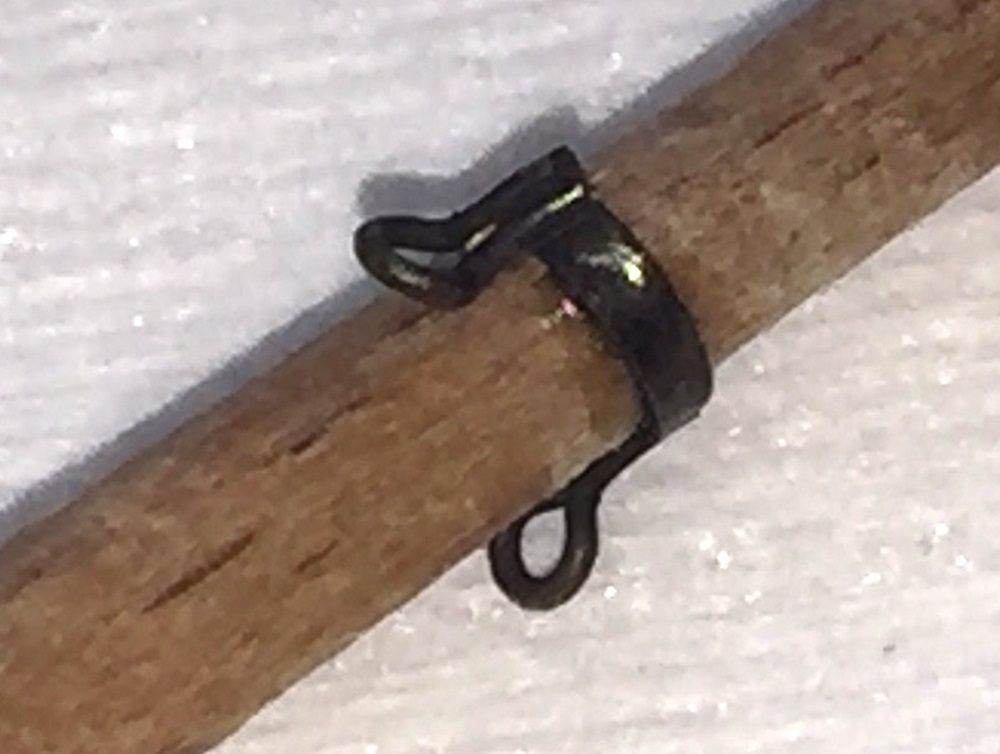
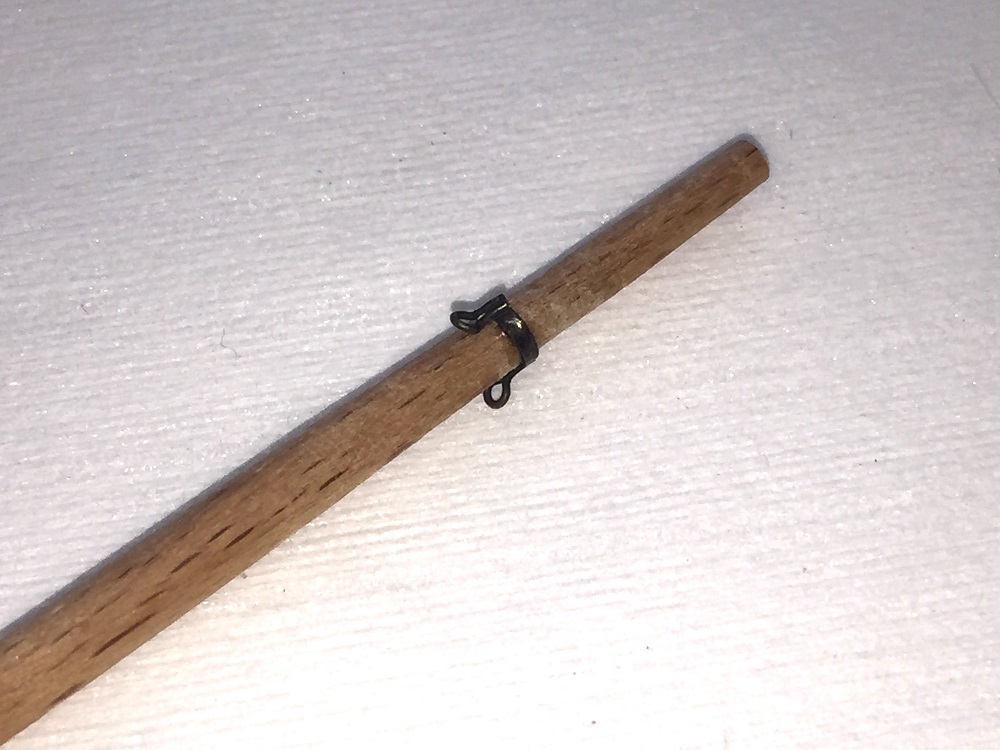
 次は最先端のフラッグを留める飾りの製作
こんな小さい部分に長穴を加工せよというのか?
Is the production of the decoration that the next leaves the highest flag what process a long hole into such a small part?
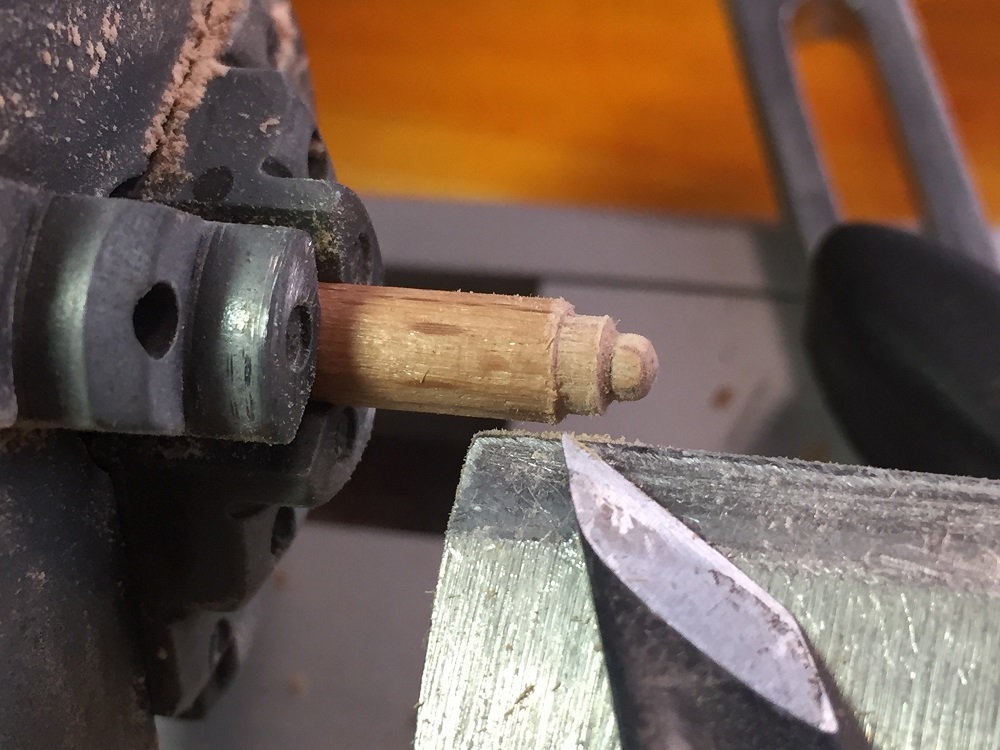 取りあえず、木工旋盤で形作り
I make form with a woodwork lathe first of all.
 0.5ミリのエンドミルで長穴加工を試みる
I try long hole processing with an end mill of 0.5mm.
 もう少しのところで穴が破れる、やはり無理なようで諦める
A loss is almost destroyed; after all it seems to be impossible, and give it up

 0.5ミリのドリルで穴を明け、それでごまかすことにする。
I decide to pocket a hole in end, it with a drill of 0.5 mm.

 フォアマストとメインマストのトップマストが出来た
The topmast of a foremast and the mine mast was made.
#16
Die Produktion (Produktion 3 des Mastes) des Toppmastes
Eine Rolle wird die internen Organe von in einem Toppmast gemacht. Die Produktion des Teiles. Ich dringe ein langes Loch mit einer Endmühle von 1 Millimetern durch und verarbeite es. Ich dringe mit einer ohrmaschine von 0.5 mm ein Rolle-zentriertes Loch durch und verarbeite es. Die Produktion der Rolle. Ich setzte mir einen Baumstamm zu einer Holzwerkdrehbank. Ich schnitze den Graben von der Rolle mit einem ehemaligen scharfen Meißel und werde gedrängt. Ich kann es ordentlich abschneiden, wenn ich eine Säge gewinne, während ich es langsam dreht. Ich ließ Sie den zentralen Langweiler von der Rolle mit 0.5mm Bohrmaschine durchdringen. Ich bin, ich lege Messinglinie von 0.5 mm ein, und hat Gutes, das sich versammelt. Ich installiere eine Metallband in der Spitzennachbarschaft des Toppmastes. Das Silber-lötende Konto eines kleinen Teiles ist für einen Anfänger sehr schwierig. Es wird die Rolle in einem flachen Ausschuß und einer Messingart von 1.2mm vom Messing produziert. Ich setzte auf einen firebrick einen flachen Ausschuß und einen Teil der Messinglinie. Ich kontrolliere durch das Stück des Backsteines einen Teil, um keine duringSilver-lötende Kontoarbeit zu bewegen. Das Feuer des Brenners heizt es vom Umfang. Setzen Sie Flamme nie einen direkten Teil aus. Wenn sich der kleine Teil zu viel erwärmt, schmelze ich in einem Augenblick. Ich war fähig, es irgendwie zu verbinden. Ich runde es, und das TheSilver-löten wird es mehr datiert. Ich bete, damit ich einen Teil von der Messinglinie auflösen kann, den ich früher durchnäßte, und das nicht Kommen. Ich verbinde es in einem Kreis. Ich ging gut. Einiges schiebt sich vom flachen Ausschuß, der zerschmolzen wird. Ach, die Auswahl, die ich revidieren kann. Wird gefärbt und macht Schwarzen und fügt es in einen Mast ein. Es scheint eine Zeichnung irgendwie geworden zu sein Ist die Produktion der Dekoration der die nächsten Blätter die höchste Fahne welcher Prozeß ein langes Loch in so einen kleinen Teil? Ich mache zuerst Form mit einer Holzwerkdrehbank aus allem Ich versuche lange Lochverarbeitung mit einer Endmühle von 0.5mm Ein Verlust wird fast zerstört; es scheint doch unmöglich zu sein, und gibt es auf Ich beschließe, ein Loch in Ende, es mit einer Bohrmaschine von 0.5 mm, einzustecken. Der Toppmast eines Vorhand Mastes und der Bergwerkmast wurden gemacht
 トップマストと舵の製作
ロアーマストとトップマストの接続のための金具の製作
1.5ミリの真鍮板にマストの径に合わせて穴加工
外形の成形、ディスクグラインダーとペーパーで仕上げ
 The production of the metal fittings which connect a topmast to a lower mast
It is machined a hole to the diameter of the mast by a brass board of 1.5mm.The molding of the external form,
I seem to finish it with a disk grinder and paper.
 真鍮板をコの字に曲げ両側に穴加工、止め金具の完成
Bend a brass board to the character of KO, and hole processing stop on both sides;
 それぞれを黒染めしてトップマストを組み付ける
これでマストの完成となる
the completion of metal fittings
Be dyed and do black of each.
I install a topmast.
I become the completion of the mast in this.
 デッキ上の天窓の製作、図面では詳細が分かりにくいので
キャビンの天窓と同じ仕様にした
The production of the skylight on the deck.
The details are incomprehensible by the drawing.
I made it specifications same as the skylight of the cabin.
 船内に入る出入り口、スライドルーフと上下のスライドドア
でも、この間口で出入りするには苦しそう
The doorway which is in the ship.
The slide door of a slide roof and the top and bottom.
I am painful to go in and out in this frontage.
 デッキへの接着、天窓の保護用の金棒は横向きなのか縦向きなのか
悩みながら、キャビンの天窓と同じ向きにした
I did whether the metal rod for the adhesion to a deck, the protection of the skylight was sideways-facing in the direction same as the skylight of the cabin while being troubled whether length was suitable for it.
 倉庫(釣った鱈を入れる倉庫か?)のハッチの製作
芯になる木材を整形し、その表面に側板、蓋、枠を貼る
I have orthopedic treatment of wood becoming the core of the hatch of the warehouse (a warehouse to put the cod which I caught in?) and complete a side plate, a cover, the frames on the surface.
 ロープのリングは、ここも電線管止を利用する
写真の左端はリングを作るため0.5ミリの真鍮線を1ミリのドリルに巻きつけ
その隣のハープの金切鋏で切断(このハサミはかなりよく切れる)
切れたリングを電線管に通しリングのつなぎ目をペンチでくっつけ
その部分をロー付けして出来上がり
The making of the ring of the rope
I use kanshi of an electric wire for railroad models.
The left edge of the photograph makes a ring.
I wind brass route of 0.5 mm around a drill of 1 mm.
I cut it with iron cutter scissors made in HARP company (these scissors cut considerably well).
I put the ring which burst through the duct.
I attach the joint of the ring with pliers.
I do a silver soldering the part and completed.
ラ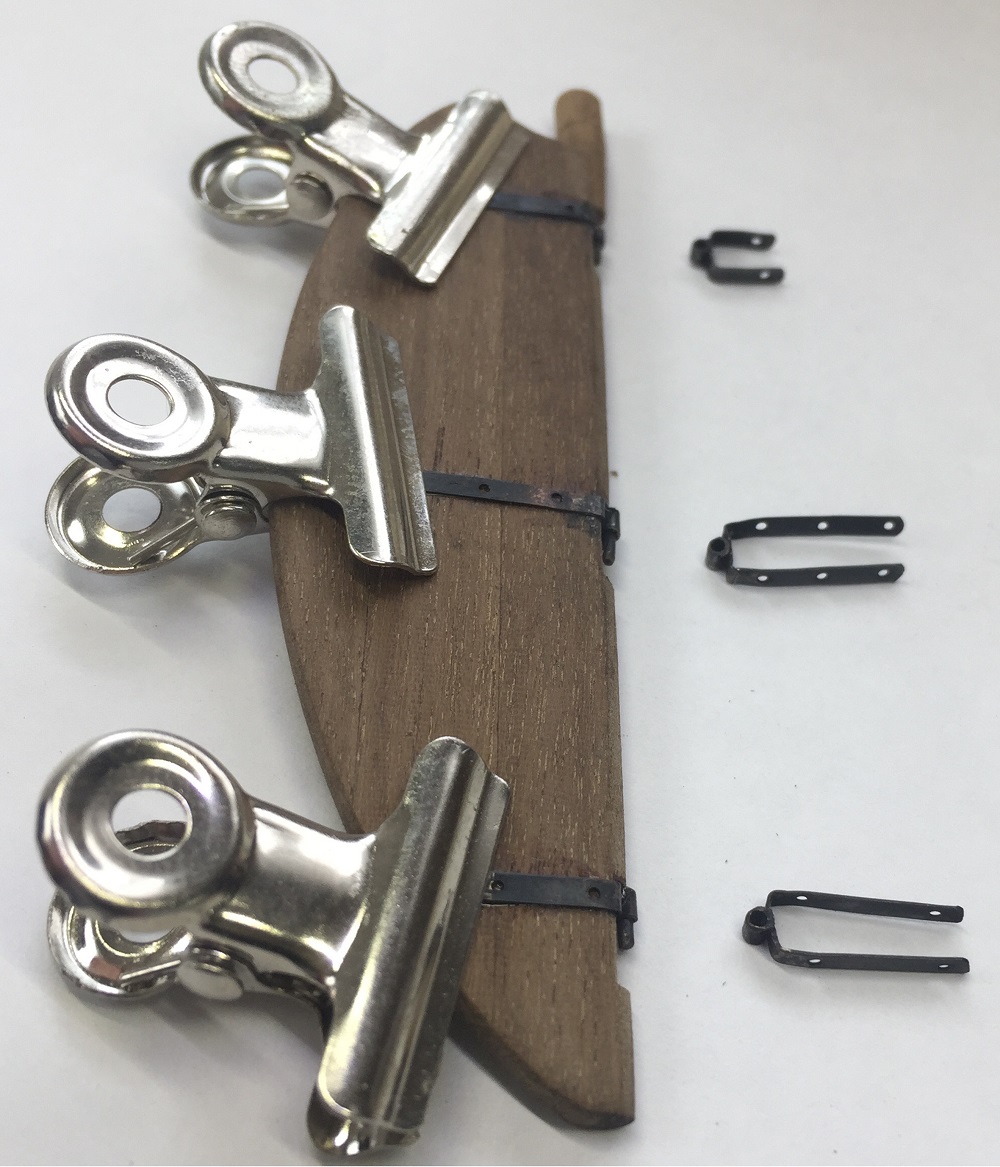 ダーの製作
ダーの製作
ウォールナットの細い板を3枚接着して成形
下へ行く程薄く、後ろへ行く程薄く成形
The production of the rudder.
I glue three pieces of thin boards of the walnut together and mold rudder.
The rudder becomes thin so as to go to the bottom.
In addition, rudder become thin so as to go behind.
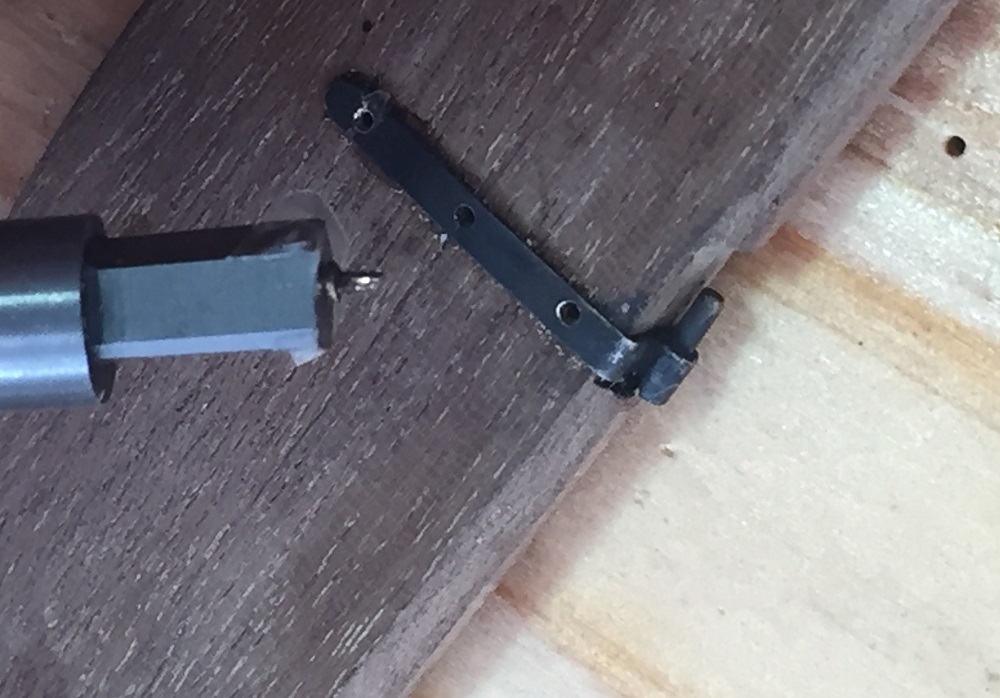
 ヒンジの金具は真鍮の平板に真鍮のパイプをロー付けしたもの
また、パイプに真鍮線をロー付けしそれを平板にロー付けしたもの
これを1Setとする
The metal fittings of the hinge do a silver-soldering a pipe of the brass in a flat board of the brass.
I do a silver-soldering brass line in a pipe.
I do a silve-soldering it monotonously.
I become one set of hinge in these
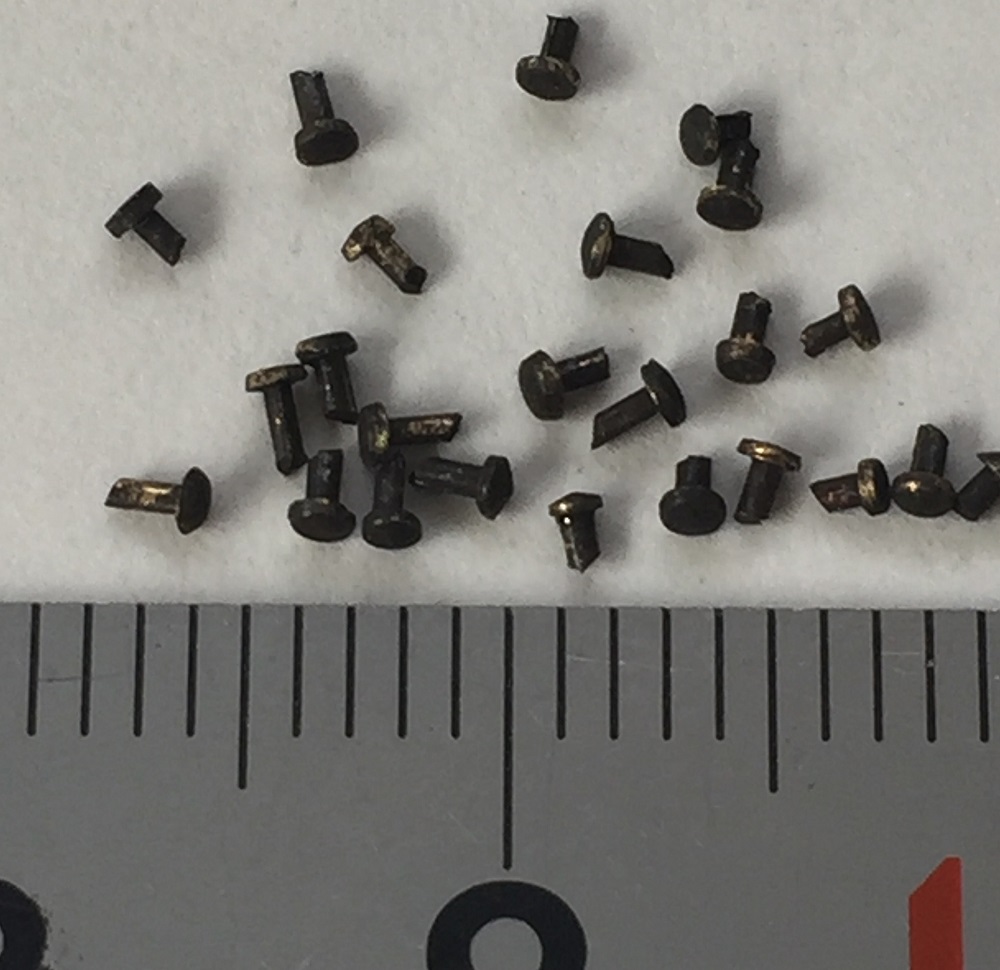 釘は頭を小さくし、薄板に両側から打ち込むので極力短く作る
The nail makes a head small.
 釘があまりにも短いので首下をピンセットでもつかみにくく
打ち込みの棒に両面テープで釘の頭を接着し打ち付ける
Because I devote myself to a sheet from both sides, I make it briefly as much as possible.
Because a nail is too short, I cannot get a neck bottom with tweezers.
I attach double-stick tape to the stick for ku ramming down and glue a nailhead together and nail it.
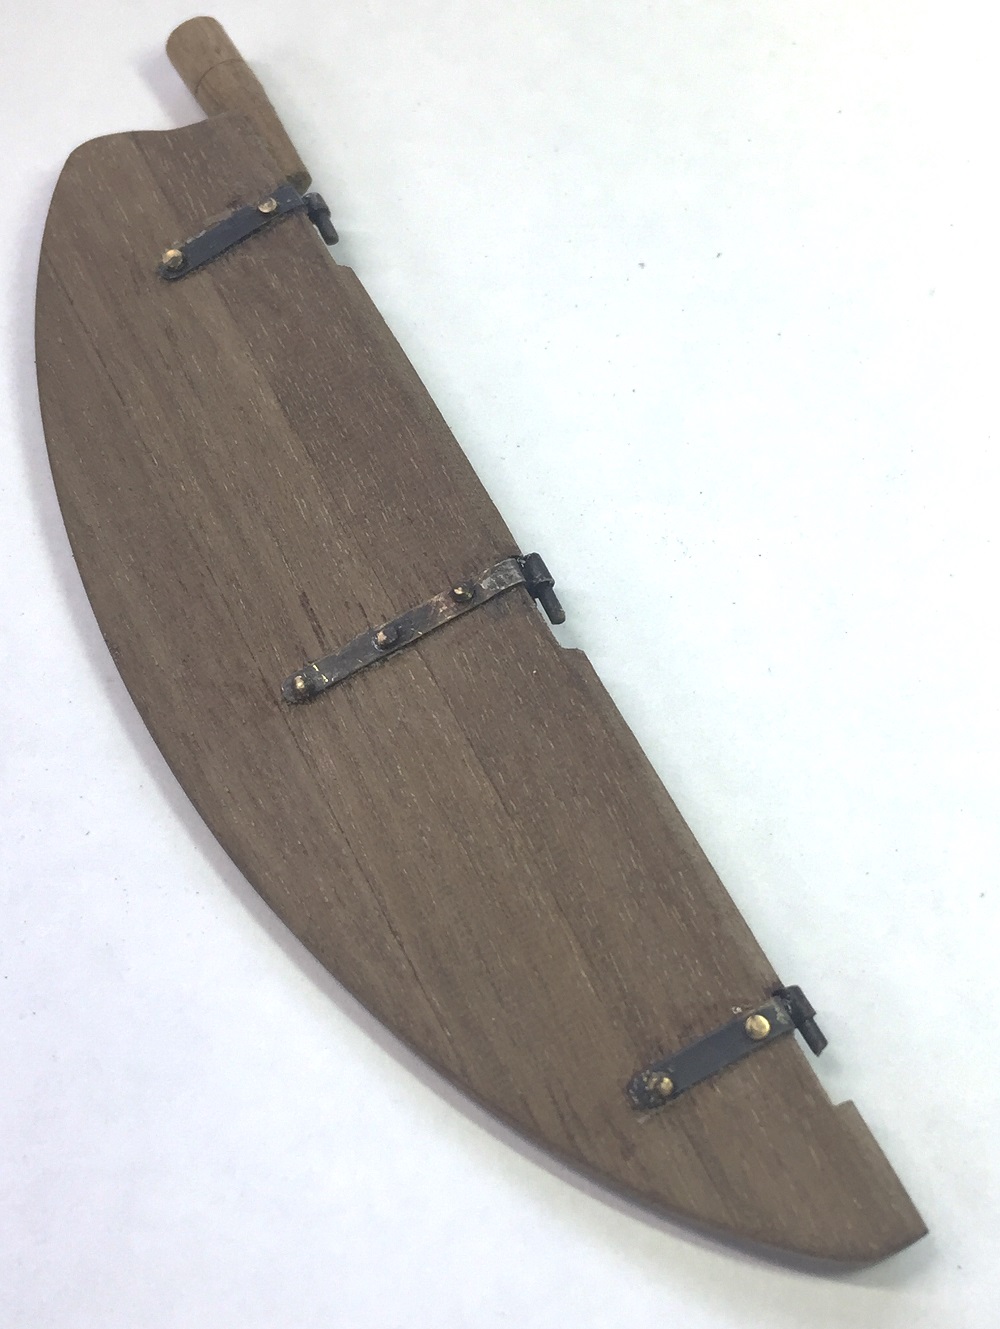 完成したラダー、ヒンジの金具は接着剤で留めてあり、釘は飾り程度
A finished rudder.
The metal fittings of the hinge are fastened with adhesive, and display the nail; degree.
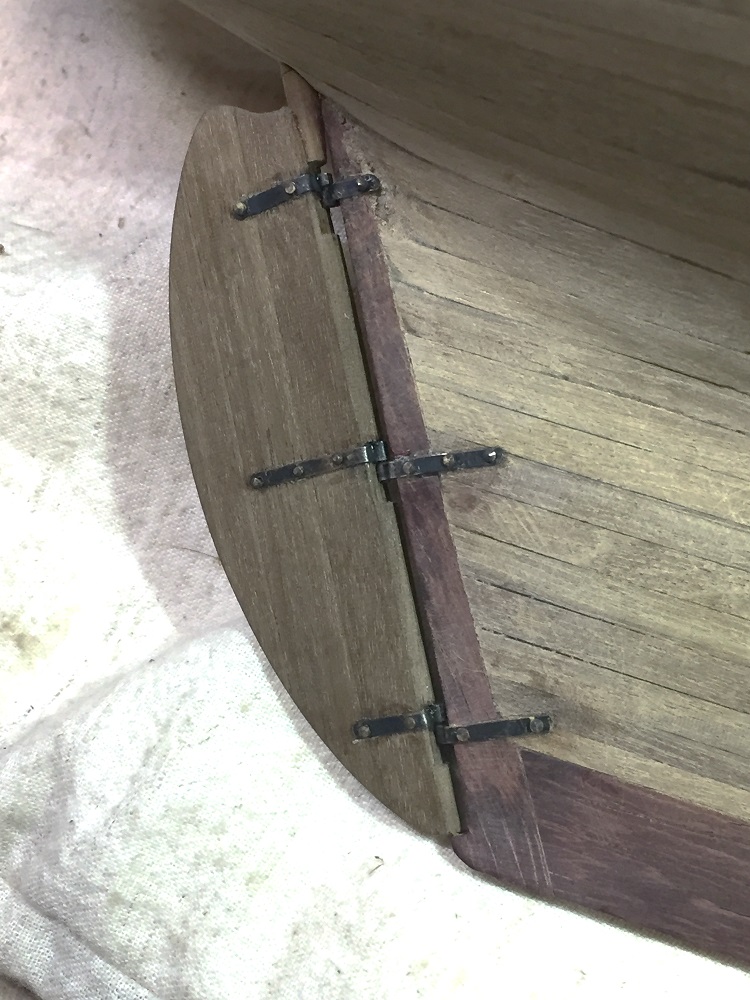 できたラダーをスタンポストに取り付ける
I install a done rudder in the Stan post.
Die Produktion von einem Toppmast und dem Ruder# 17
The production (production 3 of the mast) of the topmast Die Produktion von den Metallanproben, die einen Toppmast mit einem niedrigeren Mast verbinden
Es wird maschinell zum Durchmesser des Mastes von einem Messingausschuß von 1.5 ein Loch hergestellt. . .
Das Gießen der externen Form
Ich scheine es mit einem Diskettenschleifer und einem Papier zu beenden.
Biegen Sie einen Messingausschuß zum Charakter von KO, und Lochverarbeitungshalt auf beiden Seiten; die Vollendung der Metallanproben
Wird gefärbt und macht Schwarzen von jedem.
Ich installiere einen Toppmast.
Ich werde die Vollendung des Mastes darin.
Die Produktion des Dachfensters auf dem Deck.
Die Details sind durch die Zeichnung unverständlich.
Ich machte es genauen Angabe als das Dachfenster der Kabine gleich
Die Türöffnung, die im Schiff ist.
Die Rutschbahntür eines Rutschbahndaches und die Spitze und der Boden.
Ich bin schmerzhaft, in und aus in diese Front zu gehen.
Ich machte ob der Metallstab für die Haftfähigkeit zu einem Deck, der Schutz des Dachfensters seitwärts-blickte in die Richtung als das Dachfenster der Kabine gleich, während er gestört wurde, ob Länge geeignet dafür war.
Habe ich orthopädische Behandlung des Holzes, die der Kern der Luke des Lagerhauses (ein Lagerhaus, um den Kabeljau zu setzen, in dem ich fing?) wird, und vervollständige einen Seitenteller, eine Decke, die Rahmen auf der Oberfläche,
Das Machen vom Ring des Seiles
Ich benutze kanshi von einem elektrischen Draht, damit Eisenbahn modelliert.
Der linke Rand des Fotos macht einen Ring.
Ich wickele Messingstrecke von 0.5 mm um eine Bohrmaschine von 1 mm.
Ich schnitt es mit der eisernen Messerschere, die in HARFEN-Gesellschaft (diese Schere schnitt beachtlich gesund) gemacht wird,
Ich setzte den Ring, der durch die Leitung platzte.
Ich befestige das Gelenk des Ringes mit der Zange.
Ich mache ein Silber, das den Teil lötet, und vervollständigte
Die Produktion der Leiter
Ich klebe drei Stücke von dünnen Ausschüssen der Walnuß zusammen und forme es.
Das Ruder wird dünn, um zum Boden zu gehen.
Außerdem werde dünn, um hinten zu gehen.
Die Metallanproben des Scharniers machen ein Silber-löten in einen flachen Ausschuß des Messings einer Leitung vom Messing.
Ich mache eine Silber-lötende Messingfalte in einer Leitung.
Ich mache ein Silve-löten davon eintönig.
Ich werde ein Satz des Scharniers in diesen
Der Nagel macht klein einen Kopf.
Weil ich mich einem Laken von beiden Seiten widme, mache ich es als viel als mögliche kurz
Weil ein Nagel ist, zu kriegen Sie einen Kurzschluß, ich kann keinen Halsboden mit der Pinzette bekommen.
Ich befestige Doppelt-Stockband am Stock für ku, der hinunter stößt, und klebe zusammen einen nailhead und nagele es
Eine fertige Leiter
Die Metallanproben des Scharniers werden mit Heftpflaster befestigt und zeigen den Nagel; Grad
Ich installiere eine erledigte Leiter im Stan-Posten.
18 マスト・リングの作成
#18 The production of a mast-Ling
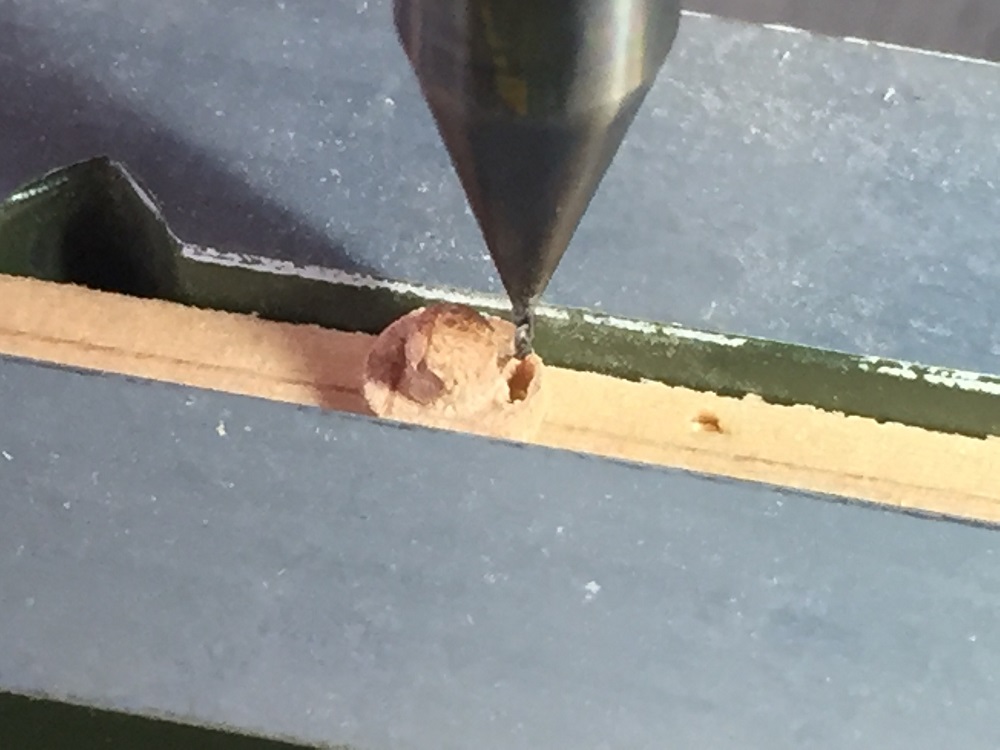
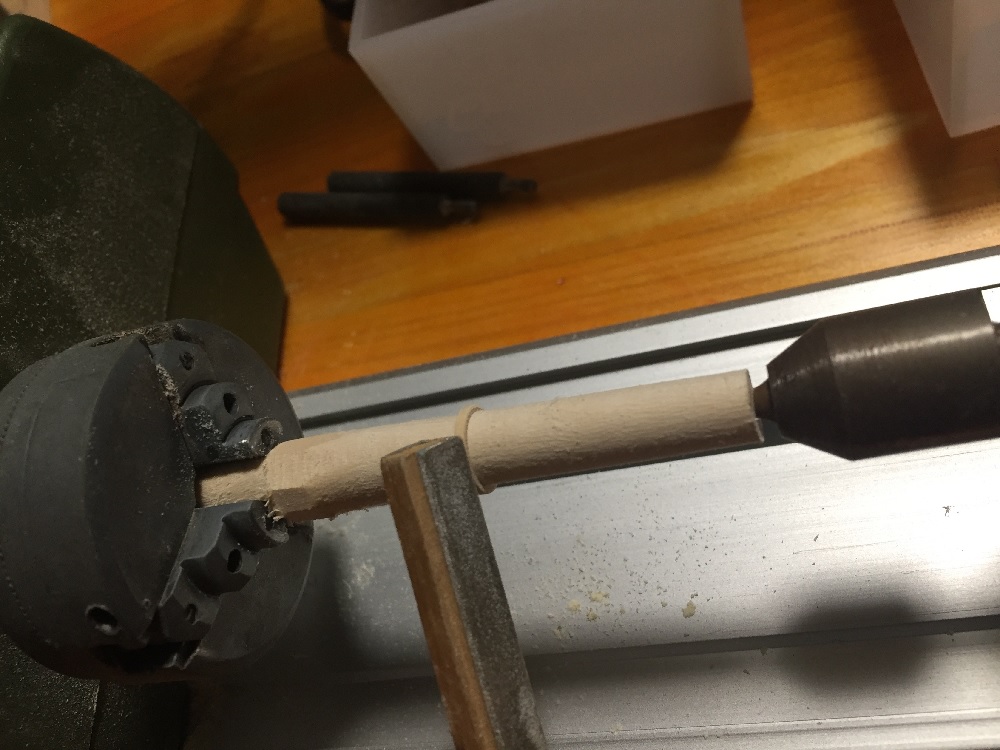
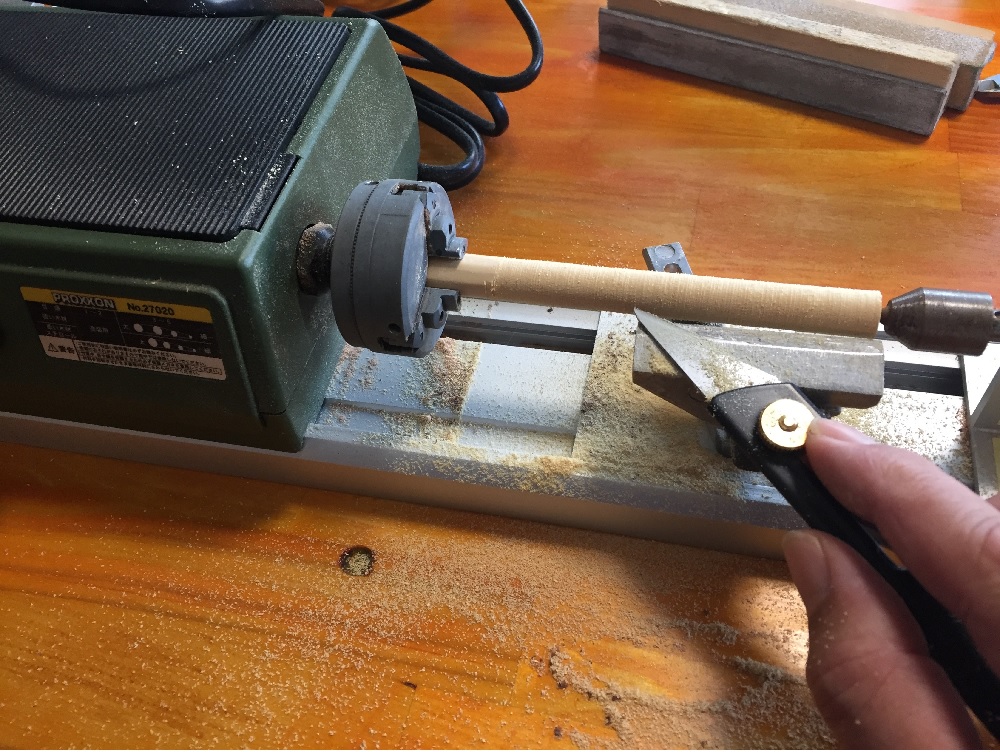 セールをマストに沿って上下させるのにマストに木製のリングを取り付けるように図面はなっているが、どういう方法で製作するか倶楽部の人に相談したところパイプを作って輪切りにする方法を教えてもらい、早速挑戦、材料はカステロ角材を木工旋盤で丸棒に削る。
It is written on a drawing to install a wooden ring on a mast.
I talked about what kind of method I produced it by with the menber of the club.
I had you teach a method you made a wooden pipe, and to cut into round slices.
I challenged it at once.
The materials are CASTERO squared lumber.
I sharpen it on a circle stick with a woodwork lathe.
 内径はドリルで設定寸法より1ミリ程度小さい穴を開ける、把持する部分が必要なので穴は貫通しない、少し内径が偏心しているので後工程として回転させてナイフで穴を拡張するとほぼ同芯に
I open the hole where around 1 mm is smaller than setting dimensions with a drill.
Because a part doing haji is necessary, the hole does not penetrate it.
Some inside diameters did a prejudiced mind, but the core was able to approximately revise it when I turned it by back process and expanded the hole with a knife.
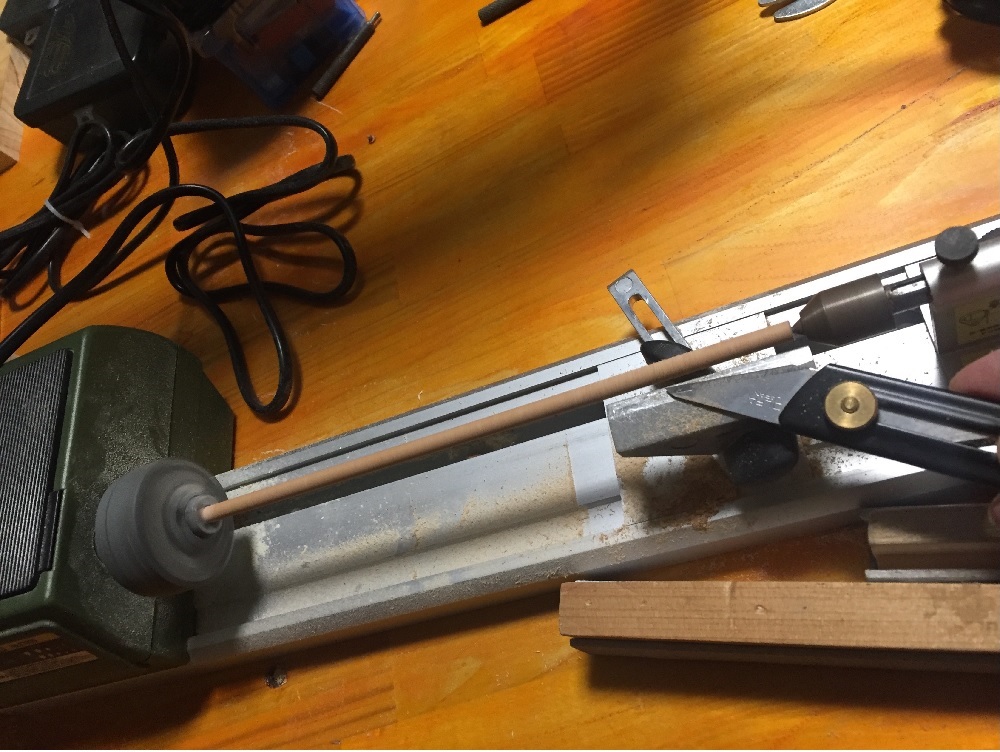
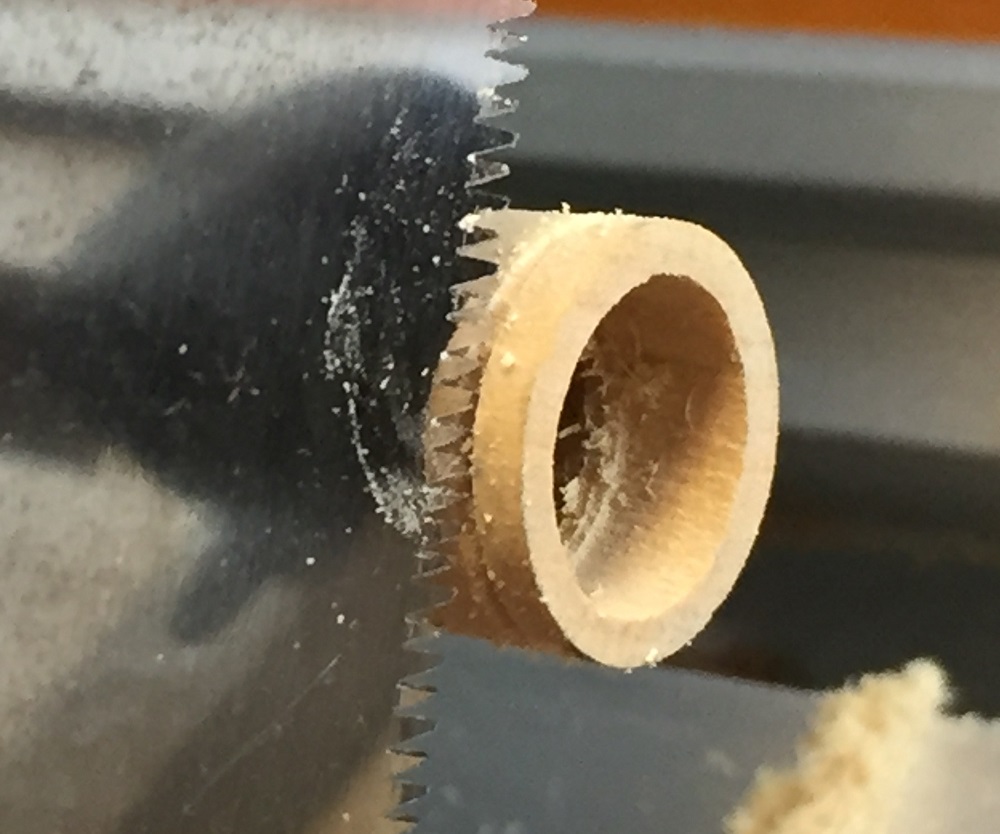 回転をゆっくりと落とし、ノコギリを逆に持って当てると簡単にスライス出来る
I down the turn of the lathe slowly so can easily slice it when I win a saw.
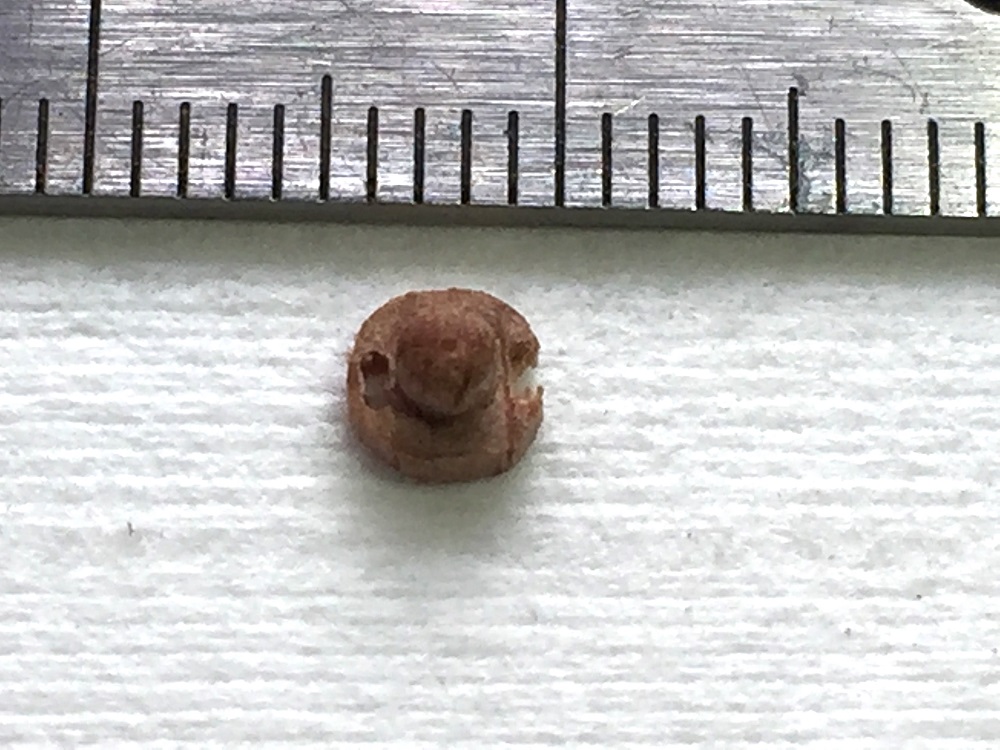
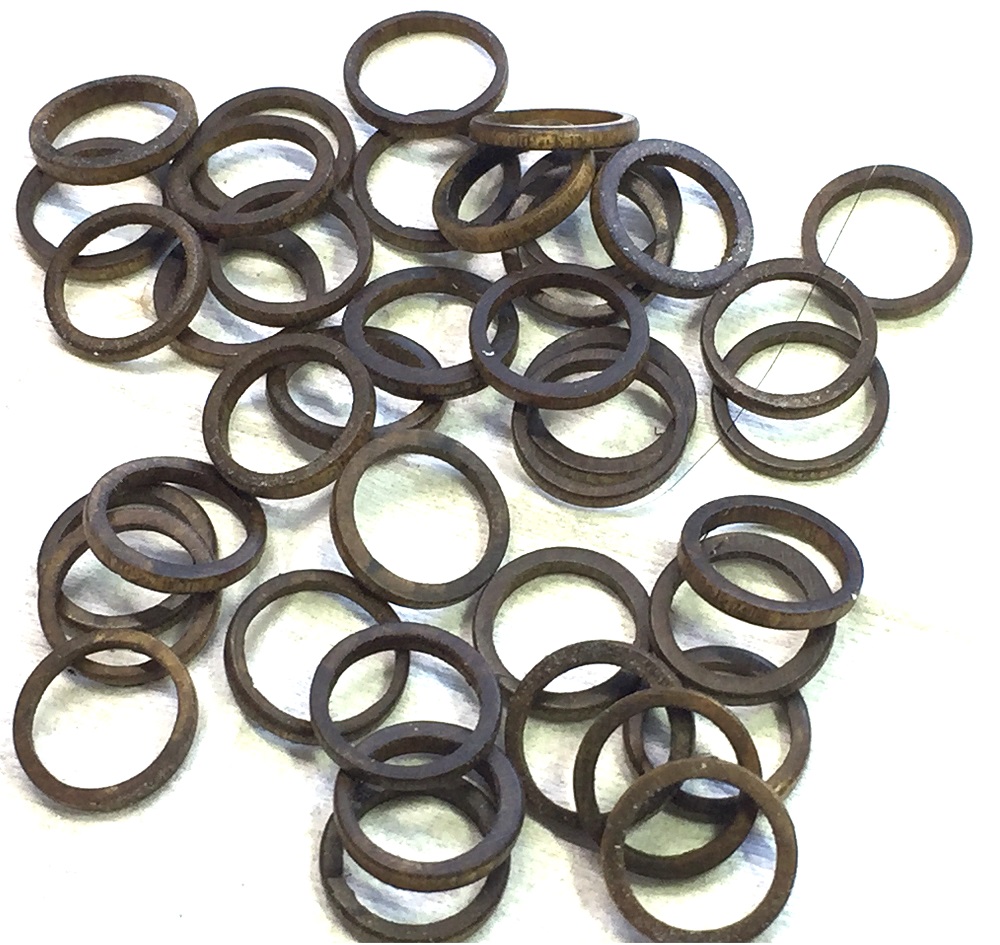
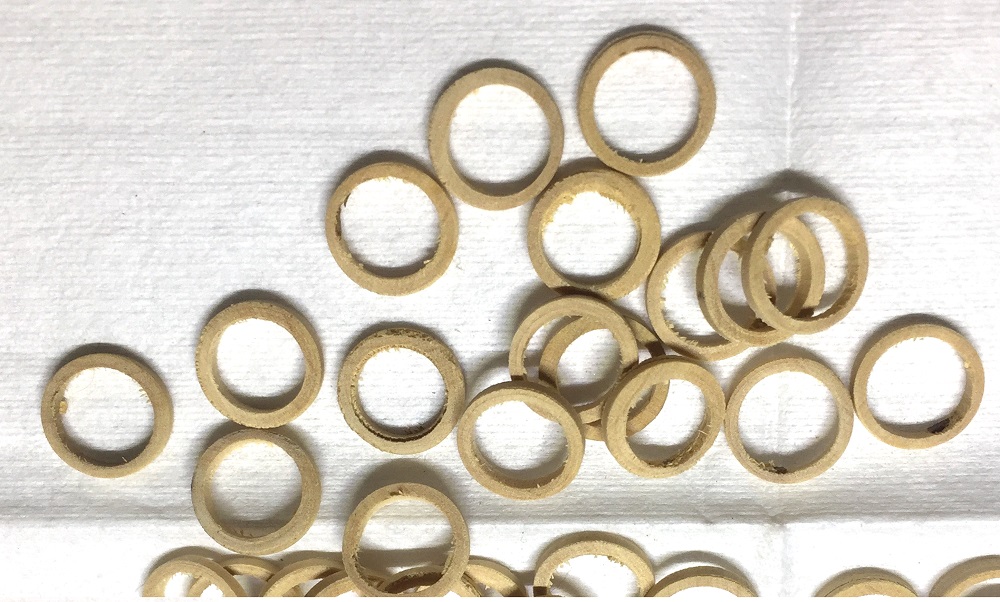 穴の拡張、切断を繰り返し、ほぼ同じ厚みに切断したもの
カステロはこういう細工をしても割れがない、優れもの
I reel the expansion of the hole, cutting and I get it and do hen.
The thing which I cut off in about the same thickness is made.
Even if the CASTERO does such a work, there is not breaking, So it’s superior wood.
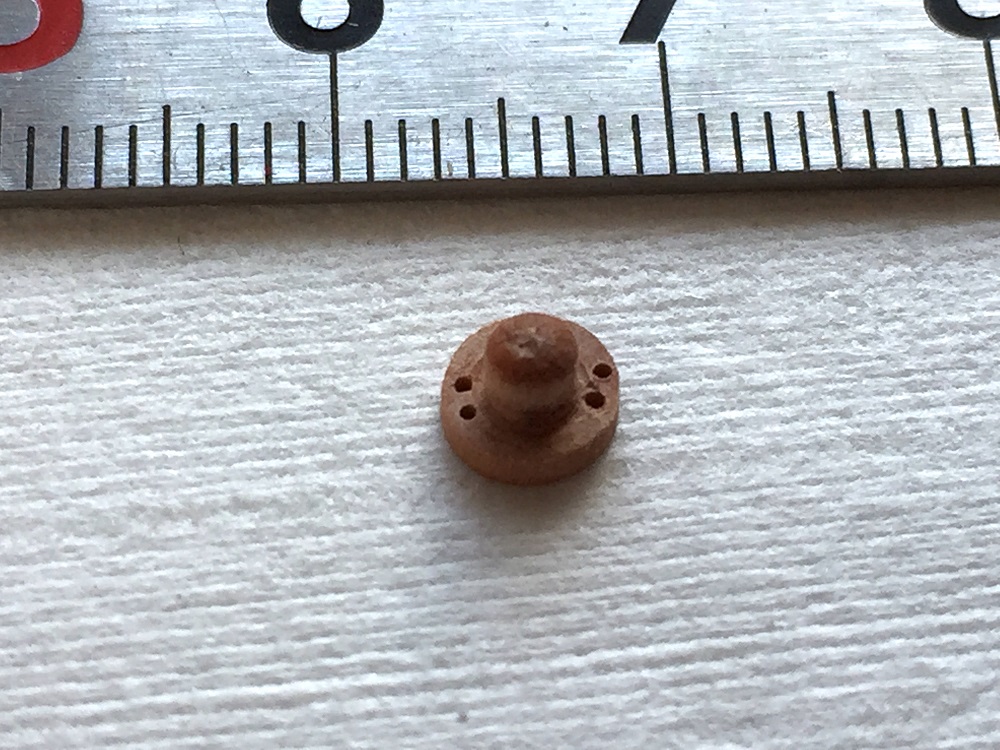
 内径寸法に合うテーパー状の治具を作り、そこに差し込んでペーパーで
面粗さを滑らかに、面取りもして綺麗に
I make a taper in accord with inside diameter dimensions-shaped jig.
It comes in there and smoothes off aspect coarseness with paper.
I do the chamfering and clean it.
カステロの白っぽい色では合わないのでオイルステンに暫く浸漬
ecause it is not correct with the whitish color of the CASTERO, it is dipped for a while by oil stain.
 充分乾燥してワトコオイルを塗って、バフで磨くとより綺麗になった
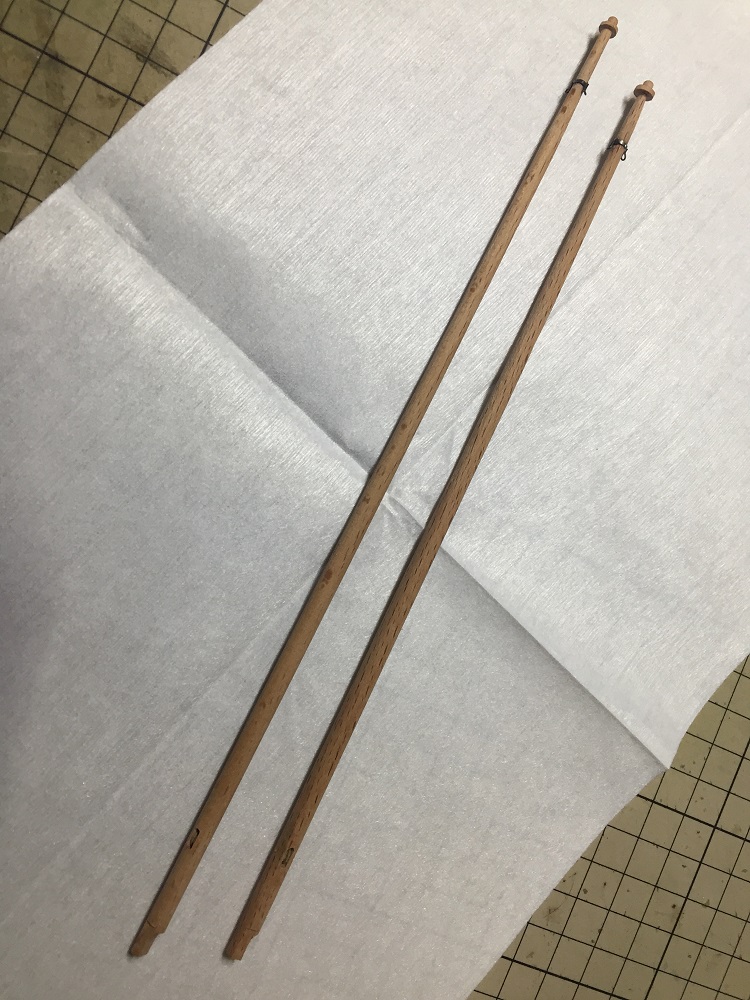
そこで、ハタと気がついたのはマストにどこから差し込むのか?
マストの上下組み込んであって入れ込むことが出来ない
下側を外すしか無い、トホホ
I dry enough and paint with watokooiru.
I polish it with a buff.
I noticed failure suddenly here.
Where does it come in through on a mast?
It is crowded and cannot put a preparatory construction on a mast.
I cannot but take off bottom.
 木部は木工用ボンドで接着してあるので水につければ取れるが金属部品は2液性
エポキシの接着剤でつけてあるので取れないかも、と思いながら教えてもらった
沸騰したお湯に漬けるという方法を試す
Wood-Part can take it if I can stick to water because it is adhered in bond for woodwork.
Because it is used to be epoxy adhesive, I cannot take metal parts.
I soak it in the hot water which boiled while thinking in various ways
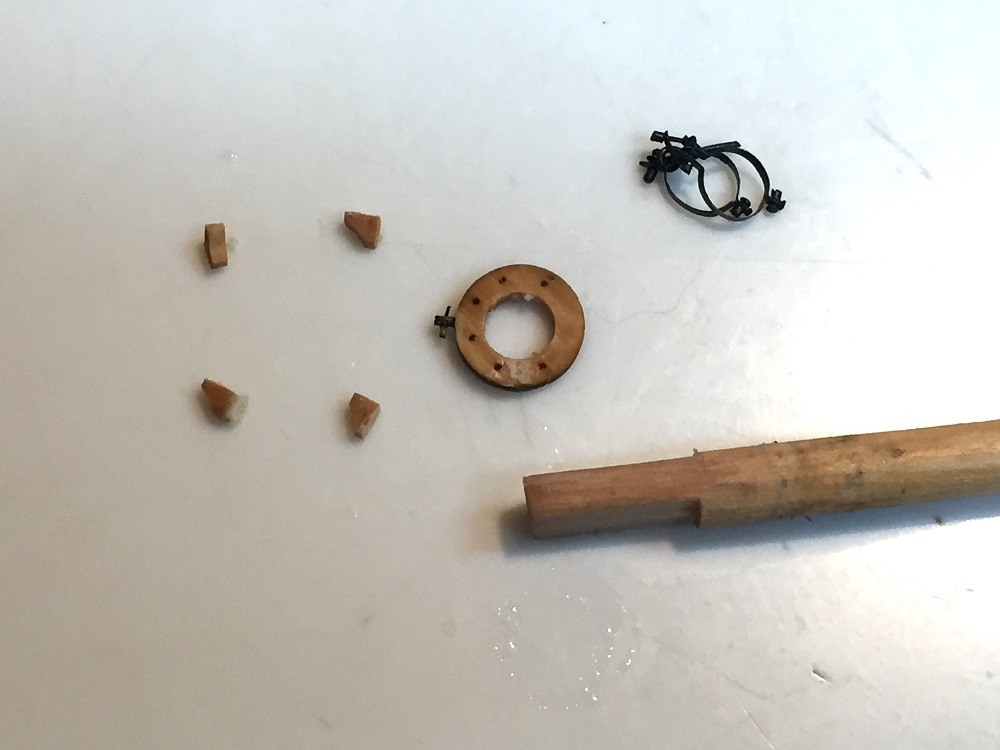 1分で接着が剥がれてバラバラに、何故か金属も剥がれたではないか
これはラッキー
falling apart after the adhesion coming off in one minute.
The metal came off for some reason, too; this is good fortune.
 なんとかリカバリーして組み込むことが出来た
もしもの事を考え図面の員数より1個多めに組み込む
後で切り取るのは簡単なので
I made recovery and was able to incorporate it somehow.
I incorporate the worst one than the number of the thought drawing a little too much.
In it being easy to cut it later.
Es wird auf eine Zeichnung geschrieben, um auf einem Mast einen hölzernen Ring zu installieren.
Ich redete worüber für eine Methode, die ich es durch mit dem menber des Klubs produzierte.
Ich ließ Sie eine Methode unterrichten, die Sie zu einer hölzernen Leitung, und in runde Scheiben zu schneiden, machten.
Ich forderte es sofort heraus.
Die Materialien sind, CASTERO klärte Bauholz
Ich schärfe es auf einem Kreisstock mit einer Holzwerkdrehbank.
Ich eröffne das Loch, wo um 1 mm kleiner als das Setzen von Dimensionen mit einer Bohrmaschine.
Weil ein Teil, der haji macht, notwendig ist, dringt das Loch es nicht durch.
Einige Innen Durchmesser machten einen voreingenommenen Verstand, aber der Kern war fähig, es ungefähr zu revidieren, als ich es durch hinter Prozeß drehte und das Loch mit einem Messer erweiterte.
Ich verliere die Drehung von der Drehbank langsam und kann in Scheiben es leicht schneiden, wenn ich eine Säge gewinne.
Ich spule die Ausdehnung vom Loch auf, Ausschnitt und ich bekommen es und machen Huhn.
Die Sache wird gemacht, von der ich in über die gleiche Dicke schnitt.
Auch wenn der CASTERO so eine Arbeit macht, dort bricht nicht, und es ist überlegenes Holz.
Ich mache in Übereinstimmung mit Innen Durchmesser eine Kerze, Dimension-formte Gigue.
Es kommt in dort und smoothes von Aspektgrobheit mit Papier.
Ich mache den chamfering und reinige es.
Weil es mit der weißlichen Farbe des CASTERO nicht korrekt ist, wird es für eine Weile von Ölfleck eingetaucht.
Ich trockne genug und Farbe mit watokooiru.
Ich poliere es mit einem Fan.
Ich merkte plötzlich Mißerfolg hier.
Wo kommt es in durch auf einen Mast?
Es wird gedrängt und kann keine vorbereitende Konstruktion auf einen Mast setzen.
Ich kann nicht außer es, nehmen Sie Boden ab.
WoodPart kann es nehmen, wenn ich bei Wasser bleiben kann, weil es in Band für Holzwerk gehaftet wird.
Weil es benutzt wird, epoxy-Heftpflaster zu sein, kann ich keine Metallteile nehmen.
Ich durchnässe es im heißen Wasser, das siedete, während ich auf verschiedene Weisen denkt
Ich wurde das Fallen nach der Haftfähigkeit, die in einer Minute weg kommt, auseinander.
Das Metall ging aus irgendeinem Grund ab, auch; dies ist gutes Vermögen
Ich machte Besserung und war fähig, es irgendwie zu integrieren.
Ich integriere das Schlechteste als die Anzahl der Denkzeichnungen ein wenig zu sehr.
Darin das Sein leicht, es später zu schneiden
#20 ブームの製作
The production of 20 # booms
 Main Boomの製作
マストと同じように木工旋盤でテーパー上に削る。
1Production of Main Boom
Like a mast, I sharpen materials in the shape of a taper with a woodwork lathe.
 先端部にプーリーが入るのでエンドミルで長穴加工
I open a long hole with an end mill so that a pulley is delivered to a leader.
 マストの時と同じようにプーリーを作成し、組立
Processing assembles a pulley like mast production.
 金具はそれぞれロー付け、黒染めを施し部品作成
The metal fittings do a silver-soldering each.
Be dyed and do black.
 ブームの根元部の組立、ブームの両側を平らに加工し接着してから釘打ち、釘は頭を小さくしてドリルで穴加工してから打ち込み
Assembling of the source part of the boom
I process both sides of the boom evenly, and it is adhered afterwards
I drive a nail and drive it after the nail makes a head small, and processing a hole with a drill.
 マストに沿う部分の部品の組立、この部品はある程度揺動しマストに沿うようピンで留める、ピン穴は慎重にボール盤で加工し、真鍮線を打ち込む
The assembling of the part of the part along the mast
This part lets you comply with a mast to some extent with room and fastens it with a pin.I empty the pin hole in a drill press carefully. I drive brass route.
 先端近くのそれぞれの金具の取付
I install each metal fittings close to the tip.
 先端の金具を取り付けるとそれらしくなってきた。I installed metal fittings of the tip, and it seems to have become it.
 メインブームの完成
The completion of the main boom.
 Fore Gaffの製作
根元部のガフを吊り下げる金具が難しそう、でもやるしか無い。
2Production of Fore Gaff
I process metal fittings hanging a gaff of the source part.
It seems to be difficult, but challenges it.
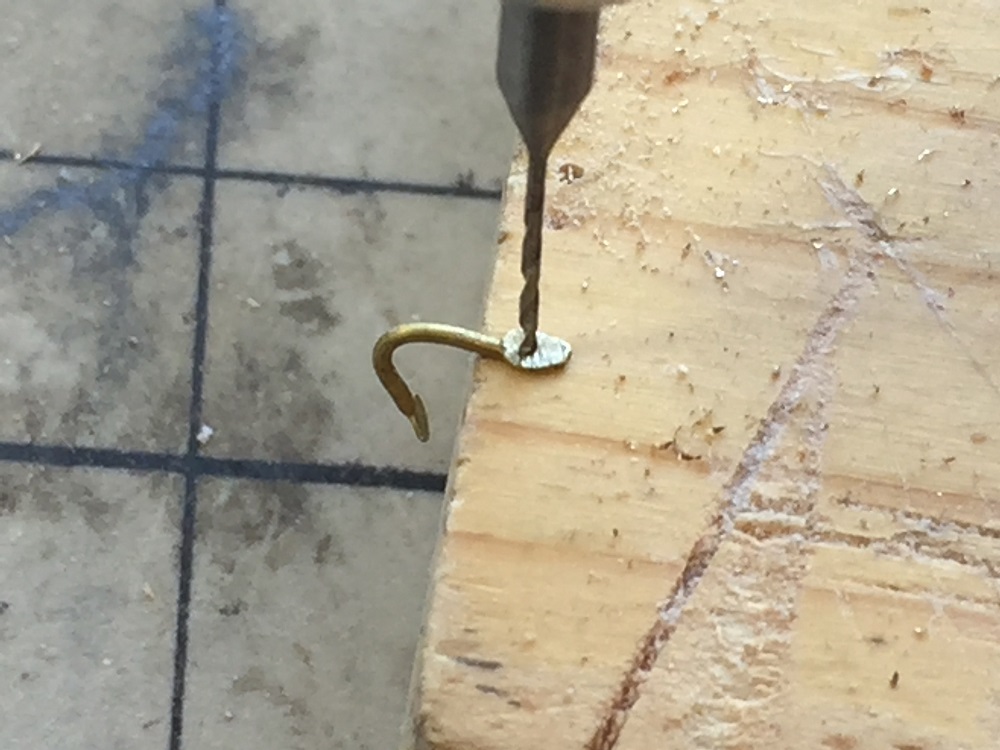 シャックルの製作、U字に曲げた真鍮線の両側を平らに伸ばし、そこに
ボルト用の穴を開ける(ドリル加工前にポンチ打ちは行っておく)
The production of the shackle
I bend brass route to the U character.
I increase both sides evenly.
I open a hole for bolts.
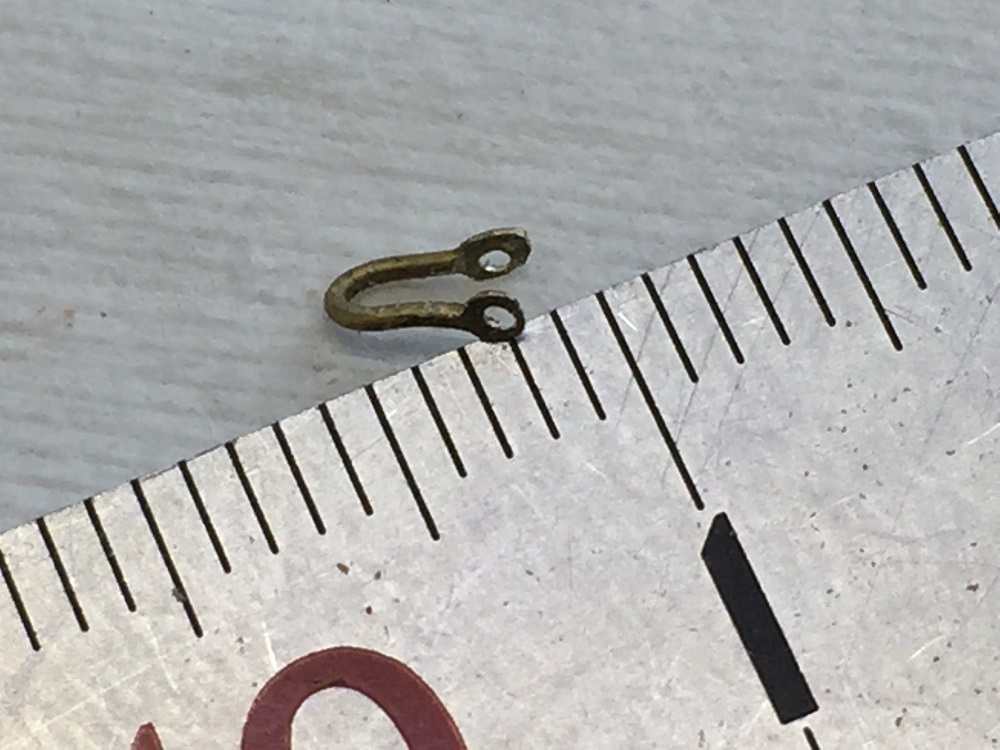 シャックル本体の完成
The completion of the main body of shackle.
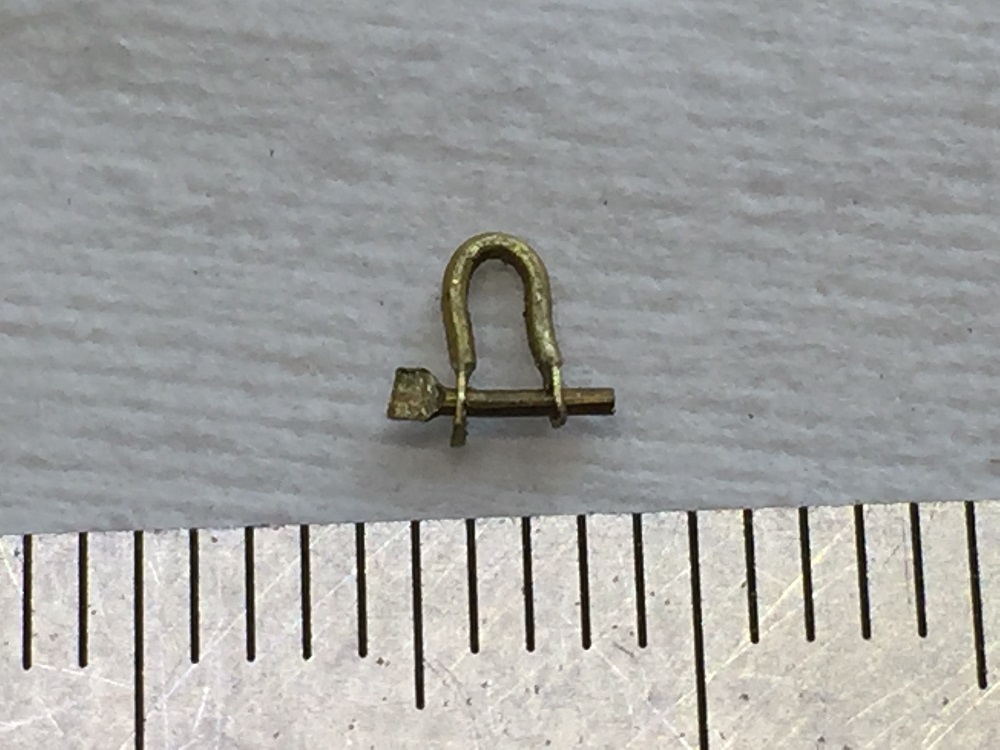 ボルトは片側を潰し、穴に通す、これでシャックルが出来た。
The bolt loses one side and puts it through the hole.
The shackle is completed in this.
アイボルトとリンクの製作
 リンクはロー付けでリングを作り潰す、これを2組作るので同じ大きさに作る。
The production of an eyebolt and the link。 The link makes a ring on silver-soldering. Several times or failure.I make two sets of rings of the isometry.
 リンクをアイボルトに通し、ロー付け
I put a link through the eyebolt, and a silver low charge account assumes the joint of the ring it.
 吊り下げるとそれらしくなったのでは?
I see it magnificently when I hang it.
 フォアガフの完成
The completion of the forehand gaff.
Main Gaffの製作
 同じような要領で金具を作り組立、ただメインガフにはロープを引っ掛ける。 チップがついている、チップはペアウッドで作りガフに彫り込みを加工し 外れにくいように接着した。
Production of Main Gaff
I make metal fittings with the similar point. However, a tip to hang a rope on is pounding the main gaff.The tip processes it in pair Wood materials. I adhered I processed a relief into a gaff, and to be hard to come off.
 メインガフの完成
The completion of the main gaff.
Jumbo Jib Boomの製作
 先端部の金具の組立
Production of Jumbo Jib Boom
The assembling of the metal fittings of the leader.
 U字状の真鍮線が二重にロー付け
I do a silver-soldering in two places of the brass line of the letter of U handwriting.
 ジャンボジブブームの完成
The completion of the jumbo jib boom.
 Fore Boomの製作
同じような手順でフォアブームの作成
Production of Fore Boom
It is made the forehand boom in a similar procedure
 これで全てのブーム、ガフが完成した、やはり金具の製作に苦心しました。
All booms, gaff are completed in this.
After all I took pains over the production of metal fittings.
Die Produktion von 20 #Booms
Produktion des Main Booms
Wie ein Mast schärfe ich Materialien in der Form einer Kerze mit einer Holzwerkdrehbank.
Ich eröffne ein langes Loch mit einer Endmühle, damit eine Rolle bei einem Leiter abgeliefert wird.
Processing setzt eine Rolle wie Mastproduktion zusammen.
Die Metallanproben machen ein Silber-löten von jedem.
Wird gefärbt und macht Schwarzen.
Das Versammeln vom Quellenteil des Booms
Ich verarbeite beide Seiten des Booms gleichmäßig, und es wird danach gehaftet
Ich fahre einen Nagel und fahre es, nachdem der Nagel klein einen Kopf gemacht hat, und das Verarbeiten eines Loches mit einer Bohrmaschine.
Das Versammeln vom Teil des Teiles am Mast
Dieser Teil läßt Sie sich in gewissem Maße mit Zimmer nach einem Mast richten und befestigt es mit einer Nadel.
Ich leere das Nadelloch in einer Bohrmaschinenpresse vorsichtig.
Ich fahre Messingstrecke.
Es ist Installations ru durch Metallanproben, führte das Seil von Boom mittlerer Teil.
Ich installiere jede Metallanproben in der Nähe von der Spitze.
Ich installierte Metallanproben von der Spitze, und es scheint es geworden zu sein.
Die Vollendung des Hauptbooms.
Produktion Vorderer Gaffel
Ich verarbeite Metallanproben, die eine Gaffel vom Quellenteil hängen.
Es scheint schwierig zu sein, außer Herausforderungen es.
Die Produktion der Kette
Ich biege Messingroute zum U-Charakter.
Ich nehme zu, beide unterstützen gleichmäßig.
Ich eröffne ein Loch für Schrauben.
Die Vollendung des Hauptkörpers der Kette
Die Schraube verliert eine Seite und setzt es durch das Loch.
Die Kette wird darin vervollständigt.
Die Produktion von einem eyebolt und der Verbindung
Die Verbindung macht einen Ring, als er Silber-gelötet hat.
Mehrere Male oder Mißerfolg.
Ich mache zwei Sätze der Ringe der Isometrie.
Ich setzte durch den eyebolt eine Verbindung, und ein silbernes niedriges laufendes Konto nimmt es dem Gelenk des Ringes an.
Ich sehe es prachtvoll, wenn ich es hänge.
Die Vollendung der Vorhand Gaffel.
Produktion der Main Gaffel
Ich mache Metallanproben mit dem ähnlichen Punkt.
Aber eine Spitze, um an einem Seil zu hängen, schlägt die Hauptgaffel ein.
Die Spitze verarbeitet es in Paarholzmaterialien.
Ich haftete, ich verarbeitete in eine Gaffel, und schwer zu sein, abzugehen, eine Erleichterung.
Die Vollendung der Hauptgaffel.
(4)
Produktion Riesigen Fockbooms
Das Versammeln von den Metallanproben des Leiters
Ich mache ein Silber-löten in zwei Stellen der Messinglinie des Briefes der U-Handschrift.
Die Vollendung des riesigen Fockbooms.
Produktion Vorderen Booms
Es wird der Vorhand Boom an einem ähnlichen Verfahren gemacht
Alles floriert, Gaffel wird darin vervollständigt.
Ich brachte doch Schmerzen zur Produktion der Metallanproben herüber.
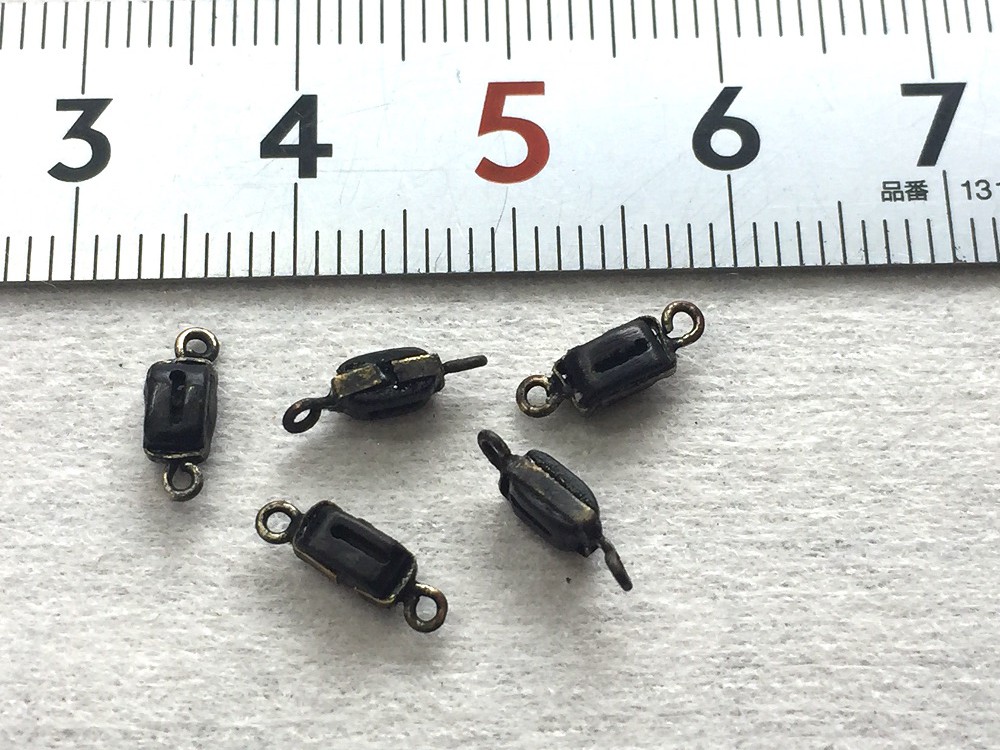
The production of dead eye Blocks
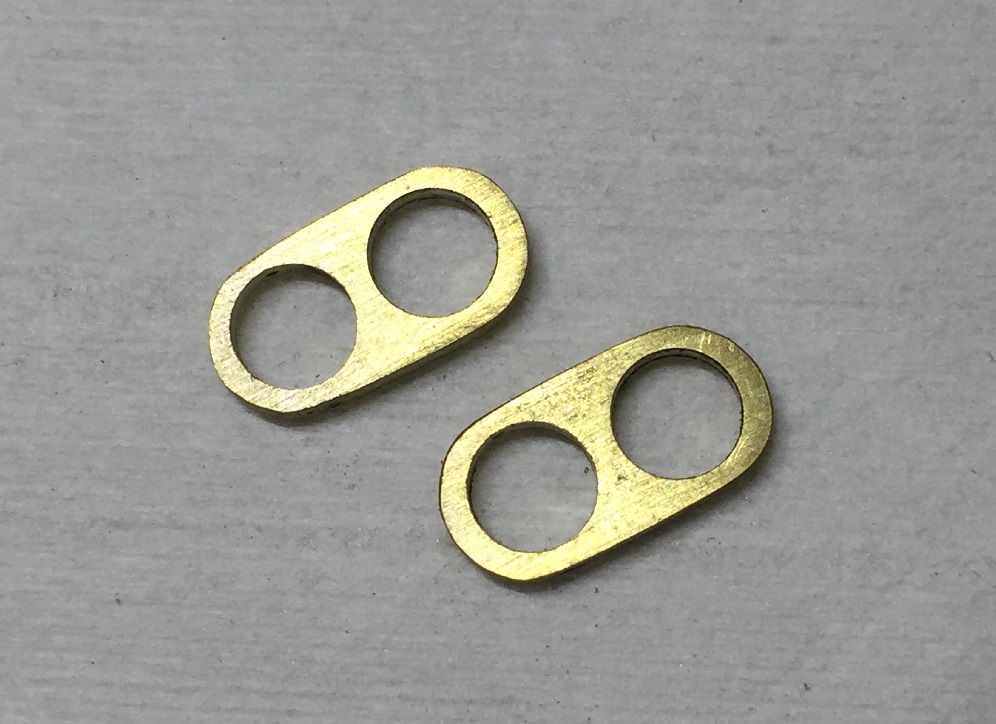
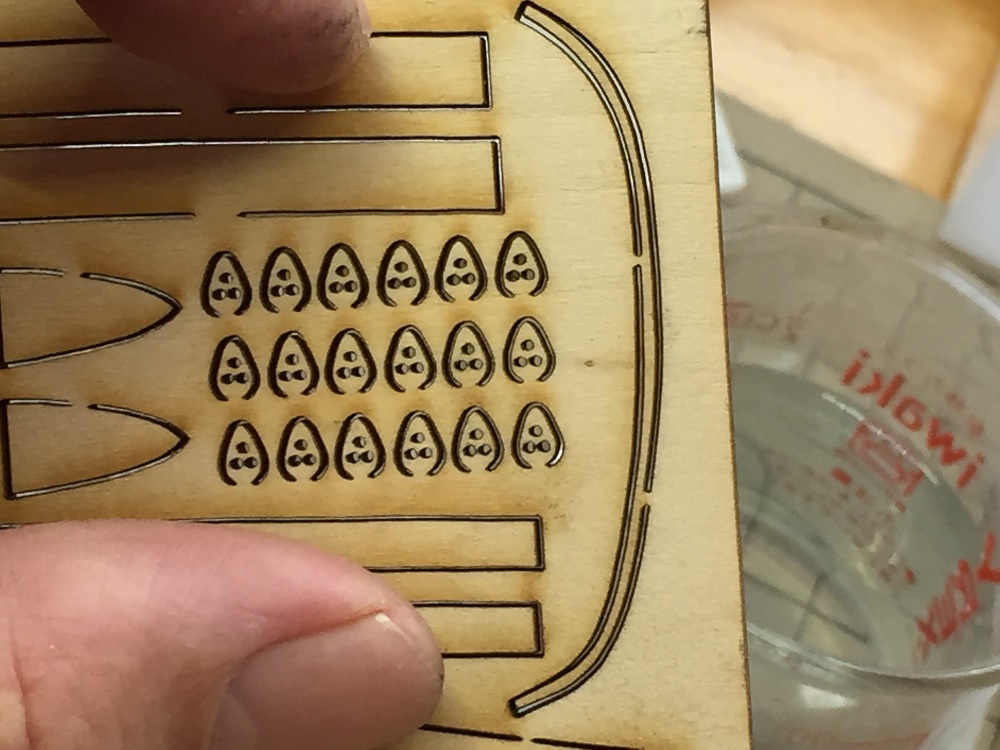 1 オーバル型デッドアイの製作
The production 1 of the block
The production of the elliptic dead eye blocks.
There are the dead eye blocks in the kit.
To use it as it is; sense of incongruity gaariru.
I decided to make this elliptic dead eye blocks.
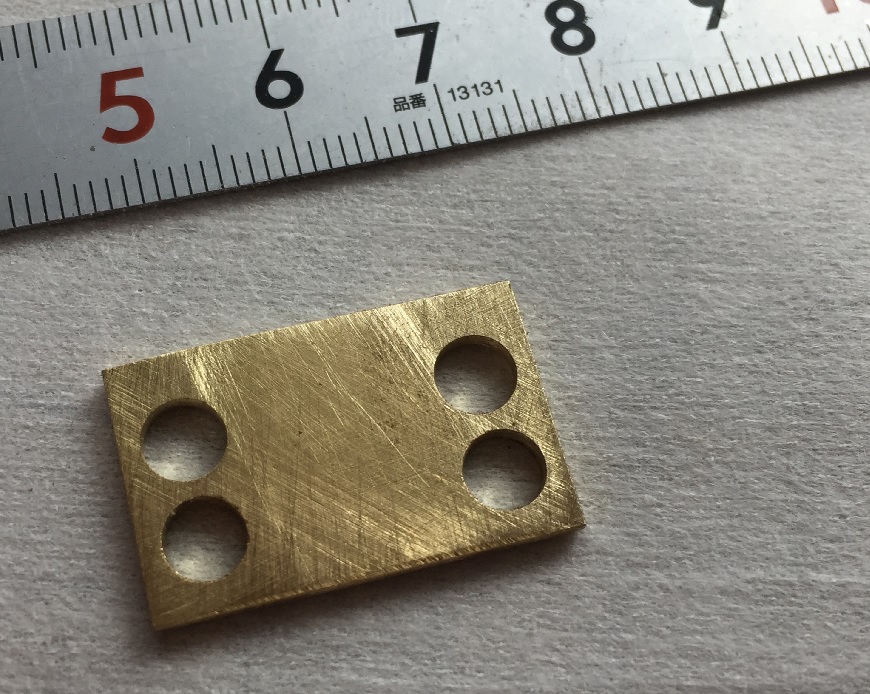
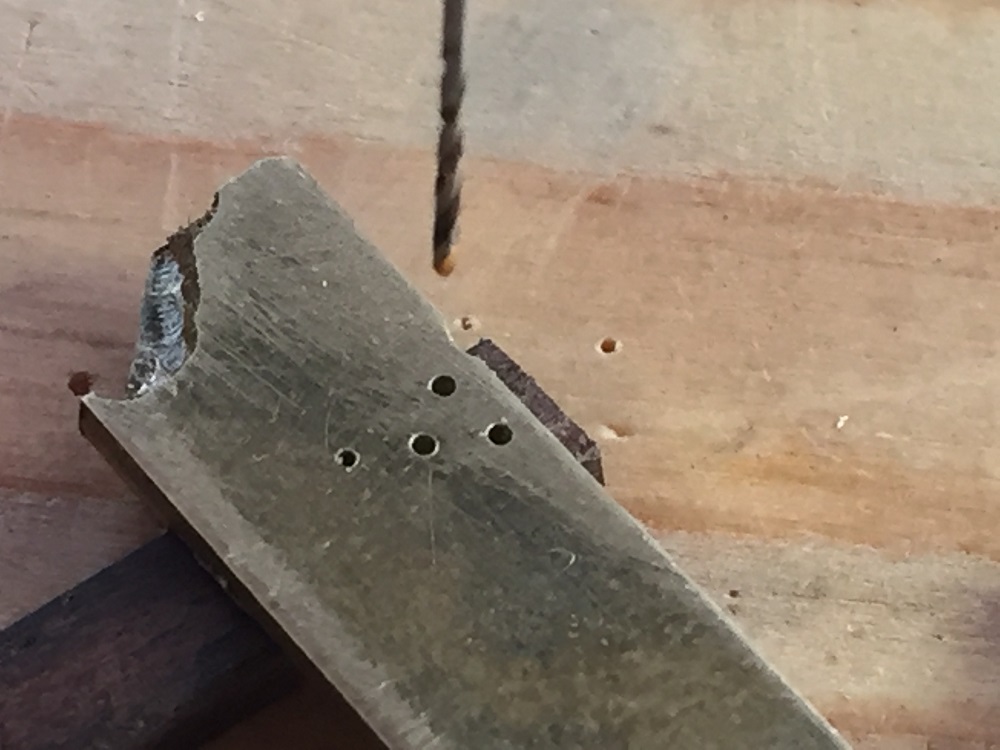
 穴のピッチがバラつかないように残材の真鍮板で治具を作る
I made a jig so that dig a hole in the block became the equal distance.
I used the brass materials which remained.
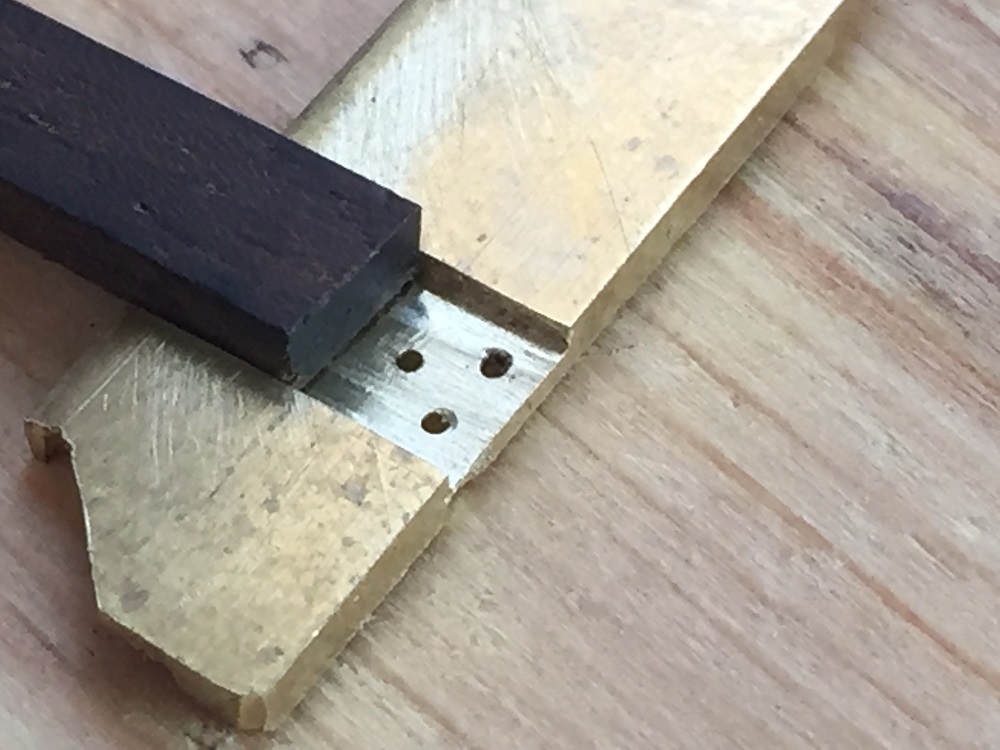
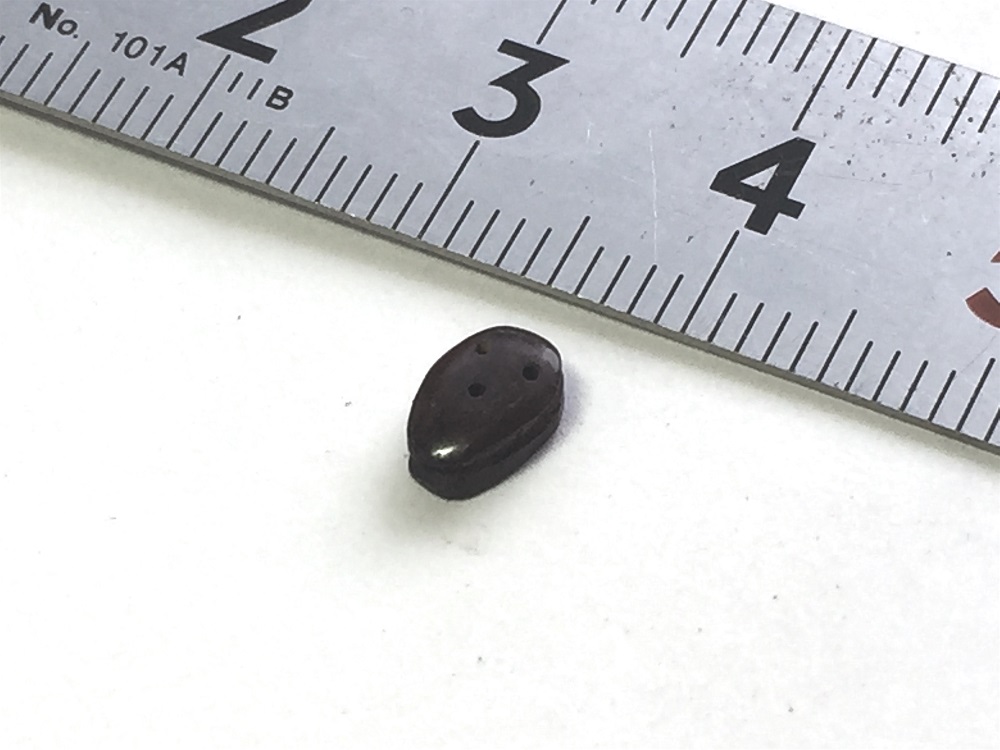
 治具にて等ピッチに穴加工、デッドアイの材質は紫檀材
I dig a hole in the block with jigs at an interval.
I made the dead eye from rosewood.
 オーバル型の下側の基本円を穴とのバランスを考えケガキ
I thought about balance with the hole and pictured a circle in the bottom of the elliptic block.
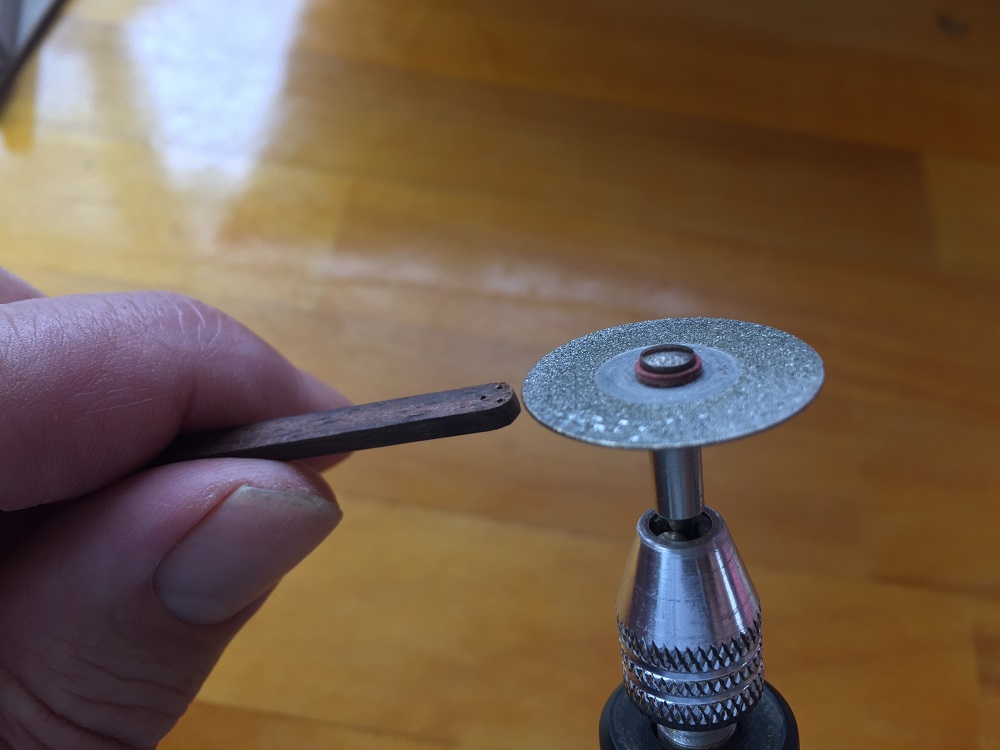 この時点でロープを掛ける溝を下側に加工しておく
ダイヤモンドソーが丁度いい感じに溝加工できた
It is convenient when I process it in diamond saw.
 ノコで切断し、ディスクサンダーで粗型状を整形し、上側の溝も同様に加工し
ペーパーで各R形状を加工、更に細かいペーパーで仕上げる
I have orthopedic treatment with a disk sander.
I process the ditch of the upper part of the block
I take the corner with sandpaper.
I finish it with smaller sandpaper.
 回転工具のバフで仕上げると紫檀は艶が出て綺麗に
I finish it with the buff of the rotary tool.
Shine was over the rose wood and became beautiful.
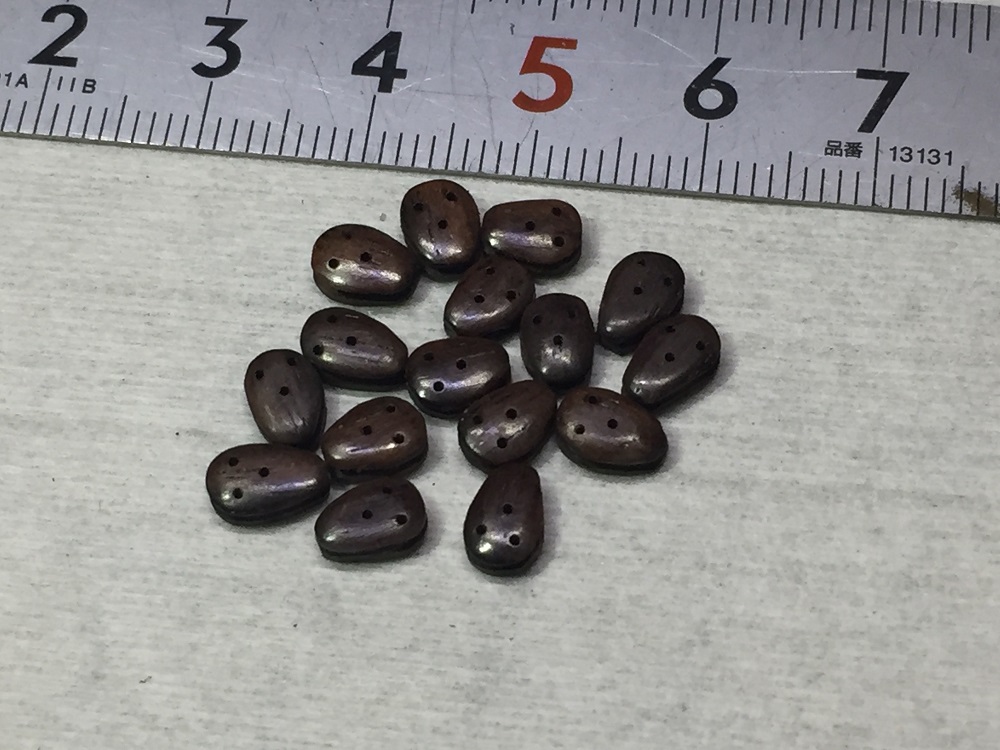 必要数作りました
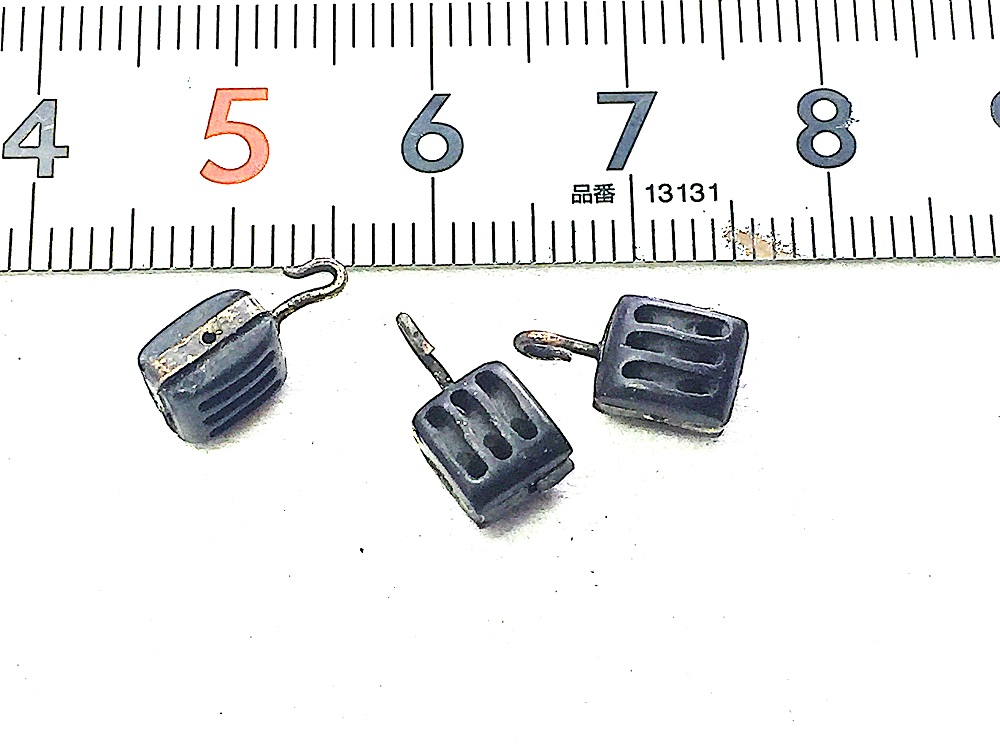
 その他の滑車の製作
The production of other blocks
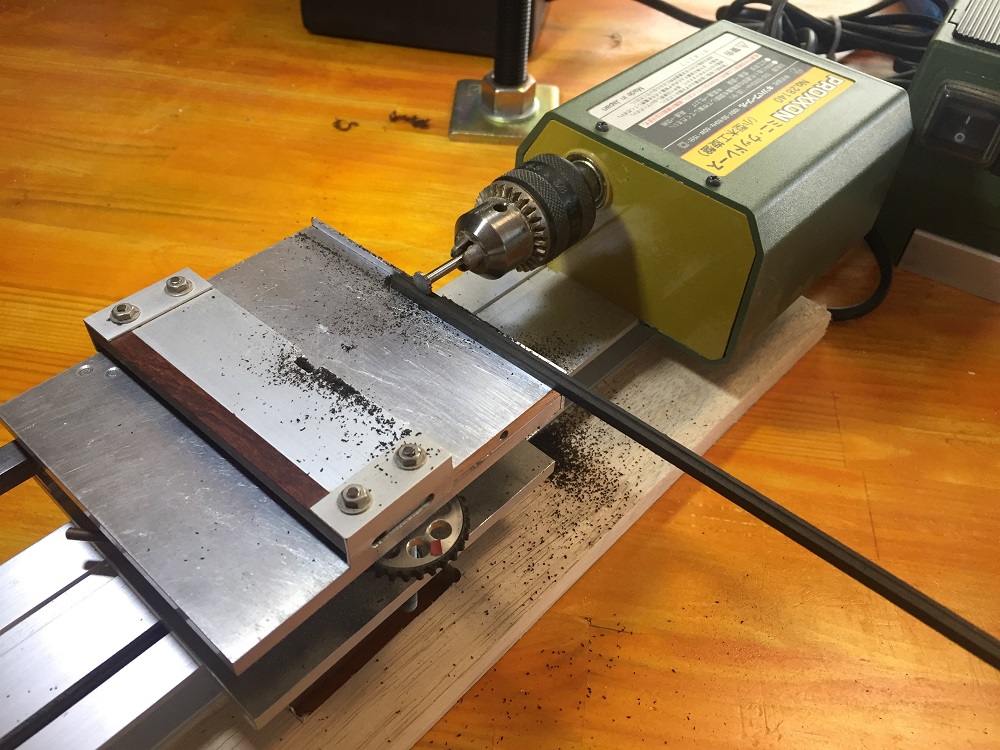
Proxxsonのミニレースを改造した専用機で滑車の両側面の溝を加工
I process the ditch of both sides of the block in the exclusive plane that I remodeled the mini-lace made by Proxxson.
 メタルソーにて両側溝入れ、滑車の材質は黒檀
I put both gutters in metal-saw.
The materials of the block are ebony.
 滑車にロープが通る穴を加工、大きな滑車はプーリーの上下に穴を開け
小さな滑車はロープの通る上部の穴のみ加工
I make the hole which a rope goes along to the block.
I leave the hole in the top and bottom of the pulley to a big block.
I make only the upper hole which the rope goes along to the small block.
 穴と穴の間をエンドミルで削り込み、滑車は組み込まれているように見せかける
I sharpen it and am crowded with end mills between a hole and holes so that a pulley seems to be in the block
 ノコで基本の長さに切断
I cut it with a saw to appropriate length from a stick.
 上下の穴の入口を斜めに削り取ると、さも滑車が入っているように見える
後、オーバル型と同じく、とげ抜きで掴み各R形状や磨きをペーパーで
I scrape off a hole diagonally so that a pulley seems to be in the block.
I catch a block without a splinter and a file deletes it and, like time of the elliptic dead eye block, finishes it.
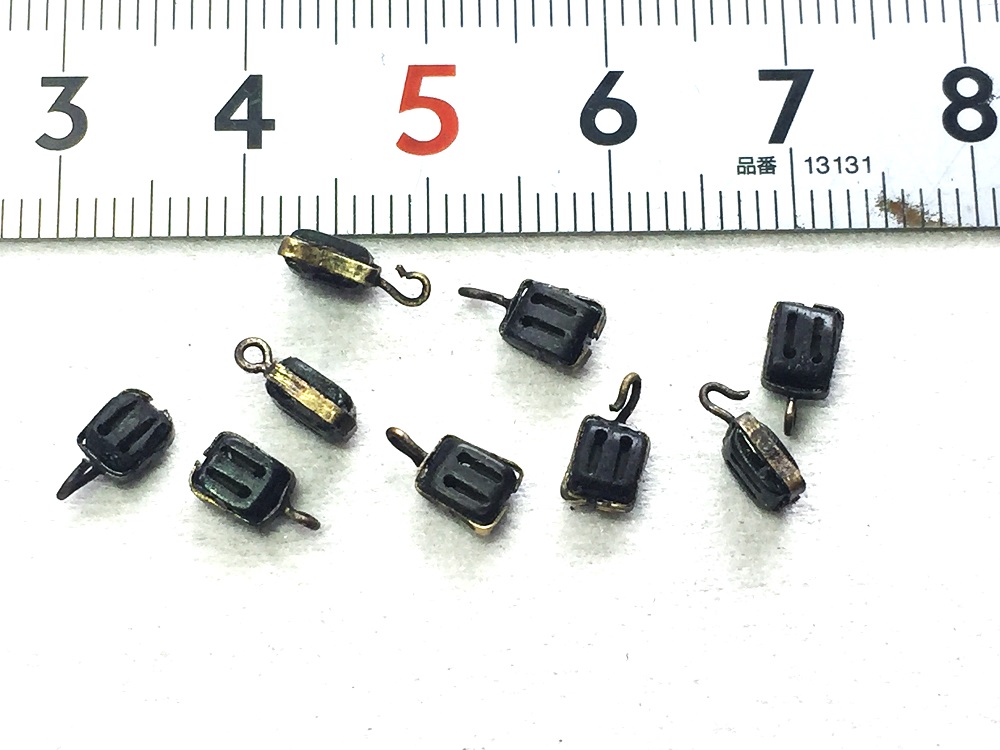
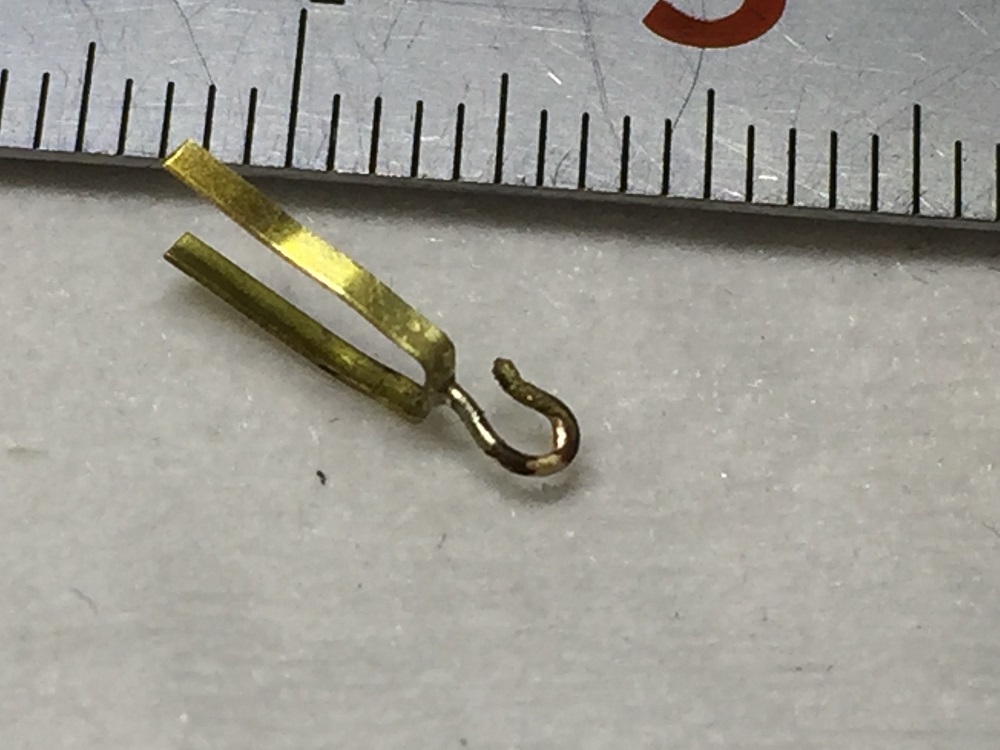 このふねの滑車は殆ど金具でフックを組み込む設計なので真鍮線でフックを作り
帯板とロー付け
The block of this ship gains hook metal fittings.
I made a hook with brass line.
A band plate and silversoldering.
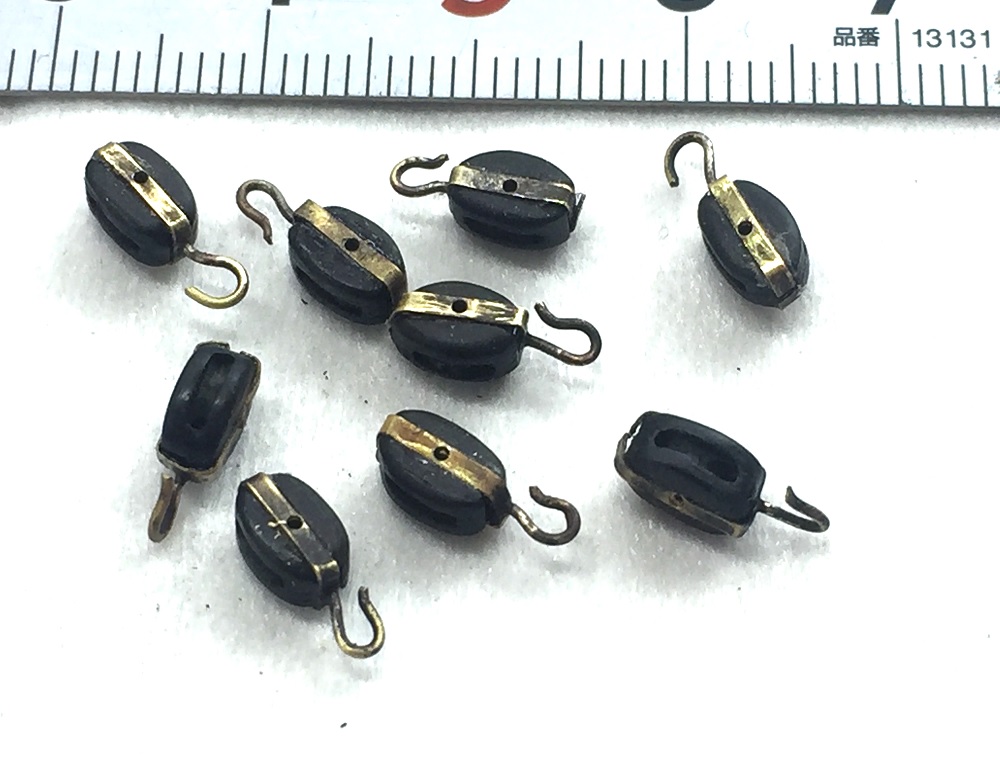 金具は黒染めし滑車本体に接着し中心に穴を加工すると滑車の芯棒が入って
いるように見える、何となく滑車らしくなってきた、真鍮金具は黒染めのままだと
全体に真っ黒なのでサンドペーパーですこし剥ぎ取った
これで7/32インチの滑車の出来上がり
Was dyed, and the metal fittings did black.
When I bond metal fittings to a block and make a hole in the center, the core dash of the block seems to become available.
It seems to have become a block.
Because the brass metal fittings are black when is black coloring, is sandpaper; went, and stripped it off.
It is the completion of the block of 7/32 inches in this.
 同じように3/16インチの滑車本体を製作
I produce the main body of block of 3/16 inches in the same way.
 金具を付け3/16インチの滑車の仕上がり
The finish of the block of 3/16 inches by metal fittings dated.
It is produced the block of 1/8 inches likewise
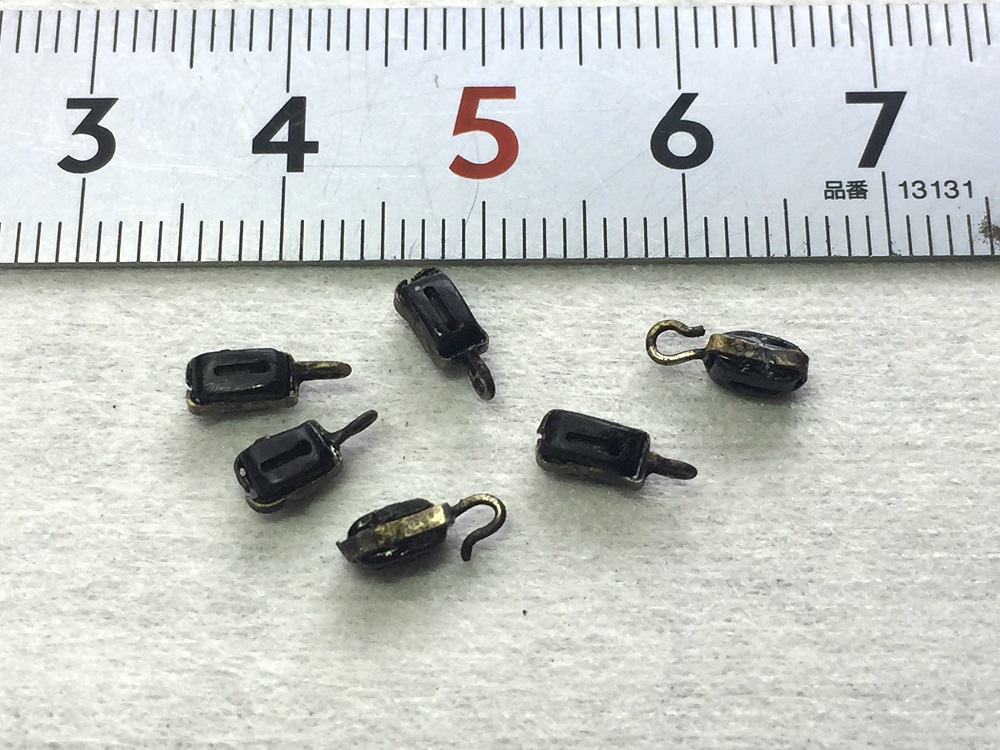
 プは通常の金具を付けた後、反対側に穴を開けフックを差し込む
The processing of the block of the type to link the rope to both sides.
I attach metal fittings to the block.
I dig a hole in the other side.
I insert a hook.
 トリプルプーリーの滑車
The block of the triple pulley
 ダブルプーリーの滑車
The block of the double pulley
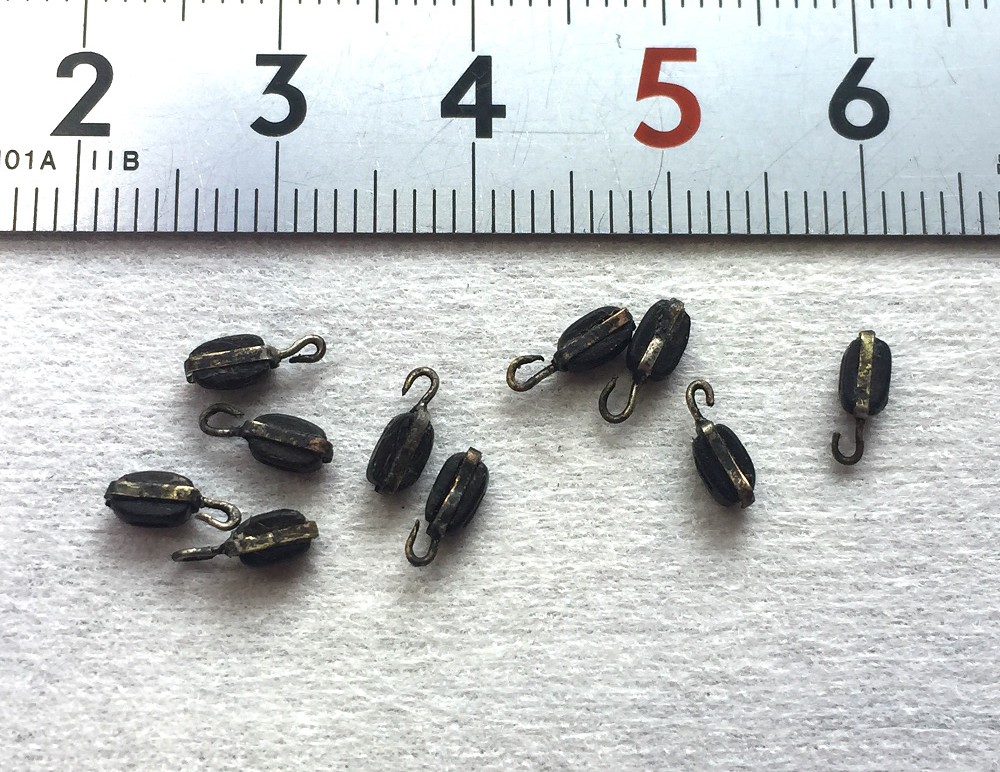
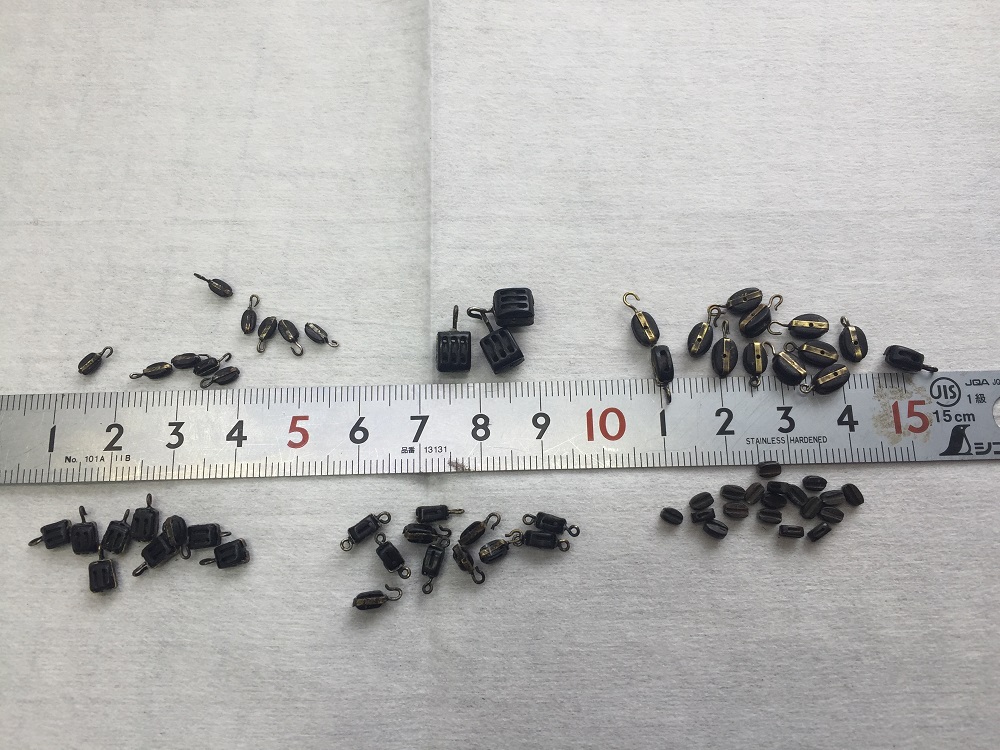 取りあえず、各種滑車を図面上で数えた員数を製作、
ただリギング時に不足していた滑車も幾つかあり、追加制作した。
I produce the number that counted various blocks on a drawing first of all.
But there were some blocks which were short in rigging and produced it more.
Die Produktion toten Auges blockiert
Die Produktion 1 des Blockes
Die Produktion der elliptischen Toten sieht Blöcke an.
Es gibt die toten Augenblöcke im Werkzeug.
Es zu benutzen als es ist; Sinn von Unstimmigkeit gaariru.
Ich blockiere, der beschlossen werde, dieses elliptische Tote zum Ansehen zu machen. Ich bin im Werkzeug
Ich machte eine Gigue damit macht im Block ein Loch, wurde die gleiche Entfernung.
Ich benutzte die Messingmaterialien, die blieben.
Ich mache bei einem Intervall im Block ein Loch mit Giguen.
Ich brachte das Tote dazu, von rosewood anzusehen.
Ich dachte über Gleichgewicht mit dem Loch nach und stellte einen Kreis im Boden vom elliptischen Block vor.
Ich verarbeitete den Graben, der zum Block ein Seil benutzte.
Es ist zweckmäßig, wenn ich es in Diamanten verarbeite, sah.
Ich schnitt und bringe einen Block entlang durch eine Säge von einem Stock.
Die Produktion anderer Blöcke
Ich verarbeite den Graben von beiden Seiten des Blockes im ausschließlichen Flugzeug, wo ich den Mini-Schnürsenkel in von Proxxson umgestaltete
Ich setzte beide Gossen in Metall-Säge.
Die Materialien des Blockes sind Ebenholz.
Ich mache das Loch, das ein Seil zum Block entlanggeht.
Ich verlasse das Loch in der Spitze und Boden der Rolle zu einem großen Block.
Ich mache nur das obere Loch, das das Seil zum kleinen Block entlanggeht.
Ich schärfe es und werde Mühlen zwischen ein Loch und Löcher mit Ende gedrängt, damit eine Rolle im Block zu sein scheint.
Ich schnitt es mit einer Säge, sich Länge von einem Stock anzueignen.
Ich kratze diagonal von einem Loch, damit eine Rolle im Block zu sein scheint.
Ich fange einen Block ohne einen Splitter, und eine Akte löscht es und, wie Zeit des elliptischen Toten-Augenblockes, beendet es.
Der Block dieses Schiffes gewinnt, greifen Sie Metallanproben.
Ich machte einen Haken mit Messinglinie.
Ein Bandteller und ein silversoldering.
Wurde gefärbt, und die Metallanproben schwärzten.
Wenn ich Metallanproben zu einem Block binde und ein Loch im Zentrum mache, scheint der Kernschuß des Blockes verfügbar zu werden.
Es scheint ein Block geworden zu sein.
Weil die Messingmetallanproben schwarz sind, wenn ist schwarze Färbung, ist Sandpapier; ging, und streifte es ab.
Es ist die Vollendung des Blockes von 7/32 Zolln darin.
Ich produziere den Hauptkörper des Blockes von 3/16 Zolln in die gleiche Weise.
Das Ende vom Block von 3/16 Zolln von Metallanproben datierte.
Ich beende es mit dem Fan des drehenden Werkzeuges.
Glanz war über dem Rosenholz und wurde schön.
Ich machte die Anzahl der Bedürfnisse.
Es wird ebenso den Block von 1/8 Zolln produziert
Die Verarbeitung des Blockes der Art, um das Seil mit beiden Seiten zu verbinden.
Ich befestige Metallanproben am Block.
Ich mache ein Loch in der anderen Seite.
Ich lege einen Haken ein.
Der Block der dreifachen Rolle
Der Block der doppelten Rolle
Ich produziere die Zahl, die zuerst verschiedene Blöcke auf eine Zeichnung von allem zählte.
Aber es gab einige Blöcke, die in Manipulation kurz waren und es mehr produzierten.
#22 セールの製作
The production of Rigging
The production of 22 # sales
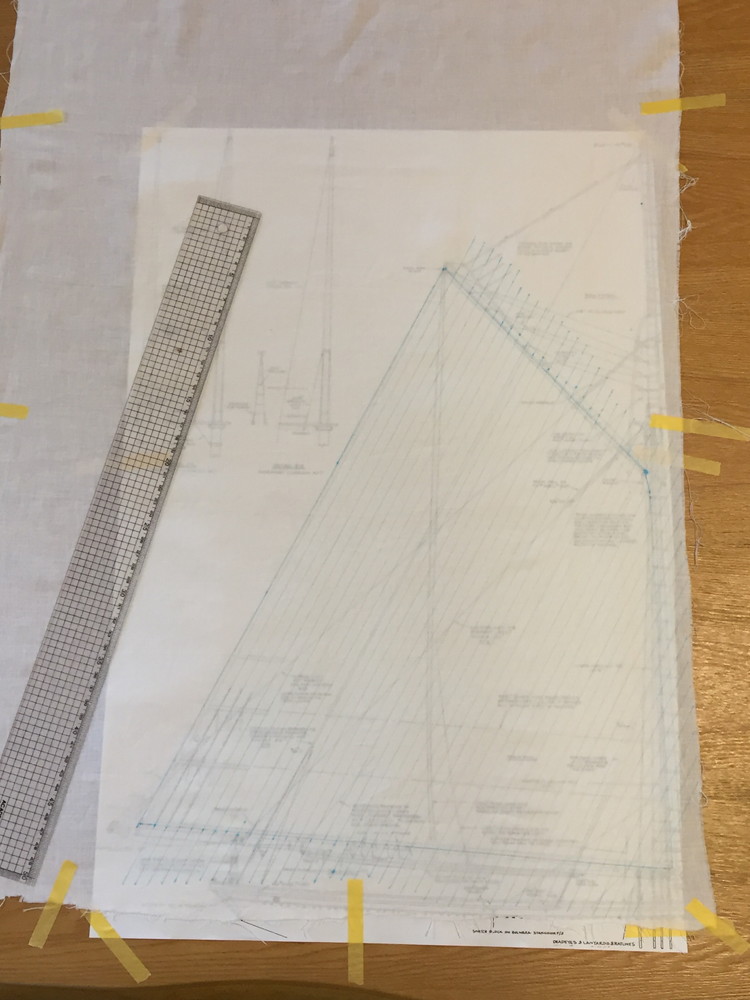 紅茶で染めた布に形を写し取る、後で消える水性のチャコペンを用い図面の上から
形状を写し取る、輪郭と8ミリピッチの縫い合わせの線を写し取る
I dyed cloth with tea.
I copy form on cloth.
I use the disappearing aqueous pen.
I copy shape from the top of the drawing.
I copy an outline and the line of the sewing together of the 8 mm intervals .
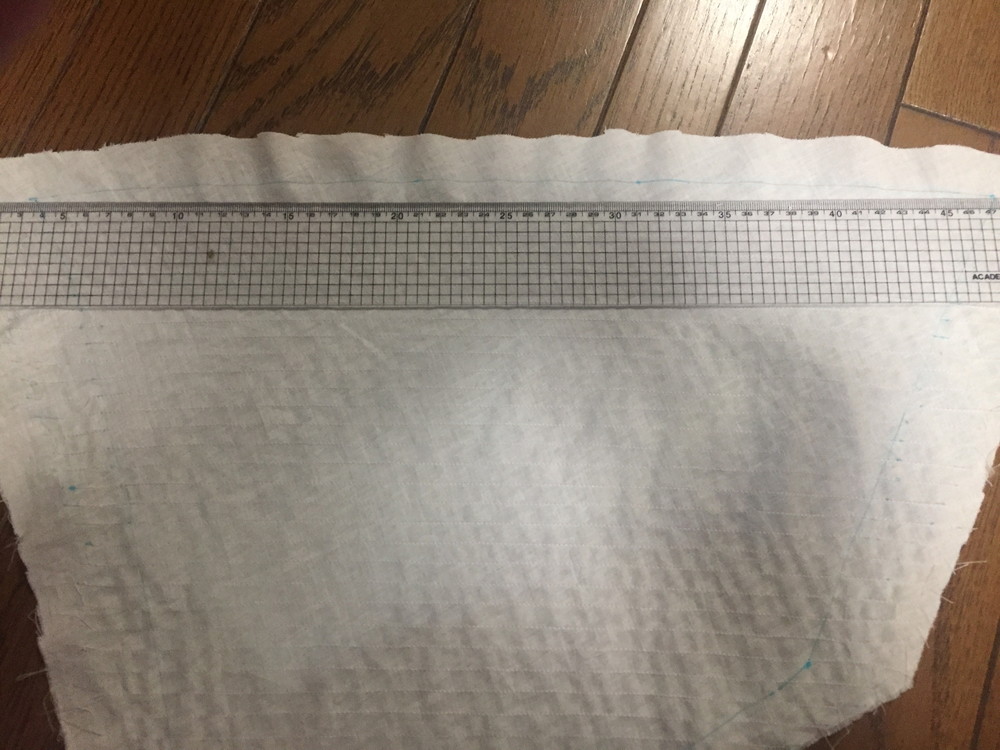 縫い合わせの線に沿ってミシン掛け、8ミリピッチに慎重に直進縫いをしたつもりだが
定規を当て確認すると、輪郭線が弯曲に曲がっているではないか。
I do going straight sewing carefully at an 8 mm intervals.
However, the outline did curvature when I won a ruler and confirmed it.
The Point for improvement.
 三角形のジブセールに至ってはミシン目が中心付近で角度が変わってミシンがけしているためか 輪郭の直線が見事に山形になってしまっている。
再度霧吹きし、スチームアイロンを掛けるとおおよそは修正できたので一安心
再度、図面と合わせ輪郭線を引き直す、次の船のときは工程を考え直さなければ
The thing that the triangular jib sale should have been a straight line has counterfeited a convex course.
I do a sprayer again and wear a steam iron.
I was able to quite revise it.
I pull a drawing and laying upon outline again.
It is necessary to reconsider a process the next ship.
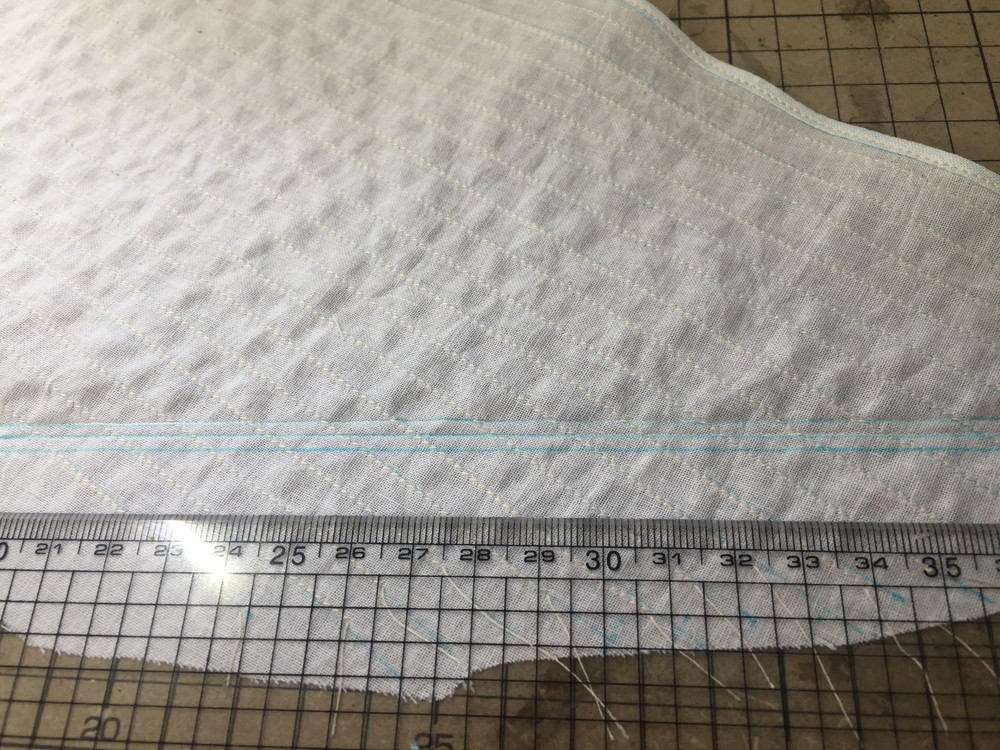 輪郭線の外側に折り返しの幅3ミリに二本、線を引いておく
I pull two of them, a line to 3 mm in width of the lapel in the outside of the outline.
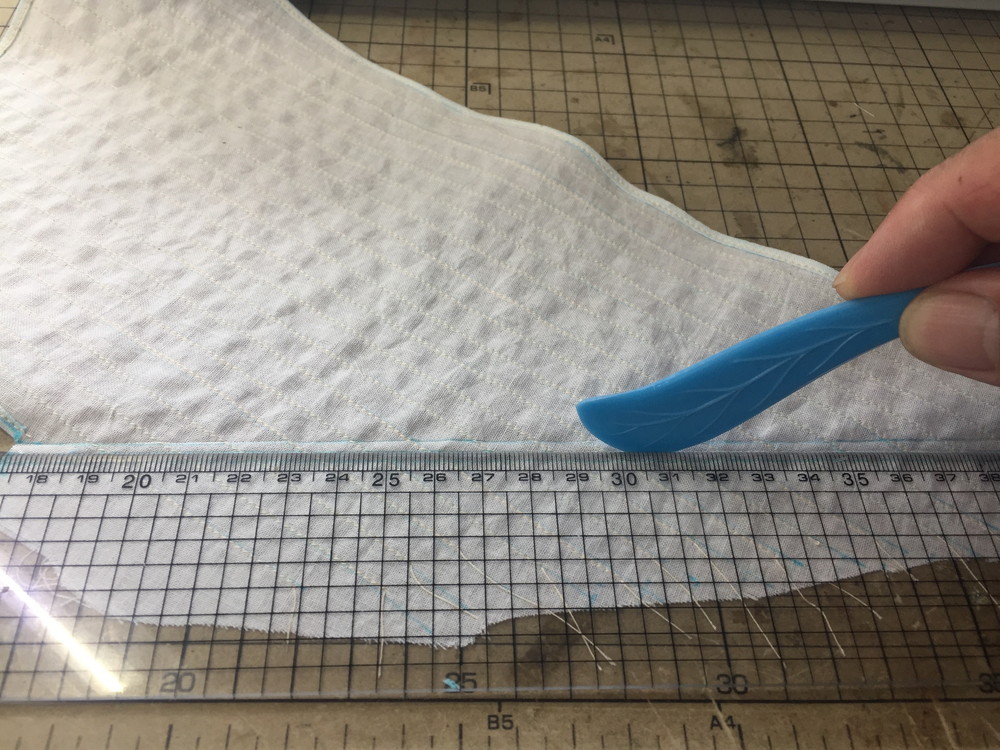 後でまっすぐに折りたためるように裁縫のヘラで線を付けておいた
I attach a line with a spatula of the sewing to be able to fold straight it.
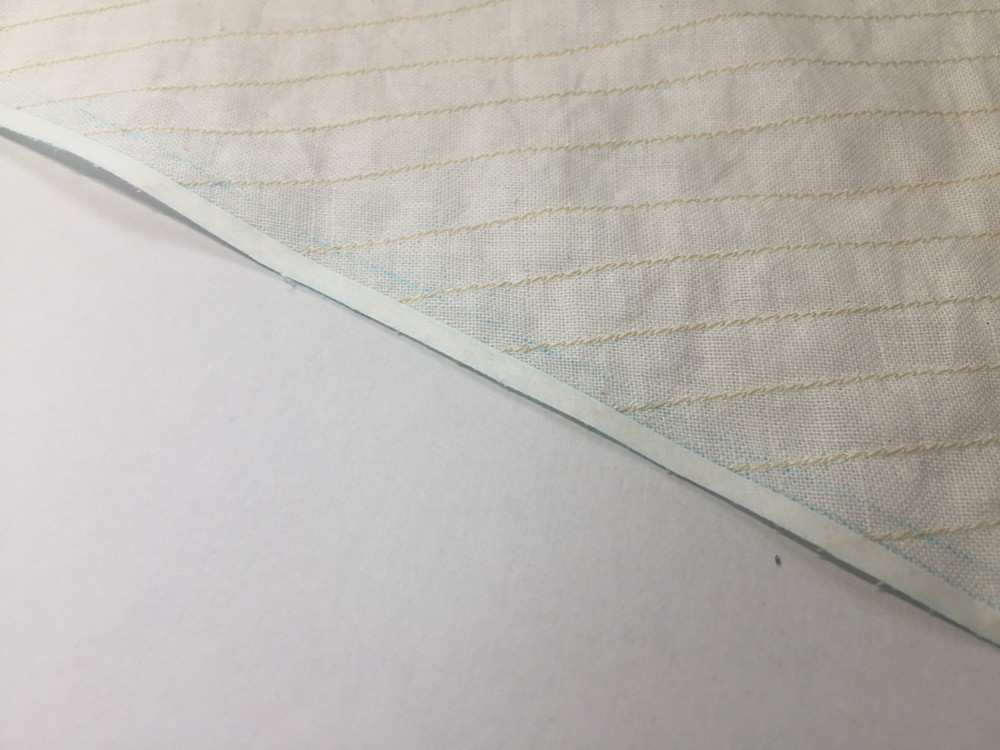 一旦、セールを裏返し、一番外側に熱接着両面テープを3ミリ幅に貼る
両面テープは10ミリなので貼り付けた後、布ごとハサミで裁断すると綺麗に3ミリ幅に貼れた.
I reverse a sail once.
I put heat adhesion double-stick tape of the 3 mm width outward.
I cut every cloth with scissors after having stuck it because the double-stick tape was 10 mmi width.
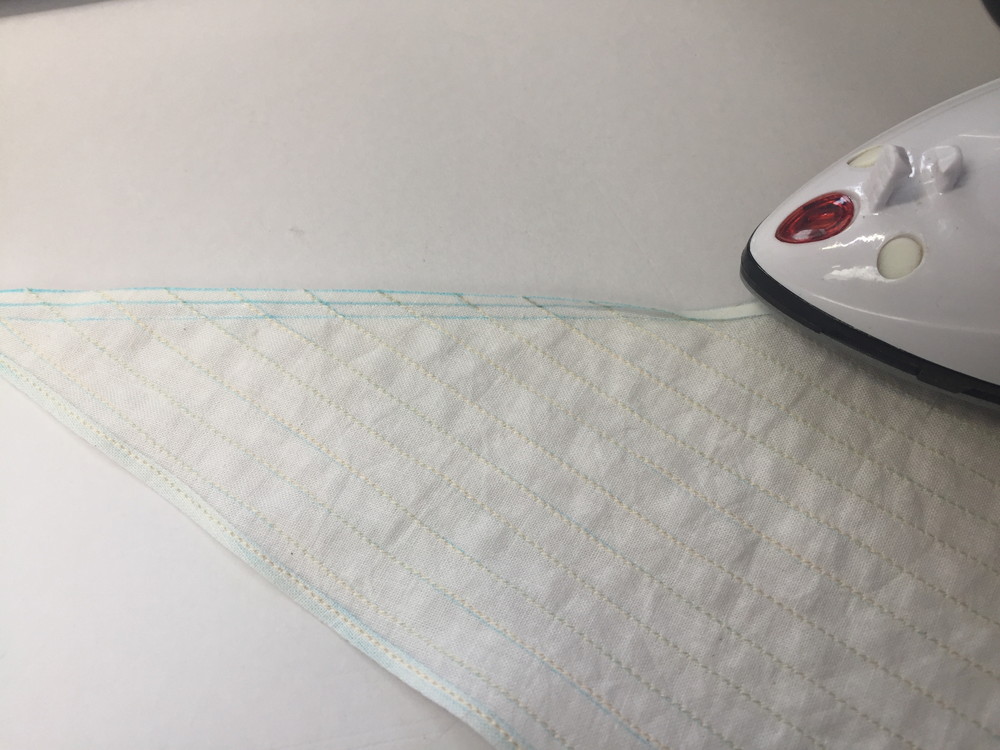 表に返し、一回折りながらアイロンで両面テープを熱により接着する
I put it back to the face.
I add heat and glue double-stick tape together with an iron once while breaking it
 もう一回、巻くように折りながら、はくり紙を剥がしながらせーるの輪郭に沿って布どうしを
貼り付ける、こうすると袋状の縁ができる
Cloth doushio can already stick along the outline of the sale once while tearing off paper in spite of being an occasion to wind it up.
A bag-shaped relationship is possible
 縁の内側に沿って、慎重にミシンがけ、速度はかなり遅い
Along the inside of the line, I do a sewing machine cliff carefully,
The speed makes it considerably slow.
 縁から外れないように、また縁の真ん中に寄らないように縫うのが大変
この歳までミシン掛けの経験がないので何度も端布で練習してから挑みました
It is difficult to sew it not to stop at the middle of the line again not to deviate from the edge.
Because there was not the experience of the sewing machine, I practiced it with edge cloth many times and challenged it until this year.
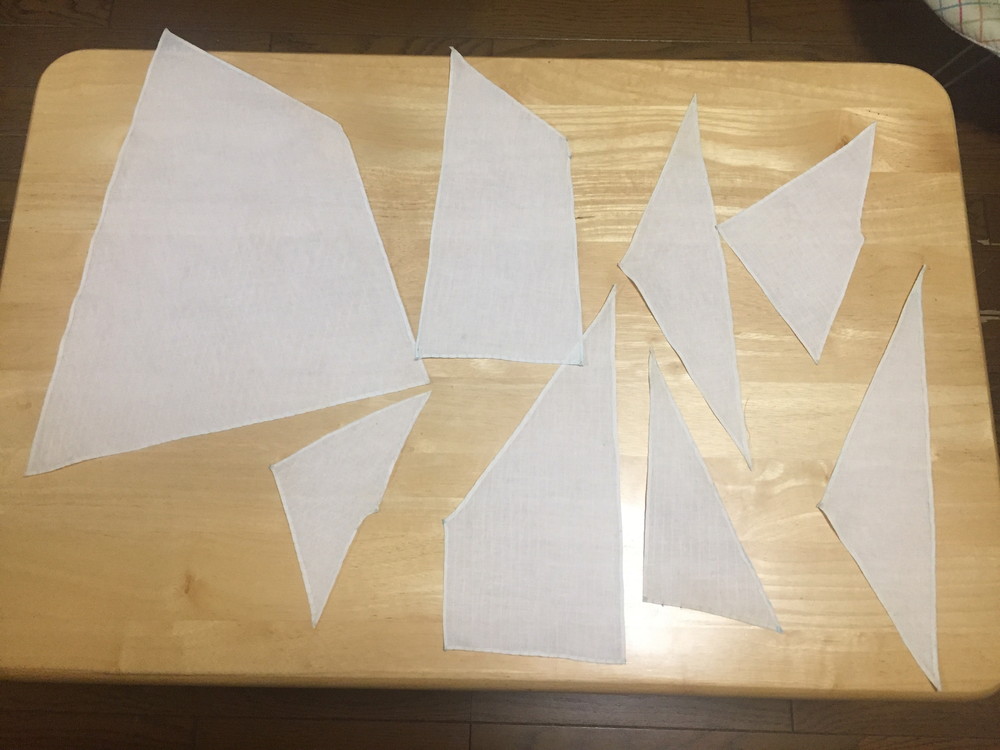 何とか曲がりなりにも全てのセールが縫えました
I was able to close all sails.
 縁に沿ってボルトロープの取付け、セールの布に縫い付ける予定であるが、縫いやすいように
木工ボンドで接着することに
Edgewise of the boltrope install it.
I sew it on the cloth of the sail.
I adhered in woodwork bond to be easy to sew it.
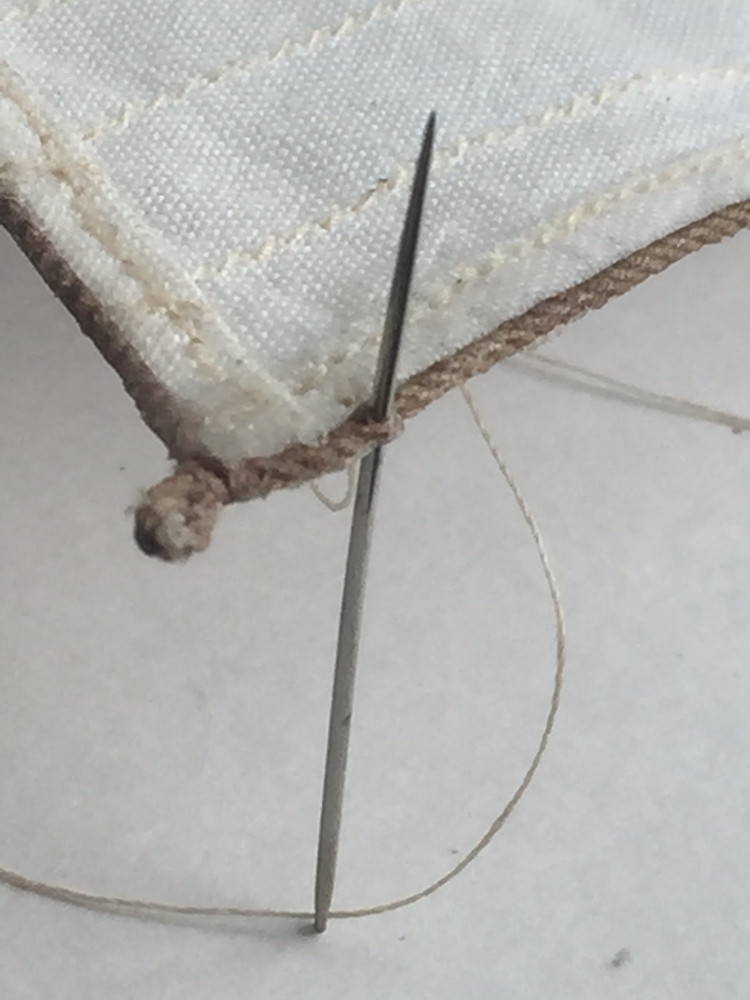 角の部分が外れやすいので先にその部分だけ縫い付ける
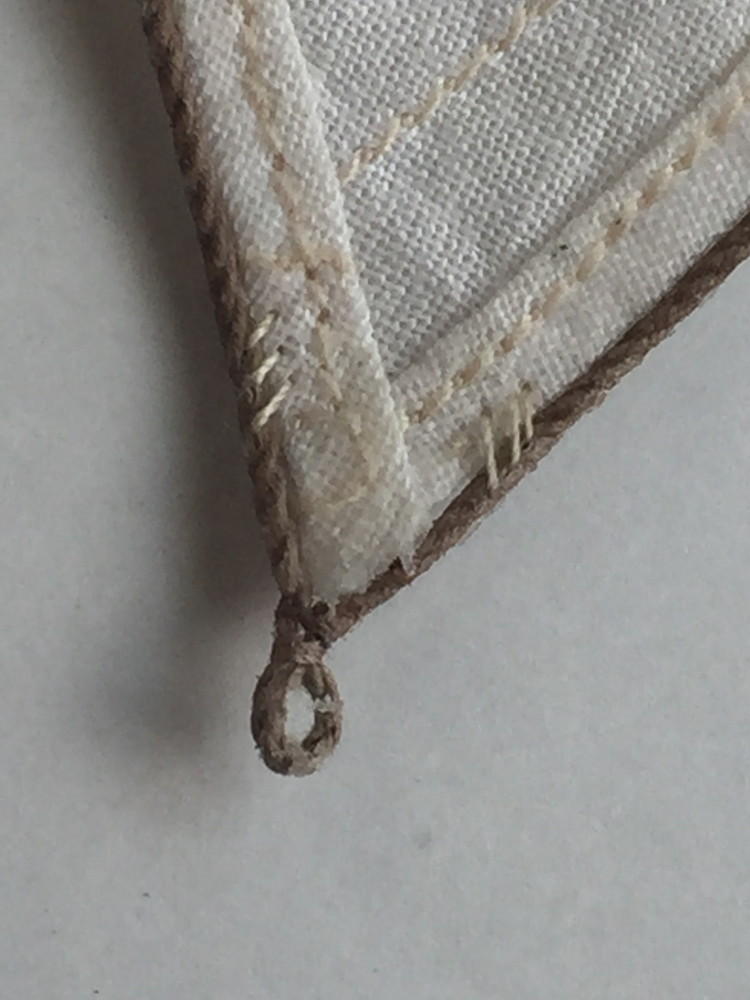 このような形に縫い付けた
I sewed it on such a form.
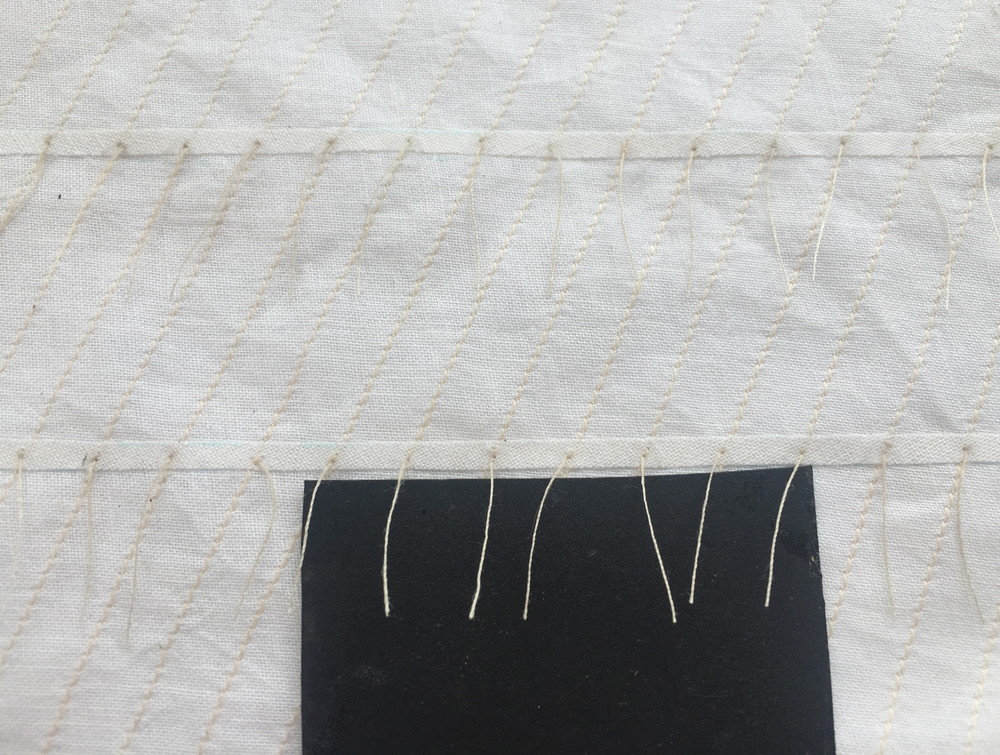 メインとフォアセールに90番の糸でリーフポイントを取付け、布から抜けないように結ぶと
結び方が上手く出来ないで糸があっちこっちに暴れてしまうので布に一回まわしただけで
木工ボンドで止めた、作業はこの方が早い
I do not go well when I grow not to leave cloth.
I stopped it in woodwork bond just to have invested it in cloth once.
As for the work, this one is early.
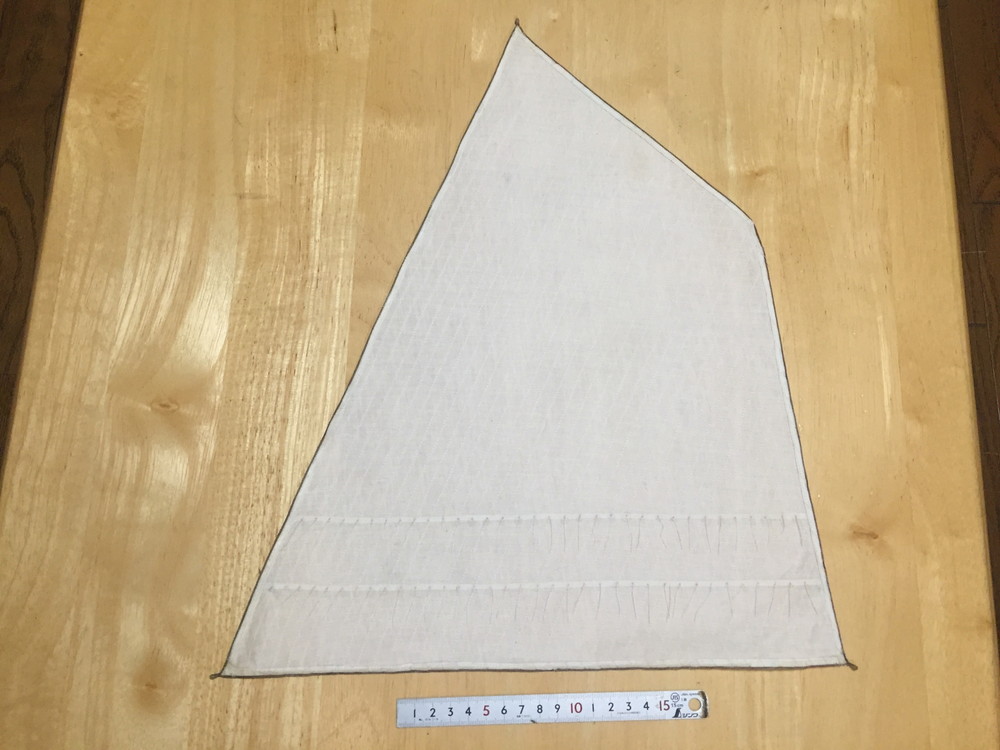 ボルトロープを縫い付ける予定でいたが、意外としっかりと付いていて外れそうに無かった
ので今回はこのまま行くことにした
I was going to sew boltrope, but stopped it in the way that I was accompanied well unexpectedly and came off because there was not it.
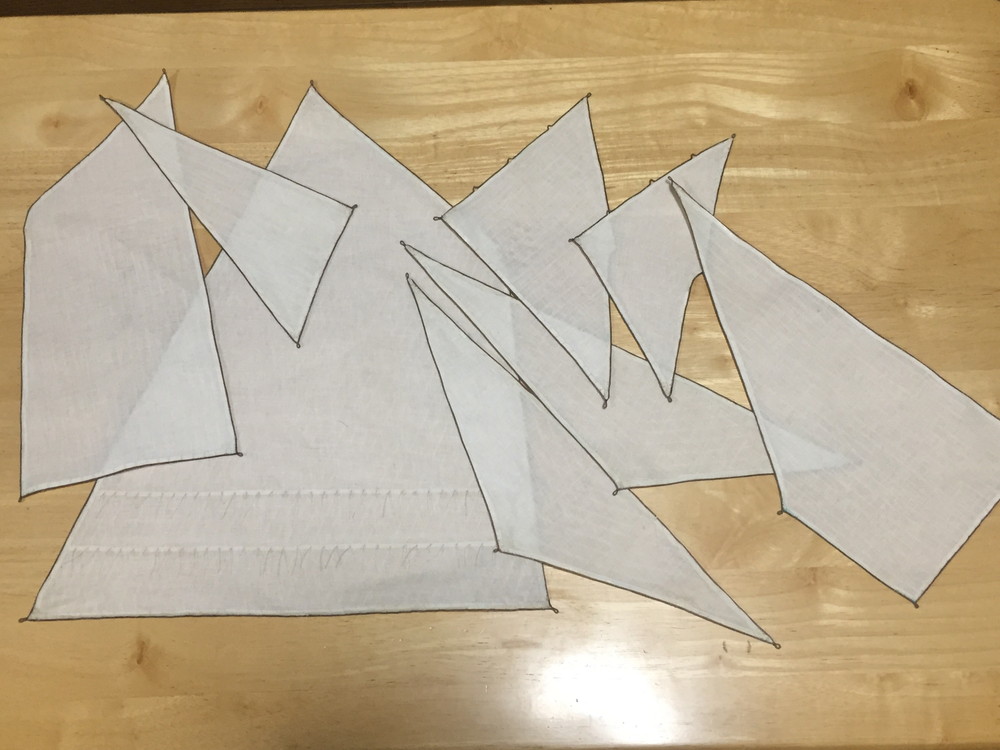 完成した8枚のセール、上手く作れるか心配したが、それなりの形になった
Eight pieces of finished sales.
I could make it well or worried, but became some form.
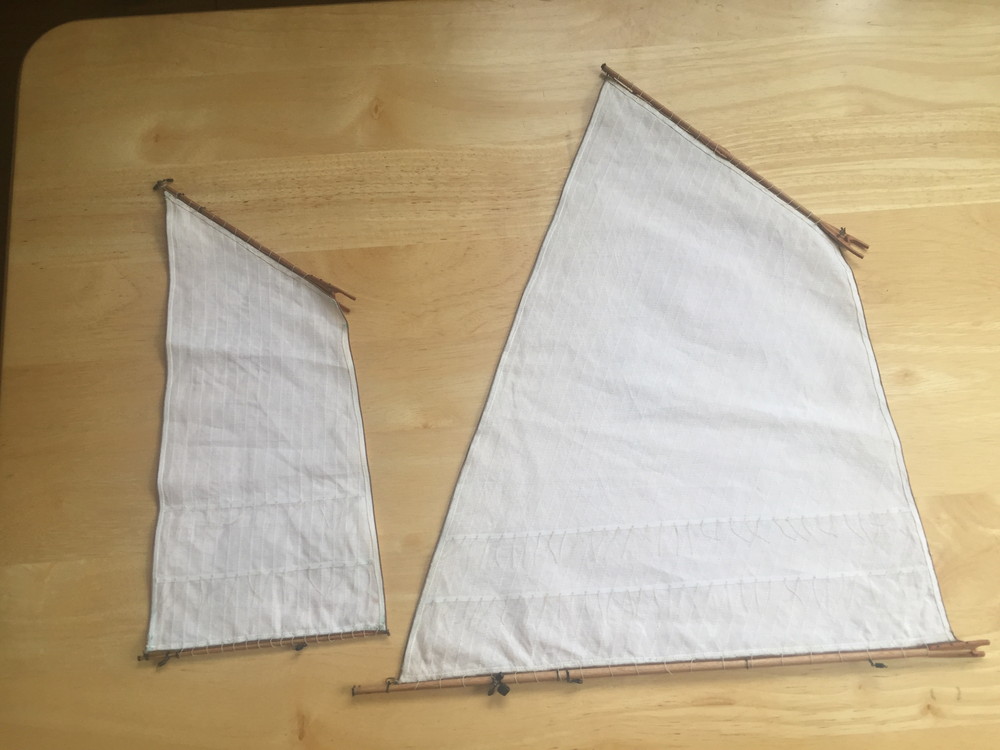 メインとフォアセールにはリギングの作業がやりやすいように先にガフ、ブームを縫い合わせた
I seamed a gaff, a boom together earlier so that work of the rigging became easy for Maine and a forehand sail.
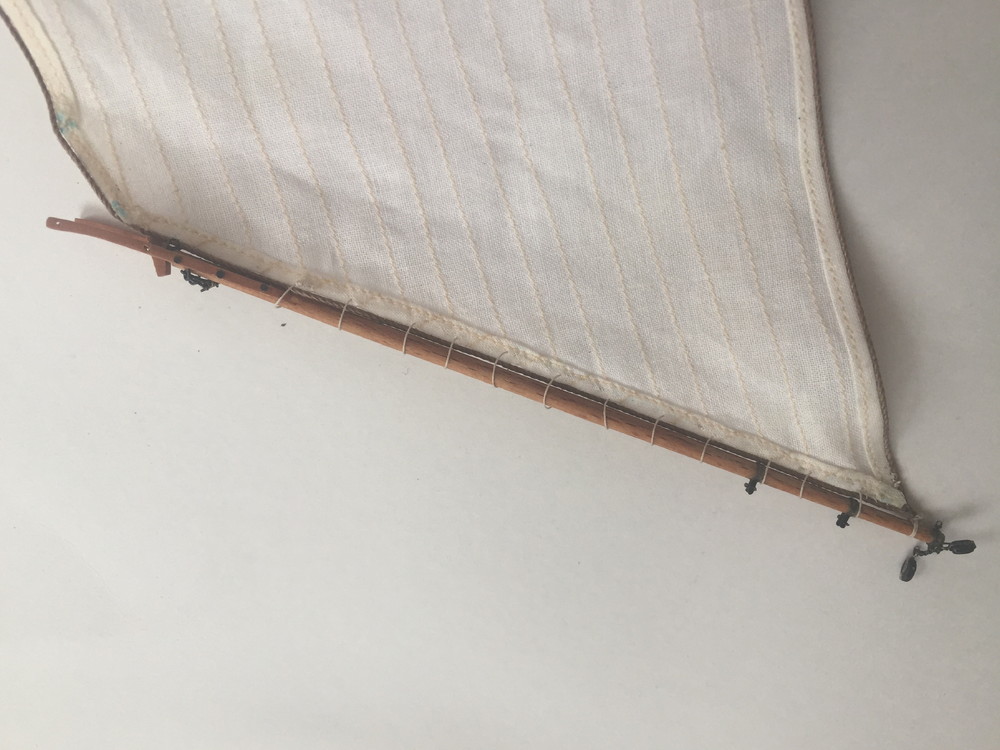 ガフやブームへの巻付けから次の巻きつけ位置への横糸を外に出すと綺麗に見え無かった
ので横糸はセールの縁の袋状の中を通した。
The weft let it go through in form of bag of the relationship of the sale.
The production of Rigging
Die Produktion von 22 #Verkäufe
Ich färbte Stoff mit Tee.
Ich kopiere Form von Stoff.
Ich benutze den verschwindenden aqueous-Kugelschreiber.
Ich kopiere Form von der Spitze der Zeichnung.
Ich kopiere einen Umriß und die Linie vom Nähen zusammen von den 8 mm von Intervallen.
Ich trage an der Linie vom Nähen zusammen ein nähend Maschinen-.
Ich mache das Losziehen, bei ein 8 mm von Intervallen vorsichtig gerade zu nähen.
Aber der Umriß machte Krümmung, als ich einen Herrscher gewann und es bestätigte.
Der Punkt für Verbesserung.
Die Sache, daß der dreieckige Fockverkauf eine gerade Linie gewesen sein sollte, hat einen konvexen Kurs gefälscht.
Ich mache wieder ein Sprühgerät und trage ein Dampfeisen.
Ich war fähig, es ziemlich zu revidieren.
Ich ziehe eine Zeichnung und das Liegen wieder auf Umriß.
Es ist notwendig, das nächste Schiff einem Prozeß zu überdenken.
Ich ziehe zwei von ihnen, eine Linie zu 3 Millimetern in Weite des Aufschlages ins außerhalb des Umrisses.
Ich befestige eine Grenze mit einem Spachtel zum Nähen, um fähig zu sein, es Gerade zu falten.
Ich kehre einmal ein Segel um.
Ich setzte Hitze Adhäsionsdoppelt-Stock Band von den 3 mm von Weite äußer.
Ich schnitt jeden Stoff mit der Schere, nachdem ich es gesteckt hatte, weil das Doppelt-Stockband 10 mmi-Weite war.
Ich stellte es zum Gesicht zurück.
Ich füge einmal Hitze und Klebstoffdoppelt-Stockband zusammen mit einem Eisen hinzu, während ich es bricht
Stoff doushio kann einmal schon am Umriß des Verkaufes stecken, während sie trotz es von Papier reißen, eine Gelegenheit zu sein, es aufzuziehen.
Eine Tasche-geformte Beziehung ist möglich
Ans innerhalb der Linie mache ich vorsichtig eine nähende maschinelle Klippe
Die Geschwindigkeit macht es beachtlich langsam.
Es ist schwierig, es zu nähen, nicht an der Mitte der Linie zu halten, um nicht wieder vom Rand abzuweichen.
Weil es nicht die Erfahrung vom nähenden Maschinen-gab, übte ich es mit Randstoff oft und forderte es bis zu diesem Jahr heraus.
Ich war fähig, alle Segel zu schließen.
Hochkant vom boltrope installieren Sie es.
Ich nähe es auf dem Stoff des Segels.
Ich haftete in Holzwerkband, leicht zu sein, es zu nähen.
Weil der Teil der Ecke leicht ist, abzugehen, nähe ich früher nur den Teil.
Ich nähte es auf so einer Form.
Ich installierte die Blattpunkte mit dem 90. Faden für Maine und ein Vorhand Segel.
Ich gehe nicht gut, wenn ich wachse, um keinen Stoff zu verlassen.
Ich hielt es in Holzwerkband an, um ihn/es erst einmal in Stoff investiert zu haben.
Wie für die Arbeit ist dieser früh.
Ich werde boltrope nähen, aber hielt es auf die Weise an, daß ich gut unerwartet begleitet wurde, und ging ab, weil es nicht es gab.
Acht Stücke fertige Verkäufe.
Ich konnte es gesund oder besorgt machen, aber wurde etwas Form.
Ich säumte eine Gaffel, ein Boom früher zusammen, so daß die Arbeit der Manipulation für Maine und einen Vorhand Verkauf leicht wurde.
Vom Volumenlaufenden Konto zu einer Gaffel und einem Boom dem nächsten wenn wickelt sich, und legt den Schuß hinaus auf die Position fest, ein Aussehen ist schlecht.
Der Schuß ließ es durch in Form der Tasche der Beziehung des Verkaufes gehen.
#23 リギング
シュラウドの作成
The making of the shroud
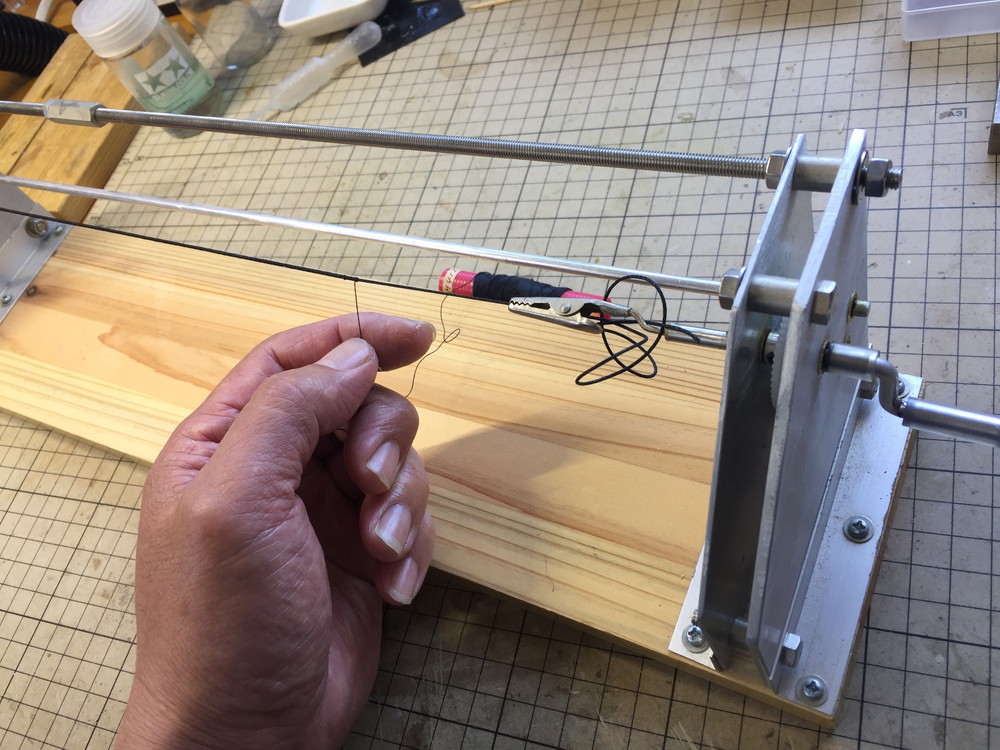 マストにかかるロープにはサービングを施す。自作の手回し式サービング機にロープになる糸を掛けΦ0.3程度の糸を水で薄めた木工ボンドを付けながら巻きつける
I make serving on a rope.I use the one’s own preparations-type serving machine.I wind the thread of a diameter of 0.3mm around a rope.I add the woodwork bond which I weakened with water to a thread.
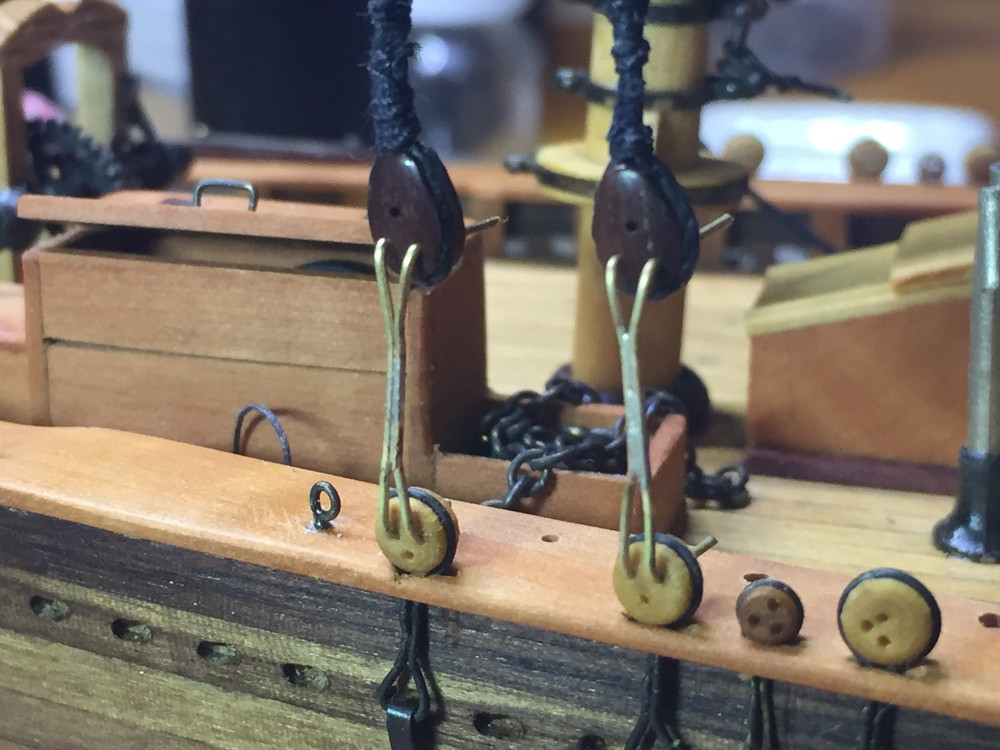 デッドアイの間隔がおなじになるように真鍮線をロー付けした治具で止め、デッドアイにロープを括り付ける、簡単そうに見えてなかなか難しい
he distance of the dead eye becomes same.I use the jig which did Silver-soldering a brass line.I tie a rope to a dead eye.It seems to be easy and is very particular.
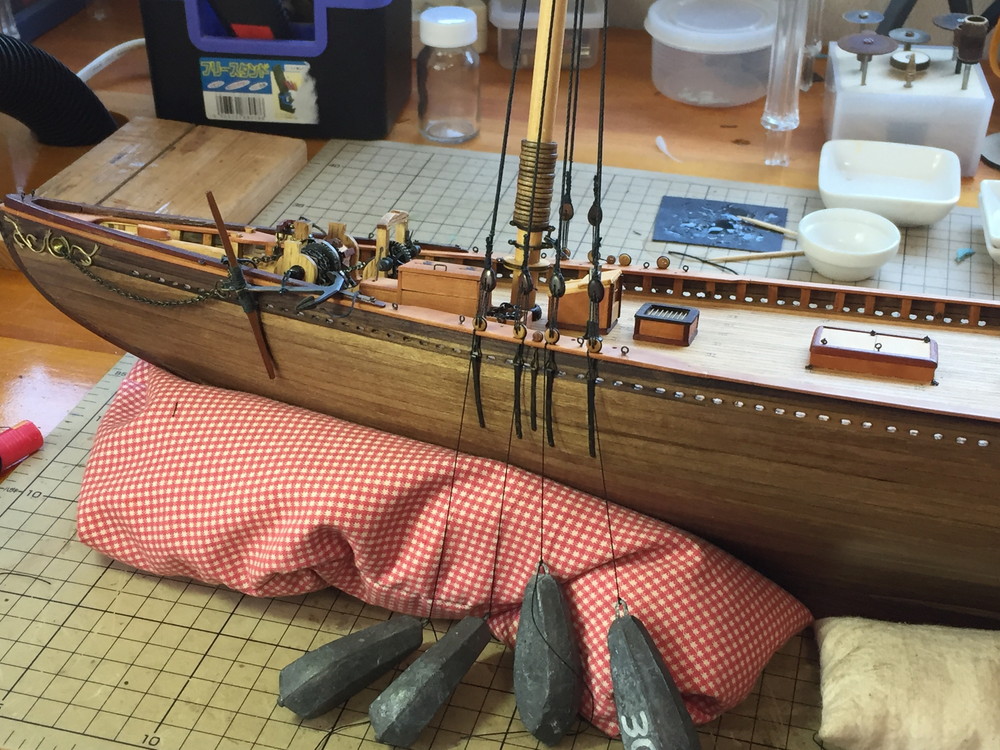 ラニヤードの糸を通したところで、反対側の作業をするため、そのまま引っ張っておきたい
何か無いかと探し、趣味の海釣りの錘が有ったので取りあえずそれで引っ張る事に。
I draw it out with a weight for fishing at sea to work on the other side in the back through the thread of the lanyard.
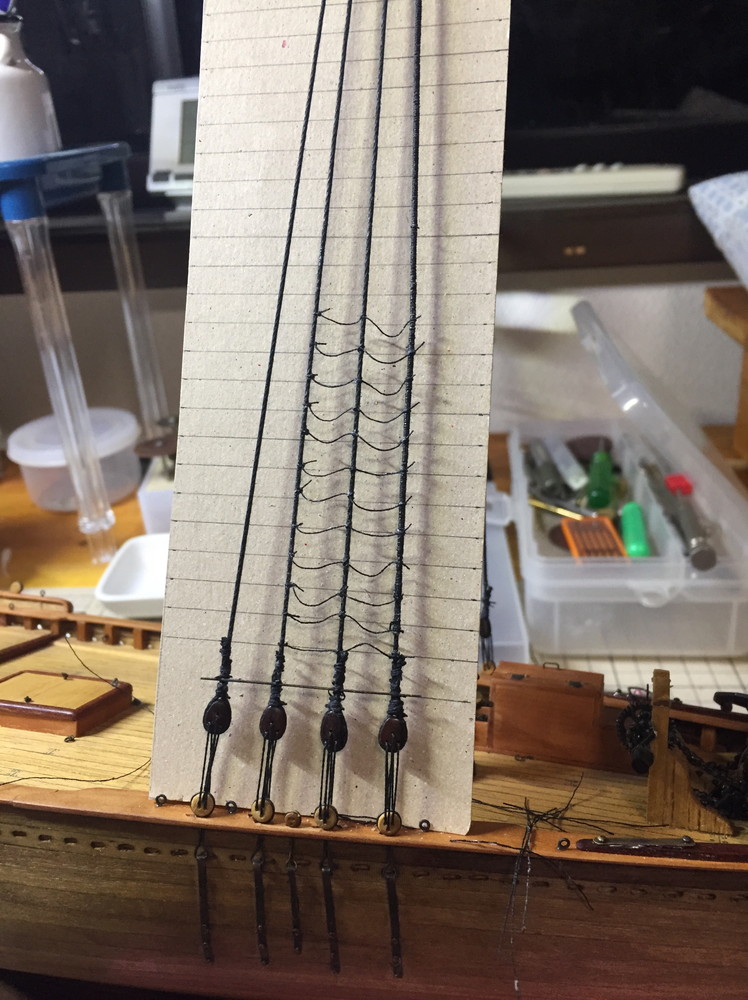 ロープが張れたらラットラインを括り付ける、糸の太さはシュラウドのロープに比べはるかに細い糸を使用、上下の間隔は実船で約35センチ程度なので1/64スケールで5.5ミリとし裏側にその間隔で線を引いたゲージをはり、ラットラインの結び目がゲージに沿っていることを確認しながら作業をする、ラットラインは少したるませた方が良いとの事ですが、同じ程度のたるませ方で括るのは結構むずかしいものです
水で薄めた木工ボンドをつけて結び目及び下に向かってたるむよう固着する
If tension is completed, a rope ties ratline to the next.
The thickness of the thread uses a thin thread in comparison with the rope of the shroud. A fruit is about around 35 cm by ship in the space of the top and bottom.Because it is 1/64 scales, I assume it 5.5mm.I set up the gauge that attracted a line in the backside of the shroud.A knot of the ratline confirms that there is it along a gauge.
It’s better , ratlines had some slack.However, ALL Ratlines have same slight sag is difficult like all. I soaked the woodwork bond which I weakened with water, and and a knot left below and fixed it to have flabby it.
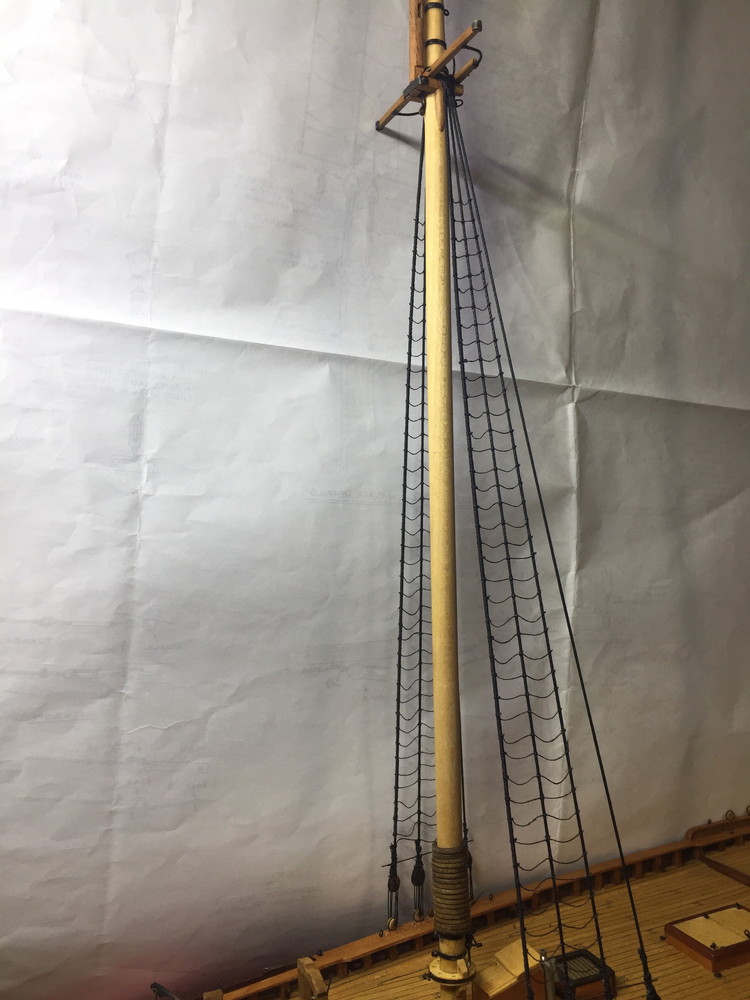 なんとかフォアマストのシュラウドが作れました、上出来では無いですがなんとか許せる範囲かと自分を慰める、メインマストも同じようにしなければ フゥ〜
I was able to make the shroud of the fore mast somehow.It is well done, and there is not it, but cheers up result and oneself who are passable,Did the work of the main mast next, and was tired; Wwooo
 ターンバックルの作成
Making of the turnbuckle
図面にターンバックルの絵があり、構成部品として無視する訳にはいかないので製作にチャレンジ。ホームセンターで本物の形を観察し工法を決める
There is a figure of the turnbuckle for a plan.Because I cannot ignore it as a component, I challenge production.I observed genuine form in Home Center and then decided a method of construction.I make six same things.
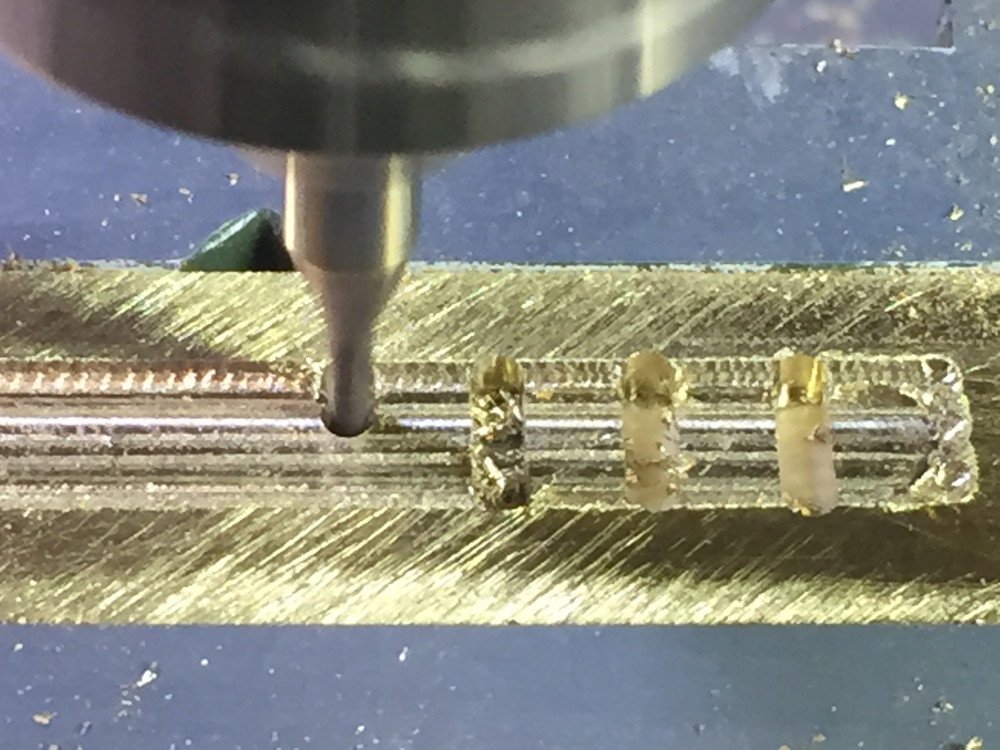 6個同じものを作るので真鍮板を加工し6個の形状が同じになるよう並べた形でエンドミルで加工、真ん中の彫込部を裏表加工する
I displayed it so that I processed a brass board, and six shape agreed.I process it with an end mill.The right side and the wrong side process the cutting groove department of the middle.
 荒加工が出来た
Processing was almost possible
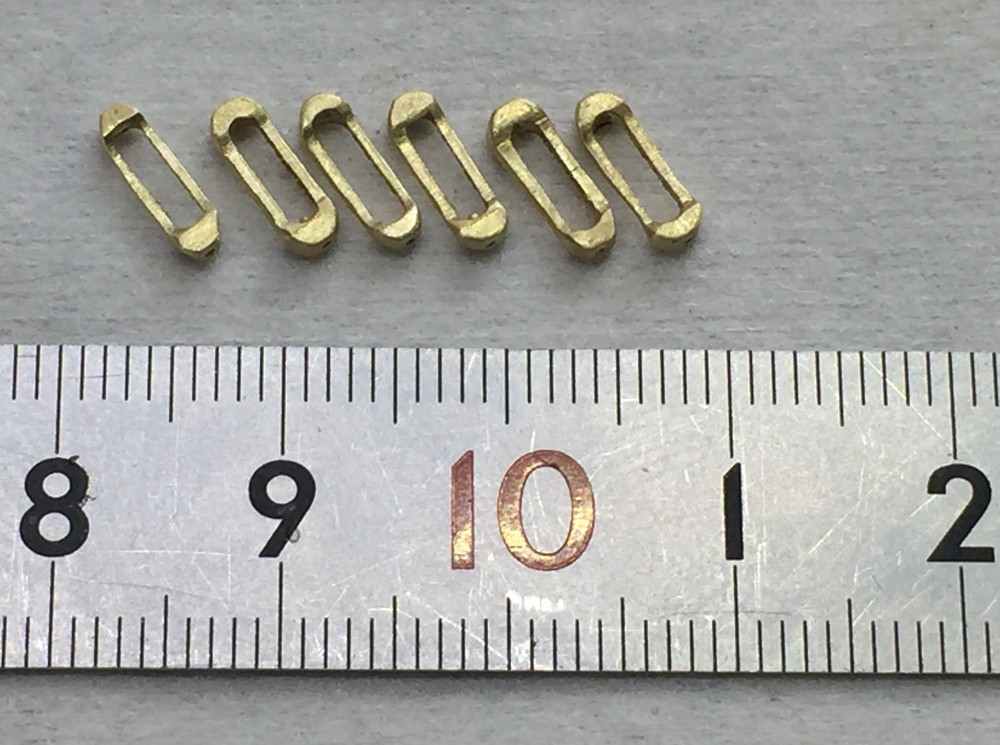 切り離して外形部と全体の仕上げをし、両側にボルトになる真鍮線の通る穴を加工し本体部分が完成
I separate it; total with external form region; I finish it, and the brass line goes on both sides; I drill it; a body portion is completion.
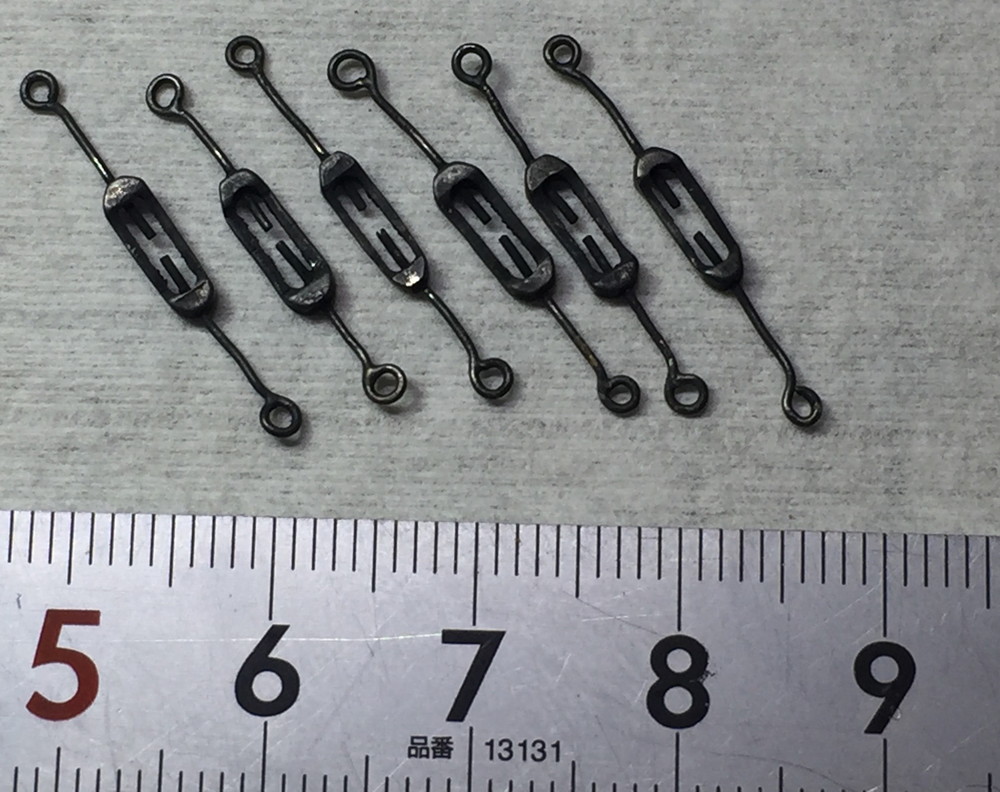 真鍮線を両側から差込み、ロー付け、黒染めをするとターンバックルの完成ネジは切ってないが遠目にみればそれらしく見えた、自己評価85点
Insert brass route from both sides, and do a silver rou low charge account, and do black coloring, and completion of the turnbuckle does not cut the screw, but seem to be it, and is seen; is 85 points of self-evaluation
 セールの取付け
The installation of the sale
マストに滑車を取り付ける、この船の滑車は金属のフックがついているので滑車を作るのは大変だが、取付けは糸で括る必要がなく、作業が楽である
Serious as for what I install a block on a mast, and a metal hook sticks to the block of this ship, and make a pulley, however, bind a block with a thread, I am not necessary, and working is comfort.
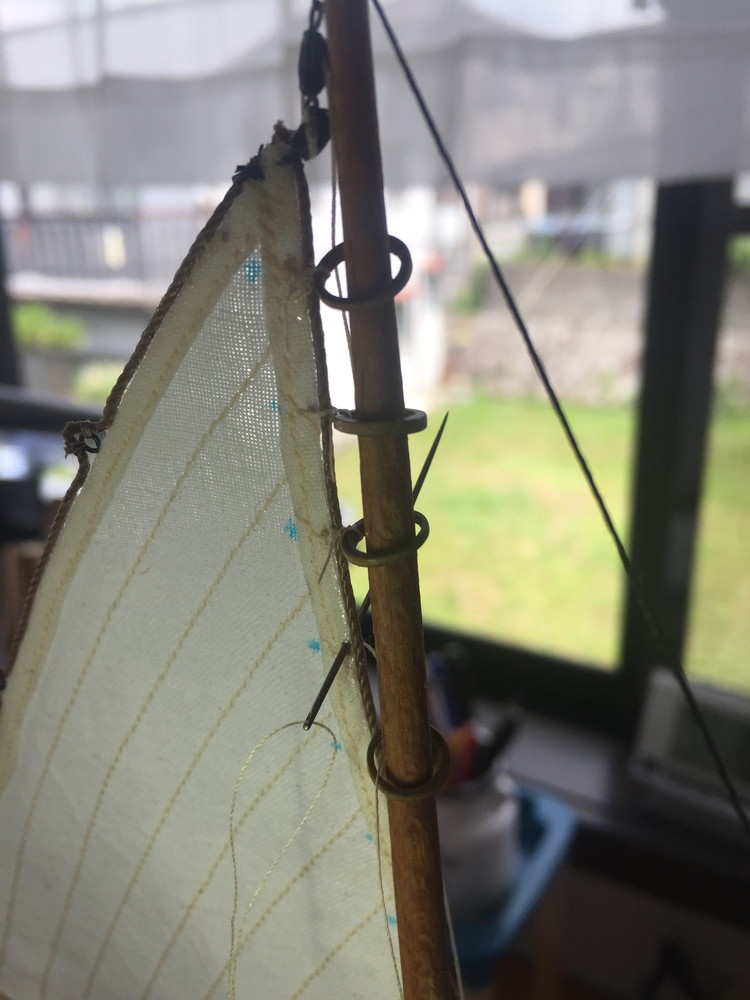 セールの取付け、マストリングにセールを括り付ける
リングの一が均等に配置するようにセールにチャコペンで印をつけ目安とする
I tie a sale to a mast ring, and the installation of the sale marks a sale with Chaco-pen so that the interval of the ring becomes same interval.
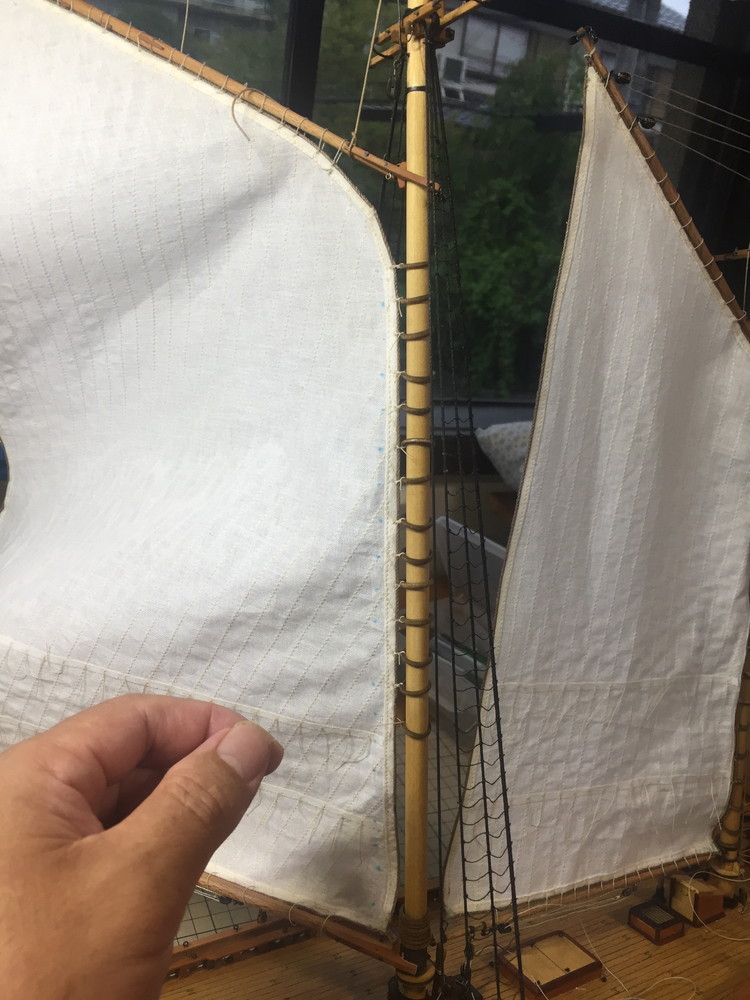 リングの数が多いのでこの作業もなかなか大変
Because there is much number of rings, this work is very great
メインのガフを吊り 下げると何となく帆船らしくなってきた、こういう作業は楽しい
模型の船でもけっこう大変な作業であるが、実際の船のこういう作業は高所でもあり、大変であっただろうなあと余計なことを考えてしまう
I hang a main gaff and it seems to have become a sailing boat, and such a work is happy, and it is the work that is quite serious by ship of the model and, however, the work by the real ship is a high place and imagines it when it is serious work.
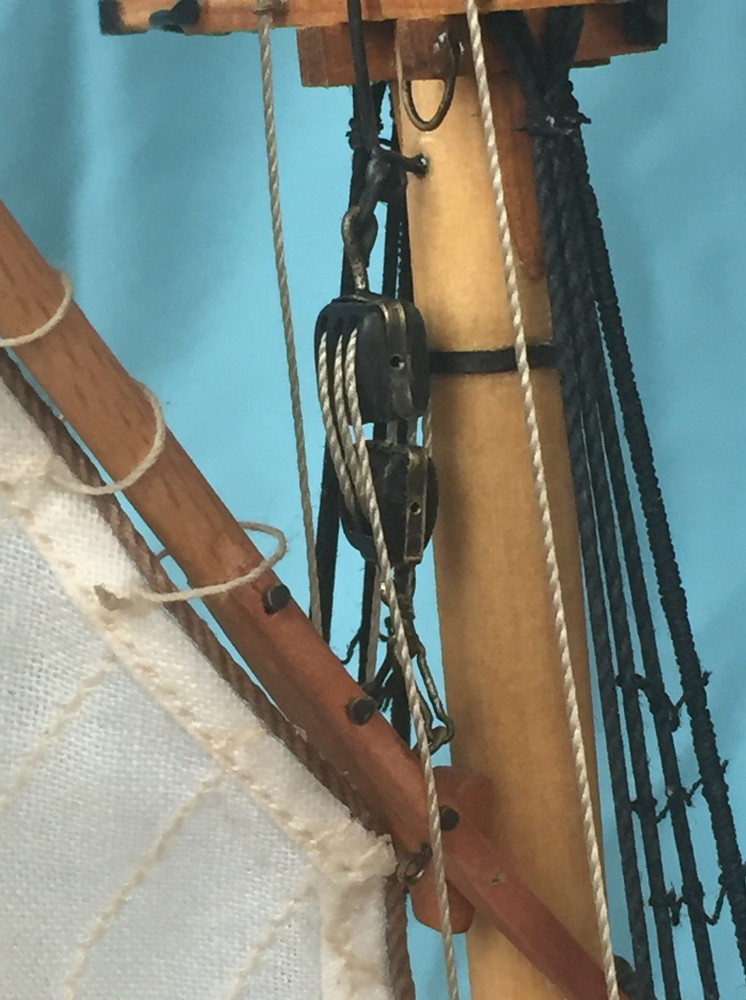 ガフのマスト側の吊り上げ部、セールにたるみが出ないようにもう少し上げたいがもう上げ代がない、
図面通り作ったつもりだが滑車の長さ、リンクの長さ等僅かの違いの累積で図面どおりとは行かない
A boost department of the mast side of the gaff wants to give it a little more so that slack does not appear for the sale and, however, I already give it and there are not charges and intends to have made it according to the plan, but does not go according to the plan by the accumulation of errors such as the length of the pulley, the length of the link
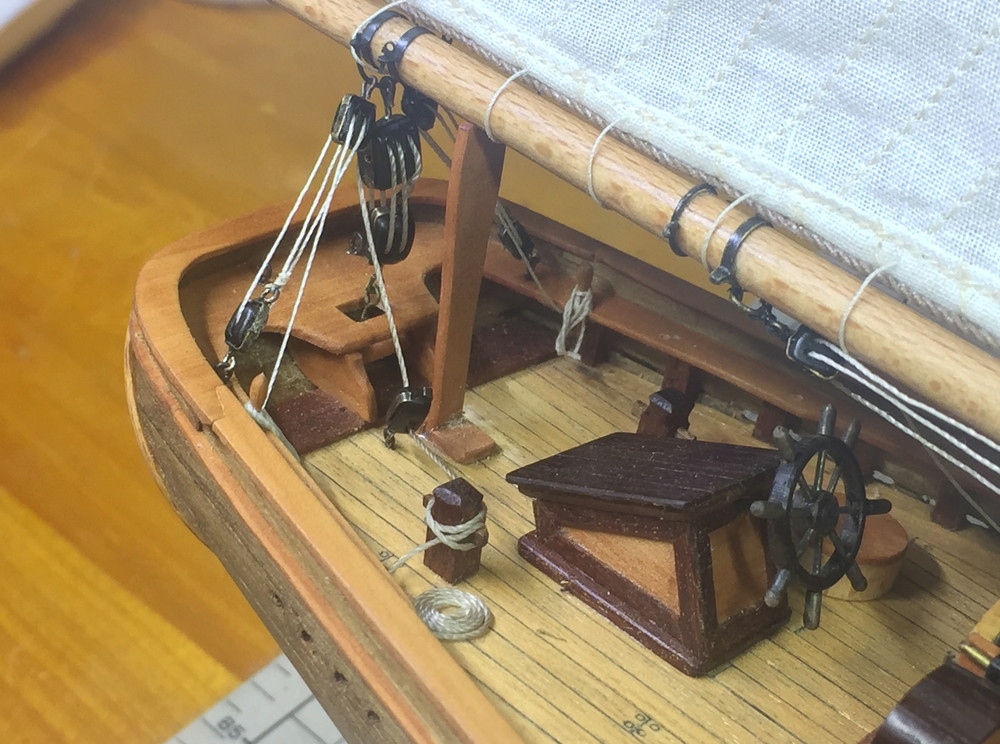 ブームも一番下の一で引っ張って留めるが メインセールにたるみが出来た。作業のプロセスに過ちがあると思う
図面通りに型をとってセールを作っても他の部分の狂いもありその通りには行かない事が分かった。
 ブームやガフの上下の位置の調整代を考えてそれを考慮してセールの大きさを決めないと失敗することになる事を勉強した
Even if I thought that there was a mistake in a process of the work and asked it a model according to the plan and made a sale, there was being out of order for the other departments and understood that I did not go to plan just what after all.
I thought about the adjustment charges of the lower position on a boom and a gaff and learned that I failed when I did not decide the size of the sale.
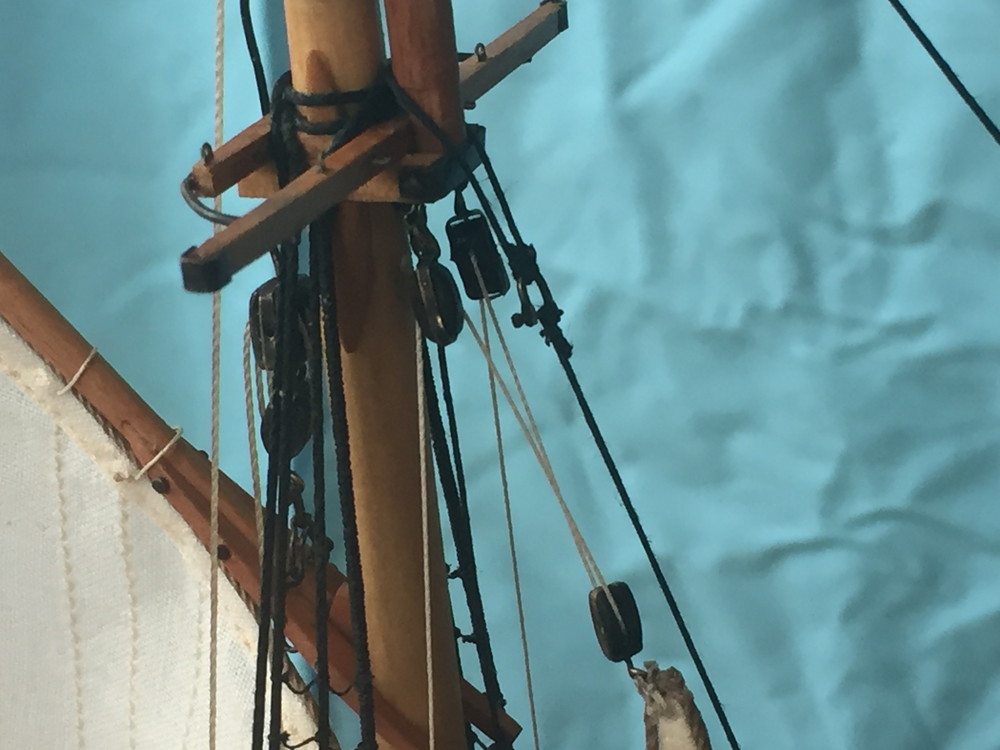 フォアマストのジブセール(三角帆)の取付け
先に作ったシャックル等でロープを引っ張ると本物らしく見えてくる
It seems to be a genuine article and is seen when I pull a rope to the tip of the jib sale (staysail) of the forehand mast with the shackles which I made earlier
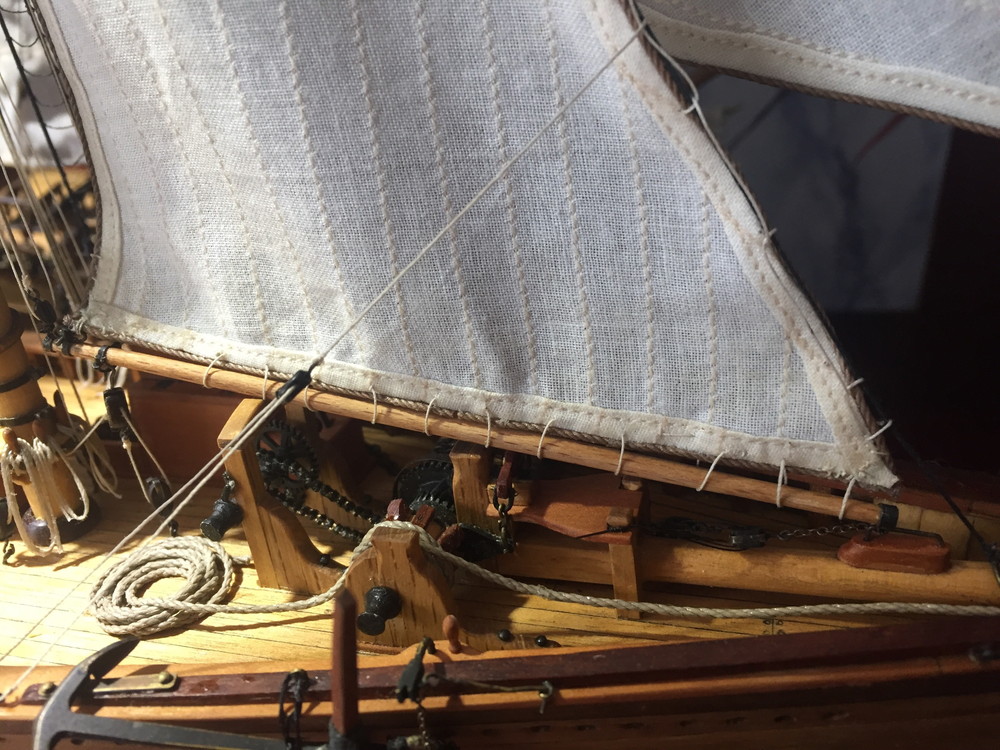 ブームの取付け
The installation of the boom
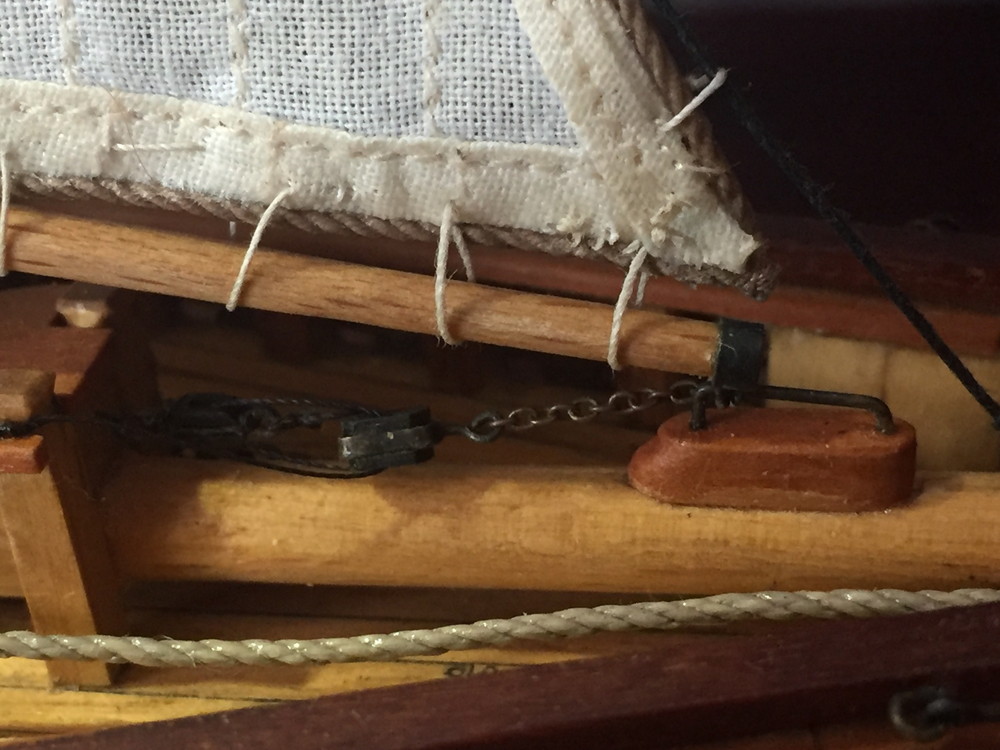 ジブセールのブームの前部はバウスプリットに接続される、金具に通してスライド出来、チェーンで引っ張る機構、細かい作業で大変
Mechanism it is connected to the bowsprit and puts the front part of the boom of the jib sale through the metal fittings and can slide, and to pull with a chain is serious by small work.
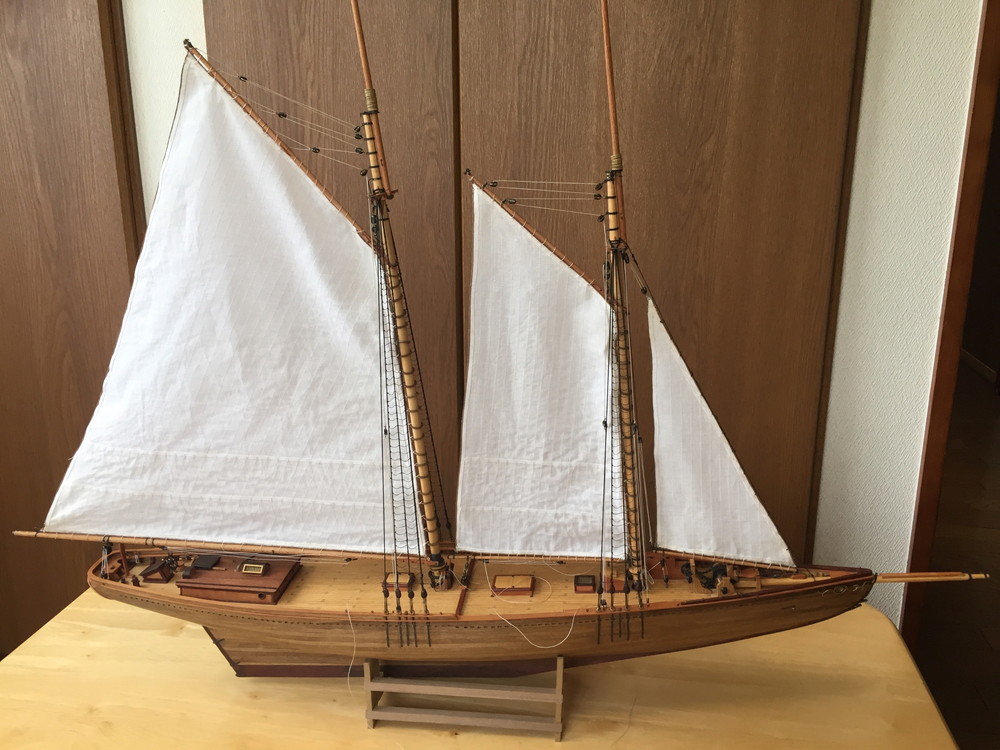 取りあえず3枚のセールが取付けられた、だんだん格好良くなってきた
Three pieces of sales were got and became gradually cool somehow.
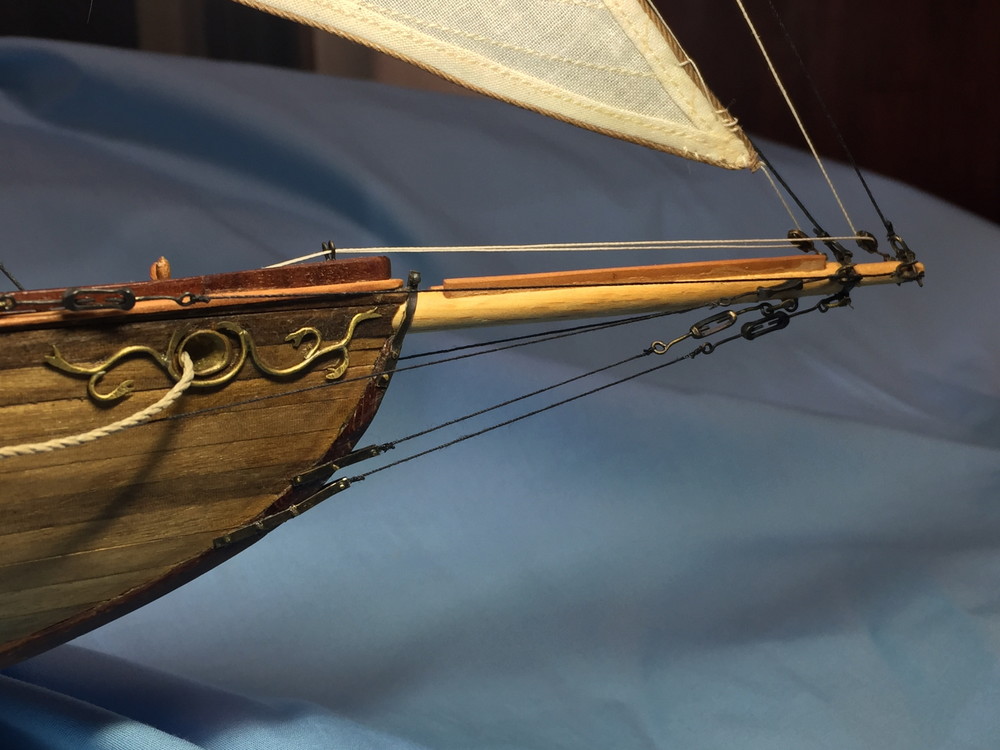 他のジブセールも取付け、バウスプリットの部分で引っ張る
先に作ったターンバックルが結構、存在感を出している、苦労した甲斐があった
I was worth I got the other jib sales, and turnbuckle in the bowsprit started presence, and having had a hard time.
 ビレイピンの部分のロープの処理
ピンに一旦括ってゆったりと巻きつける、これが結構難しい、真鍮棒で作った
自作の道具でロープを押さえながら、ピンセットで巻きつける、重力を感じさせる
様にするため、薄い木工ボンドを塗り押さえながらドライヤーで固まるまで乾燥させる。
The end of the rope to bireipin
I dry it to let I can coil myself with tweezers and feel gravity while controlling a rope with and I bind it to a pin once one’s own tool which I wind it, and it is quite difficult, and this made with a brass stick till I harden with a dryer while I paint with thin woodwork bond, and controlling it.
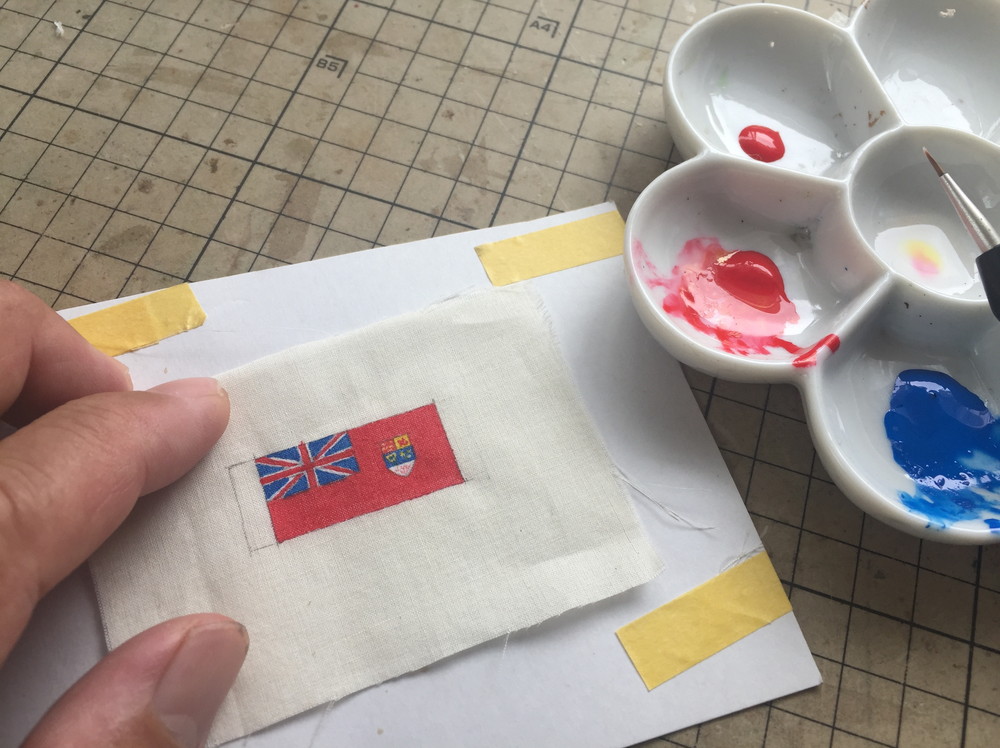 フラッグの作成
The making of the flag
キットに付属されている旗は現在のカナダの旗であり全く的外れなので作ることにした。布用の水性絵の具で1921年当時の旗を両面に描く
旗を上げる位置や大きさは当時の写真から想像して決めた
Because a flag of current Canada was irrelevant at all, the flag attached to to a kit decided to make it.
I imagined a position and the size I drew a flag at the time of 1921 on the both sides with aqueous paint for cloth, and to give a flag to from a then photograph and decided it
 赤い旗がワンポイントとなってかっこいいこのキットの図面には糸の太さが全て明記され非常に親切であるが、全ての糸の太さを調達できなかったためある程度グループ分けして作業した
A red flag became the one point, and I was cool, and it was specified the thickness of the thread for the plan of this kit entirely and I was very kind, but because I was not able to recruit the thickness of all threads, I grouped it to some extent and worked.
Das Machen vom Leichentuch
Ich mache Dienst auf einem Seil.
Ich benutze die eine eigene Vorbereitung-Typendienstmaschine.
Ich wickele den Faden eines Durchmessers von 0.3mm um ein Seil.
Ich füge das Holzwerkband hinzu, das ich mit Wasser zu einem Faden schwächte.
Die Entfernung des toten Auges wird gleich.
Ich benutze die Gigue, die Silver-soldering eine Messinglinie machte.
Ich binde ein Seil an ein totes Auge.
Es scheint leicht zu sein und ist sehr besondere.
Ich ziehe es mit einem Gewicht dafür, bei Meer zu fischen, um durch den Faden des Taljereepes auf der anderen Seite vom Rücken zu arbeiten, heraus.
Wenn Spannung vervollständigt wird, bindet ein Seil ratline an den nächsten.
Die Dicke des Fadens benutzt im Vergleich zum Seil des Leichentuches einen dünnen Faden.
Eine Frucht geht um um 35 cm neben Schiff im Raum von der Spitze und dem Boden.
Weil es die 1/64 Waage ist, ich nehme es 5.5mm an.
Ich stellte den Maßstab auf, der eine Falte in der Kehrseite vom Leichentuch anzog.
Ein Knoten des ratline bestätigt, daß es es an einem Maßstab gibt.
Irgendein ratline hatte Sie besser bummeln gelassen.
Kein Ratlines zieht aber” zu tighth, ist wie alles schwierig.
Ich durchnäßte das Holzwerkband, das ich mit Wasser schwächte, und und ein Knoten ging unten und reparierte es, es schlaff zu haben.
Ich war fähig, das Leichentuch aus dem Vorhand Mast irgendwie zu machen.
Es ist gut erledigt und es gibt nicht es, außer Beifallsrufen auf Ergebnis und sich selbst, das passierbar ist,
Machte die Arbeit vom Hauptmast nächster und war müd; wer ist
Das Machen vom turnbuckle
Es gibt eine Zahl des turnbuckle für einen Plan.
Weil ich es als ein Bestandteil nicht ignorieren kann, fordere ich Produktion heraus.
Ich beobachtete in Home Center echte Form und beschloß dann eine Methode der Konstruktion.
Ich mache sechs gleiche Sachen.
Ich zeigte es, so daß ich einen Messingausschuß verarbeitete, und sechs Form stimmte überein.
Ich verarbeite es mit einer Endmühle.
Die richtige Seite und der falsche Seitenprozeß die Ausschnittsfurchenabteilung der Mitte.
Processing war fast möglich.
Ich trenne es; total mit externem Formgebiet; ich beende es, und das Messing säumt, geht auf beide Seiten; ich bohre es; ein Körperteil ist Vollendung.
Beifügungsmessingroute von beiden Seiten, und macht ein silbernes rou Tieflaufendes Konto, und macht Schwarze-Färbung, und Vollendung des turnbuckle schneidet die Schraube nicht, sondern scheint es zu sein, und wird gesehen; ist 85 Punkte der Selbst-Einschätzung
Die Installation des Verkaufes
Ernst wie für das, was ich auf einem Mast eine Rolle installiere, und ein Metallhaken klebt an der Rolle dieses Schiffes, und bringt eine Rolle dazu, aber eine Rolle mit einem Faden zu binden, ich bin nicht notwendig, und das Arbeiten ist Bequemlichkeit.
Ich binde einen Verkauf an einen Mastring, und die Installation des Verkaufes markiert mit Chaco-Kugelschreiber einen Verkauf, damit das Intervall des Ringes Gleichgestelltes wird.
Weil es sehr Anzahl von Ringen gibt, ist diese Arbeit sehr groß
Ich hänge eine Hauptgaffel, und es scheint ein Segelnboot geworden zu sein, und so eine Arbeit ist froh, und es ist die Arbeit, die neben Schiff des Modells ganz ernst ist, und, aber die Arbeit neben dem wirklichen Schiff ist eine hohe Stelle und stellt es vor, wenn es ernste Arbeit ist.
Eine Auftriebsabteilung der Mastseite der Gaffel will ihm ein wenig mehr geben, damit lockerer Teil nicht für den Verkauf erscheint, und, aber ich gebe es schon und es gibt, beauftragt nicht und beabsichtigt, es dem Plan zufolge gemacht zu haben, aber geht nicht dem Plan zufolge durch die Ansammlung von Fehlern wie die Länge von der Rolle, der Länge der Verbindung,
Auch wenn ich glaubte, daß es einen Fehler in einem Prozeß der Arbeit gab, und fragte es dem Plan zufolge nach einem Modell und machte einen Verkauf, es gab aus Reihenfolge von den anderen Abteilungen und verstand, daß ich nicht ging, das zu planen, was doch.
Ich dachte über die Regulierungsgebühren der niedrigeren Position zu einem Boom und einer Gaffel nach und lernte, daß ich scheiterte, als ich die Größe vom Verkauf nicht beschloß.
Es scheint ein echter Artikel zu sein und wird gesehen, wenn ich ein Seil mit den Ketten, die ich früher machte, zur Spitze des Fockverkaufes (staysail) des Vorhand Mastes ziehe
Die Installation des Booms
Mechanismus es wird mit dem bowsprit verbunden und setzt den Frontteil des Booms des Fockverkaufes durch die Metallanproben und kann rutschen, und mit einer Kette zu ziehen, ist durch kleine Arbeit ernst.
Drei Stücke Verkäufe waren, bekam und wurde allmählich, kühlen Sie sich irgendwie ab.
Ich war wert, daß ich die anderen Fockverkäufe bekam, und turnbuckle im bowsprit begann Gegenwart, und habend eine harte Zeit gehabt.
Das Ende vom Seil zu bireipin
Ich trockne es zu lassen, ich kann mich mit der Pinzette wickeln und empfinde Ernst, während das Kontrollieren damit eines Seiles und ich es an eine Nadel bindet, sobald sein eigenes Werkzeug, das ich es wickele, und es ist ganz schwierig, und dies machte mit einem Messingstock, bis ich mich mit einem Trockner härte, während ich mit dünnem Holzwerkband, und das Kontrollieren davon, male.
Das Machen von der Fahne
Weil eine Fahne von aktuellem Kanada überhaupt irrelevant war, befestigte die Fahne zu zu einem Werkzeug, das entschieden wird, es zu machen.
Ich stellte mir eine Position und die Größe vor, daß ich zur Zeit von 1921 auf die beiden Seiten mit aqueous-Farbe eine Fahne für Stoff stützte, und zu davon eine Fahne zu geben ein fotografieren Sie dann und beschloß es
Eine rote Fahne wurde der ein Punkt, und ich war kühl, und es wurde die Dicke vom Faden für den Plan dieses Werkzeuges ganz spezifiziert, und ich war sehr nett, aber weil ich nicht fähig war, die Dicke von allen Fäden anzuwerben, gruppierte ich es in gewissem Maße und arbeitete.
#24 その他の艤装?完成へ
Equipment of a ship and the completion of 24 # others
① 汲み上げ用ポンプDraw it; a pump

写真はキットに付属してあったポンプの部品
これを黒く塗って取付けてもポンプらしくは見えないので、木で自作することにした。
The part of the pump which the photograph is attached to the kit, and there is.Because the genuine article did not show it even if I painted this black, I decided to compose by itself with a tree.
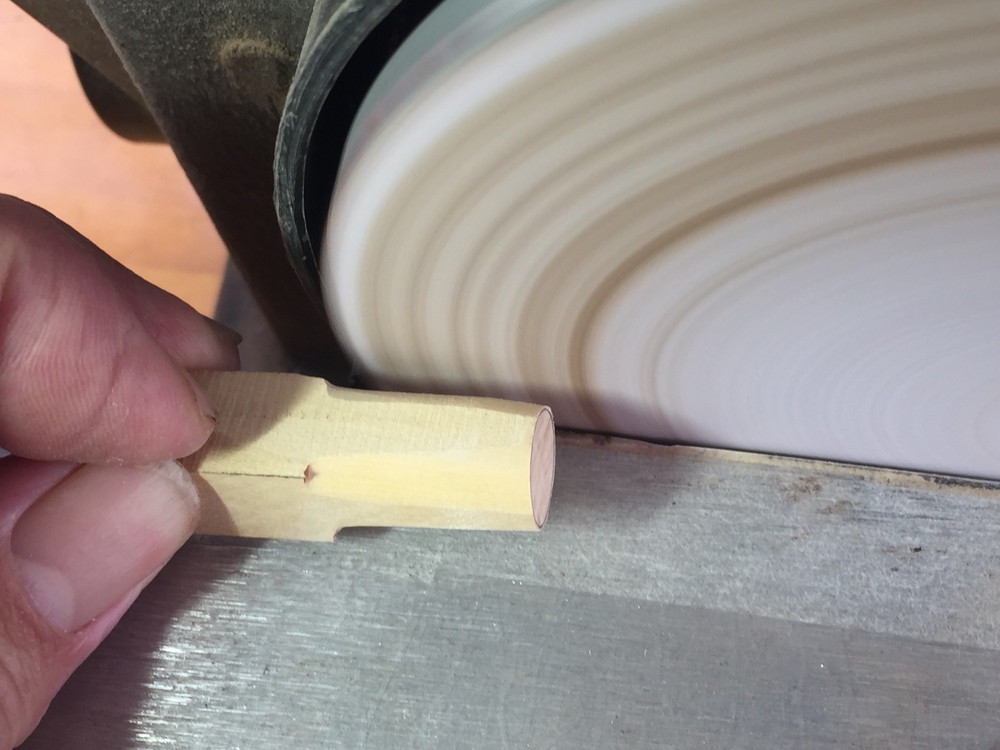 角材を丸くする、荒取りはディスクグラインダーが一番手っ取り早い
I round squared lumber, and, as for the wild final performance, a disk grinder is quick most.
 旋盤で綺麗に最大径の丸棒にして径方向の成形
I made it the circle stick of the greatest dimension with a lathe neatly and molded the diameter course.
 中心の穴と外形の粗取り
The fault collecting of the central hole and external form.
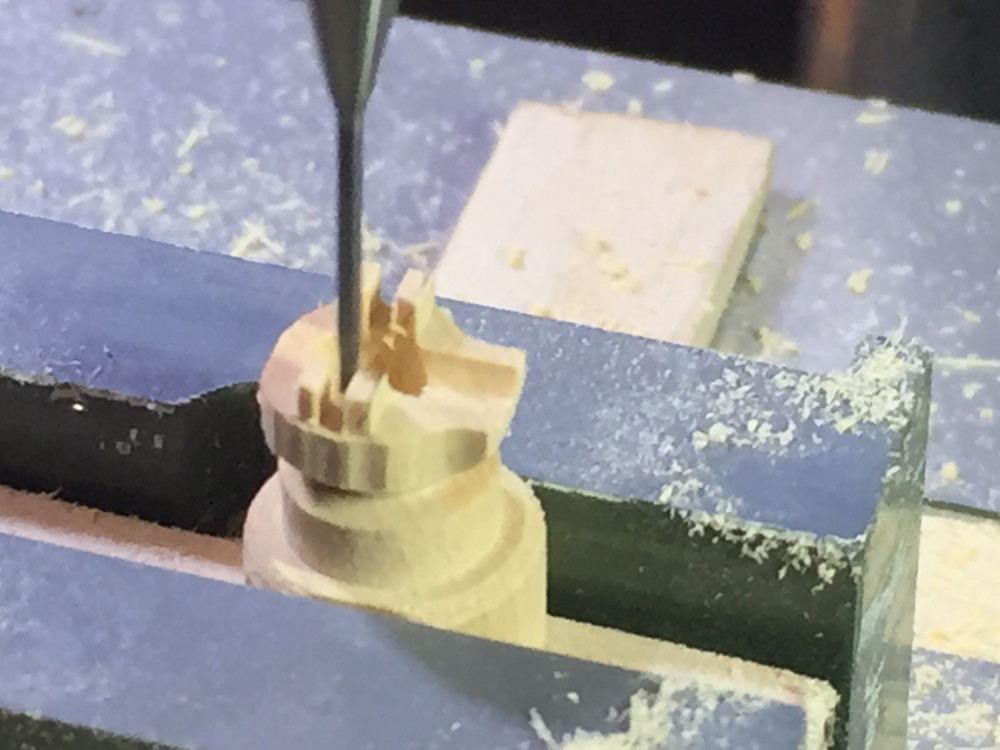
細かいところをエンドミルで成形
I molded a small place with an end mill.
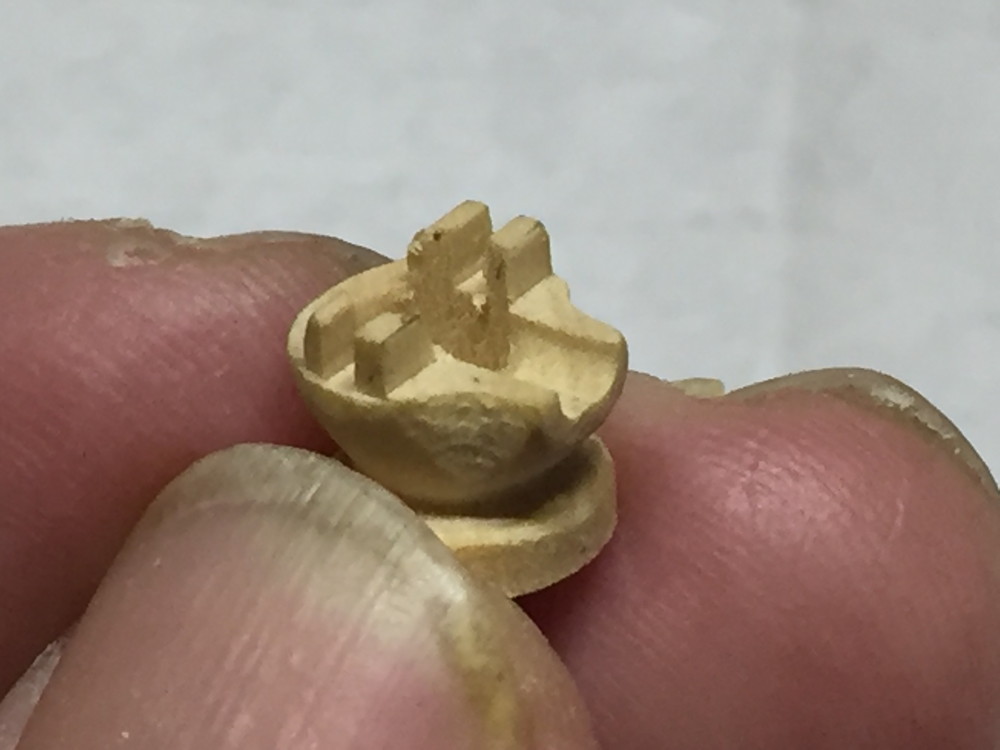 切り離すとポンプのボディーらしくなってきた
When it separated it, it seems to have become the body of the pump.
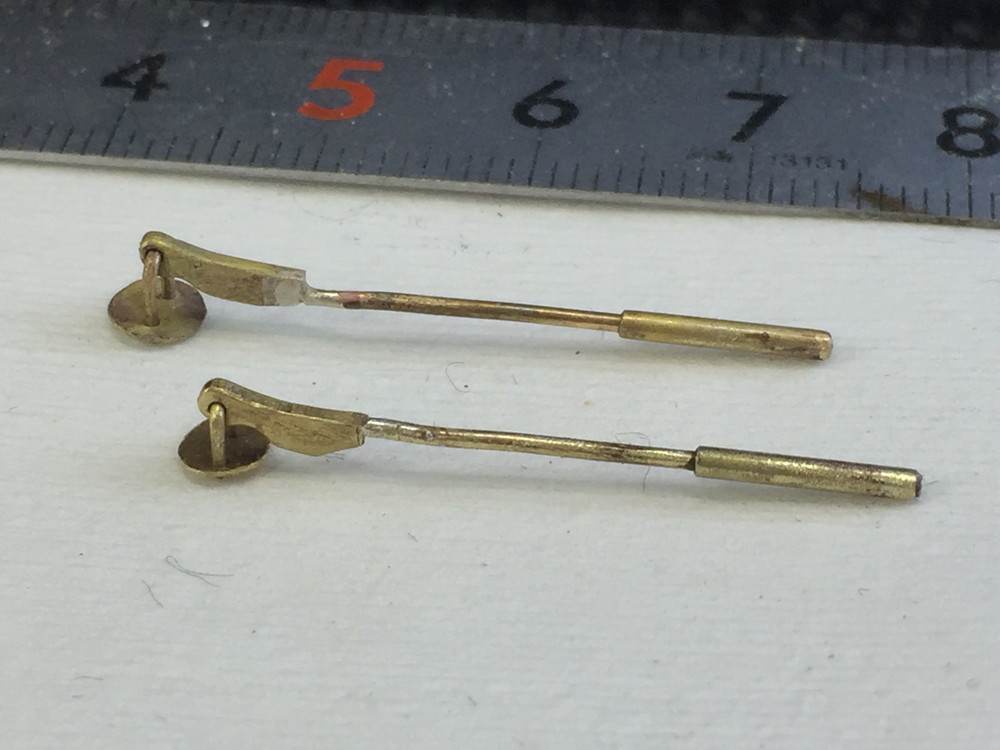 真鍮の板と棒、パイプを組み合わせロー付けしてハンドルの作成
I put a board of the brass, a stick, a pipe together and did Silver-Soldering and made a handle.
 ボディーはオイルステンで着色、ハンドルは黒染め後ボディーにピンで連結
The body connected the coloration, the handle with a body with a pin after black coloring in oil stain.
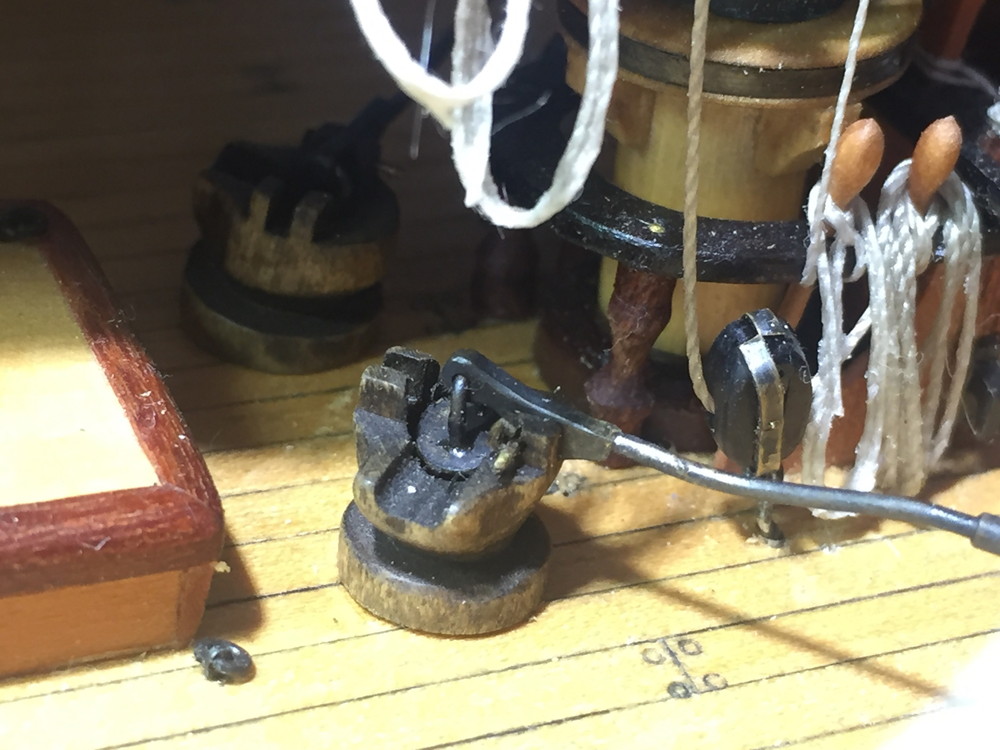 デッキに取付け、ポンプのハンドルは水抜き作業の時だけ取り付けるようであるが模型なので、取付けておいたほうがポンプらしいので、そうした
I was able to possess a deck, and actually the handle of the pump could possess it only at the time of draining off work, but was able to possess it because it was a model.
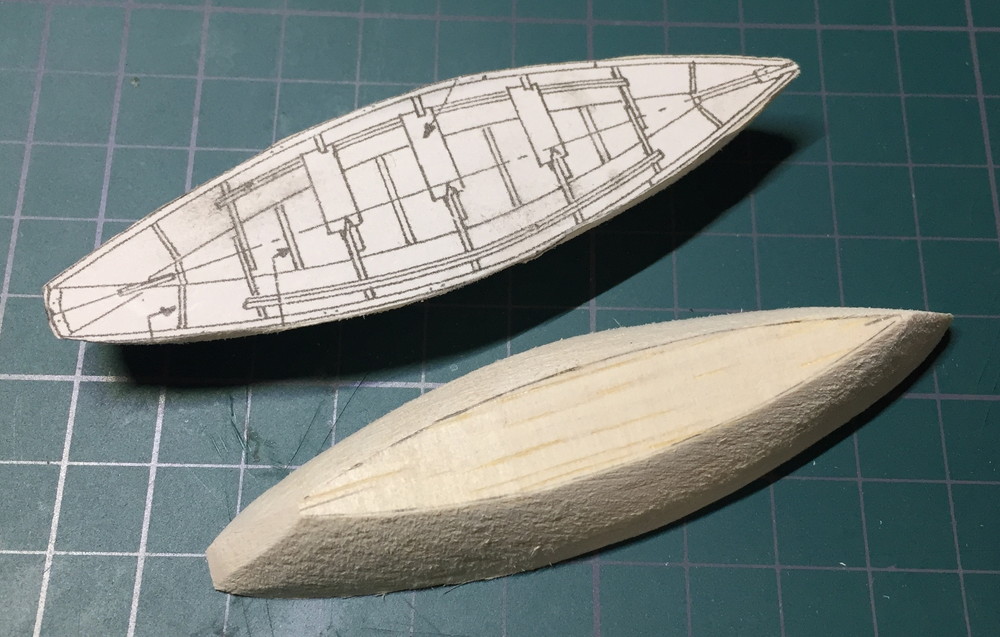 ② ボートの製作
2 The production of the boat
ファルカタ材に図面を貼り付けて成形、ボートの製作も全く初めてなので不安を抱えながら取りあえず着手
I started work while I stuck a drawing on farukata materials and molded it, and the production of the boat was the first time at all, and holding uneasiness.
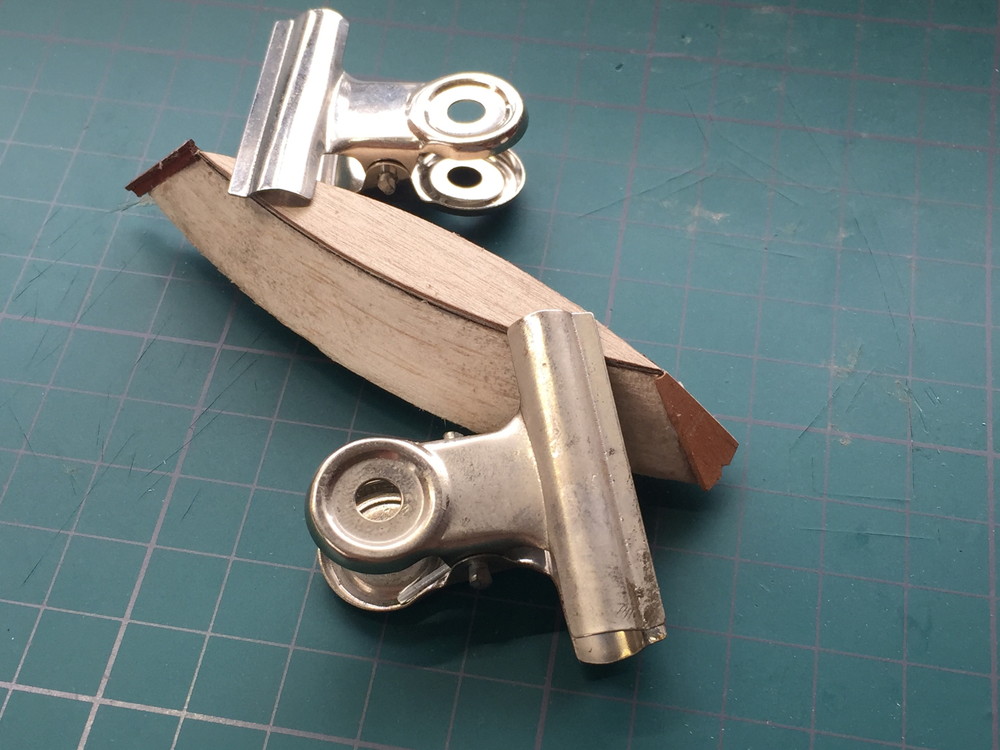 型材に周りの板を貼り付けて、後で型材を除去する工法を採用したので型材にロウを塗りつけて接着後剥がれやすくした、このノウハウも教えてもらいました。 底板、船首船尾の部品を貼り付ける。
I made it easy I stuck the board of the circumference on a shape and remove a shape after work completion and apply low on a shape, and to come off after the adhesion and stick soleplate, a part of the bow stern.
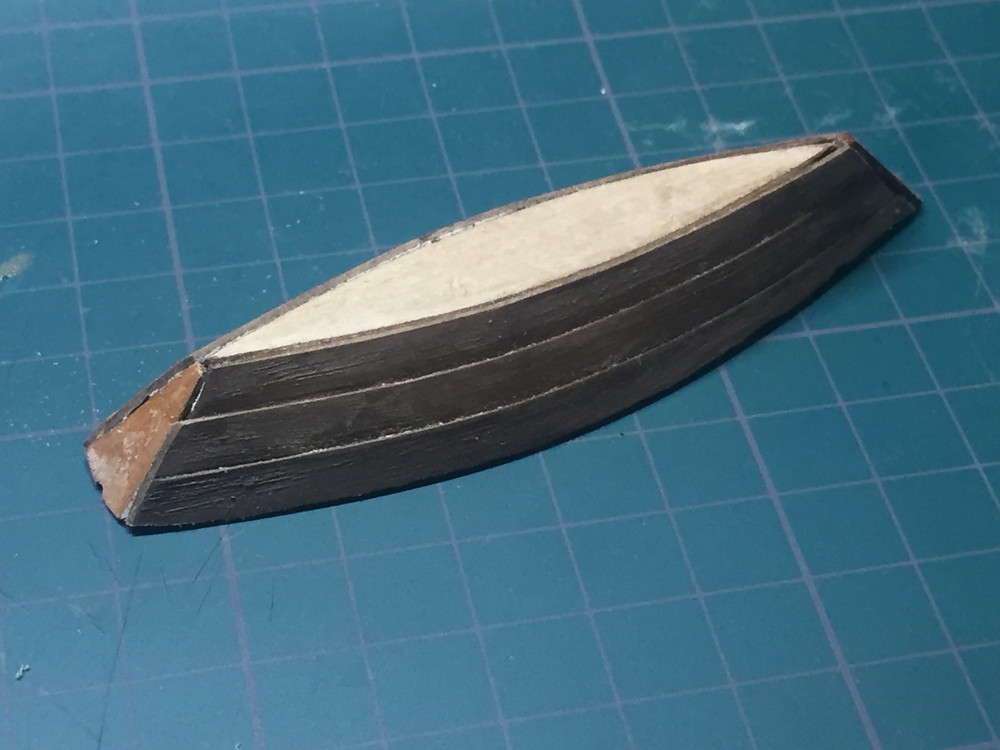 外板を図面通りに少し段を付けて貼り付ける、この部分は瞬間接着剤で固定
I attached some steps according to the plan and stuck a shell, and this part utilized superglue.
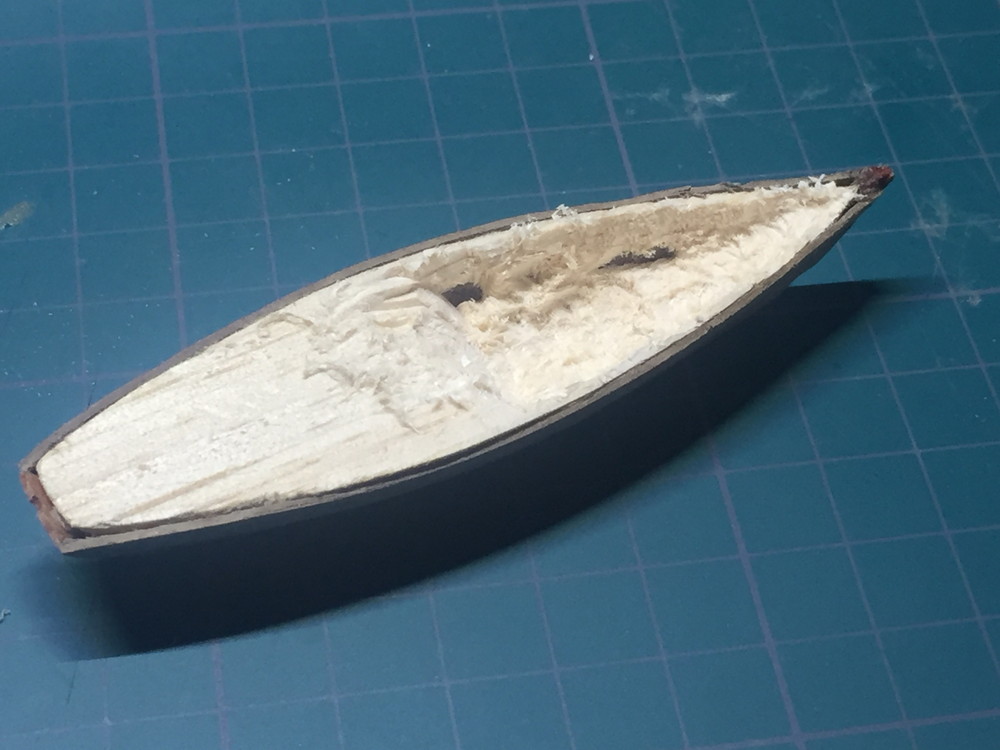 いよいよ、型材の除去、上手く剥がれてくれるかどうか周りの板が壊れないように慎重にすすめる。
Finally of the shape can advance carefully so that remove it, and is good, and expect that come off, and the board of the circumference is not broken.
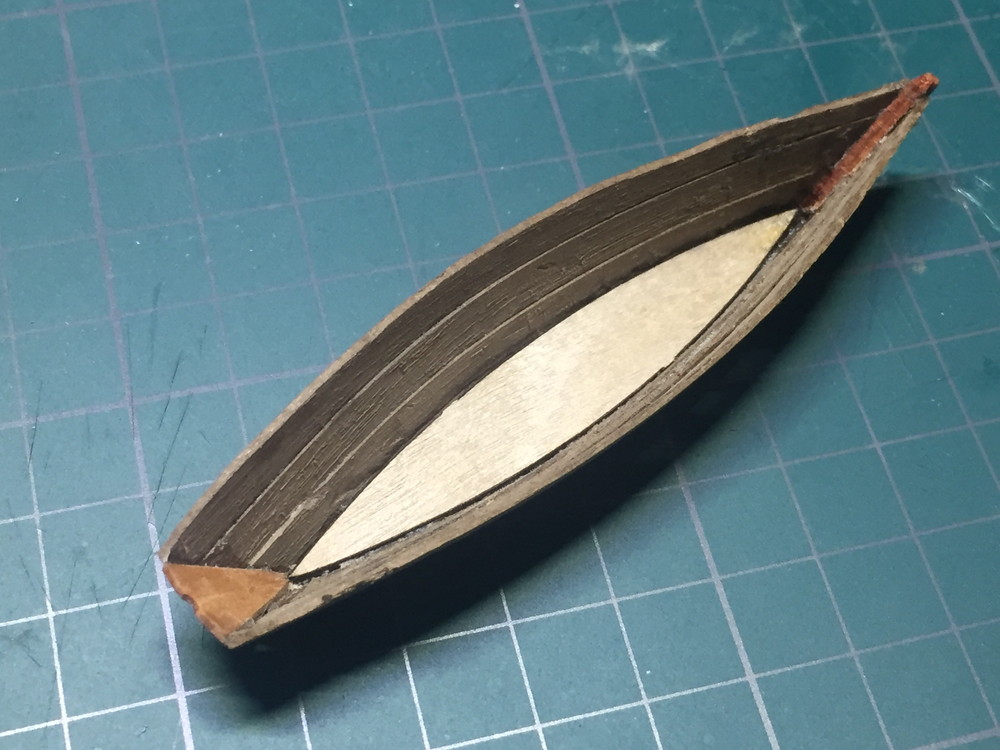 何とか綺麗に取れました
I was able to remove a shape neatly somehow.
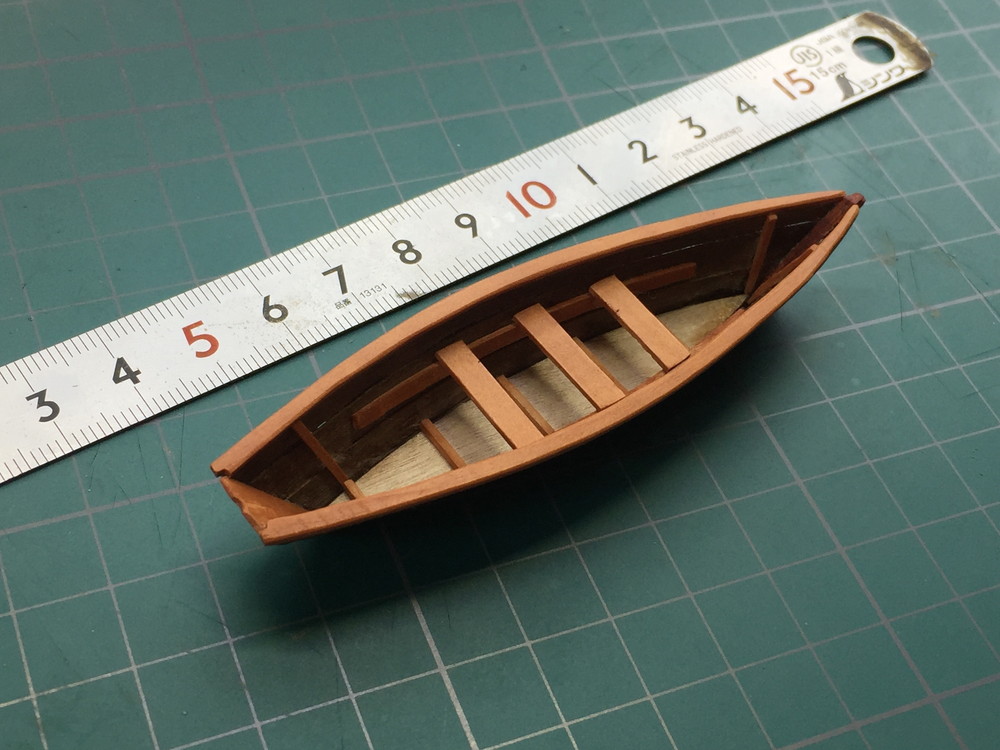 手摺と座を付けたらボートらしくなってきた
When it attached a handrail and a seat, it seems to have become a boat.
 オールの留め金を0.4の真鍮線でロー付けし取付け
A Silver-Soldering did the clasp of the oar in 0.4 brass line.
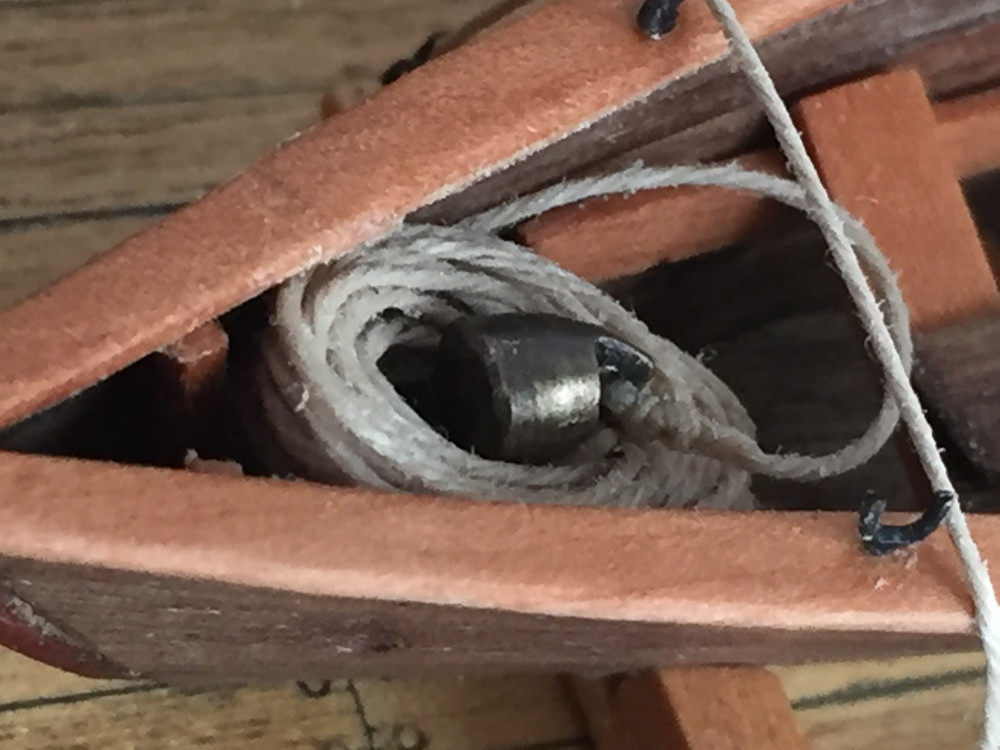 ボートのアンカーとなる錘も真鍮で作り、ロープで留めておく
I made the weight becoming the anchor of the boat with brass and keep it with a rope.
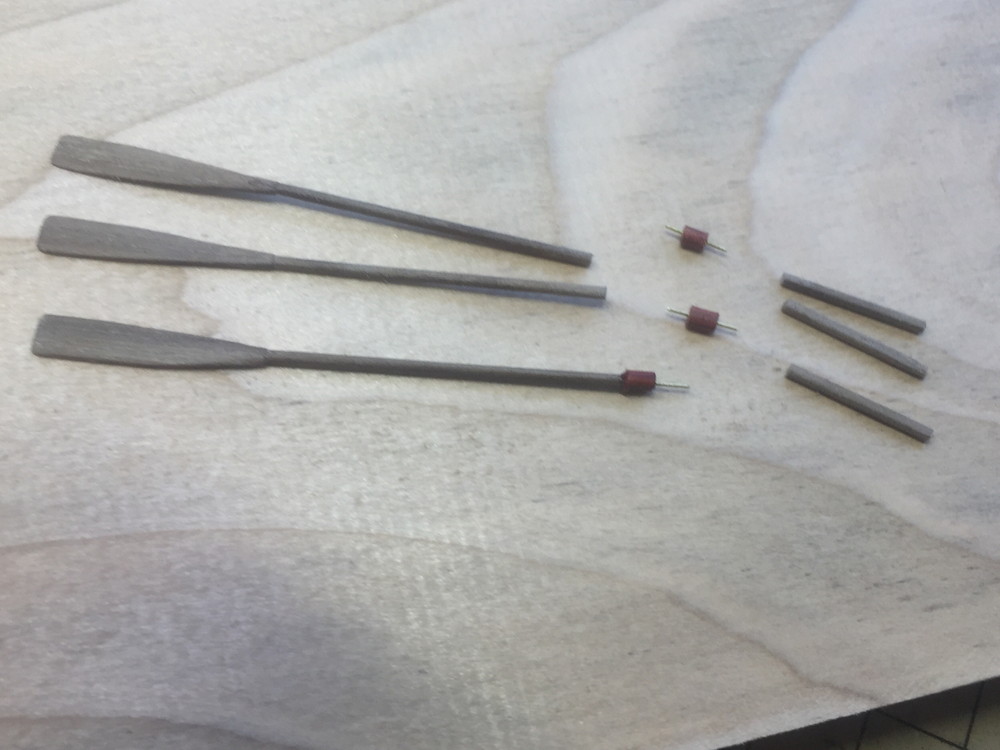 オールはウォールナットで先端の水掻きの部分とバーの長い部分、手元の短い部分、留め金に当たる部分の4つの部品を接着(写真では3つに見えるが) 留め金に当たる部分はパオロッサで色違いにしてアクセントに・・・
The oar is made in a walnut.I glued the part of the web of the tip and the long partially short part of the bar at hand, four parts of the part equal to the clasp together, and the part equal to the clasp did it in different colors in paorossa materials.
 オールの長さは他の資料を倶楽部の方に頂き参考にした
取りあえず4本製作
Had other documents towards a club, and took the length of the oar into account; is four production first of all.
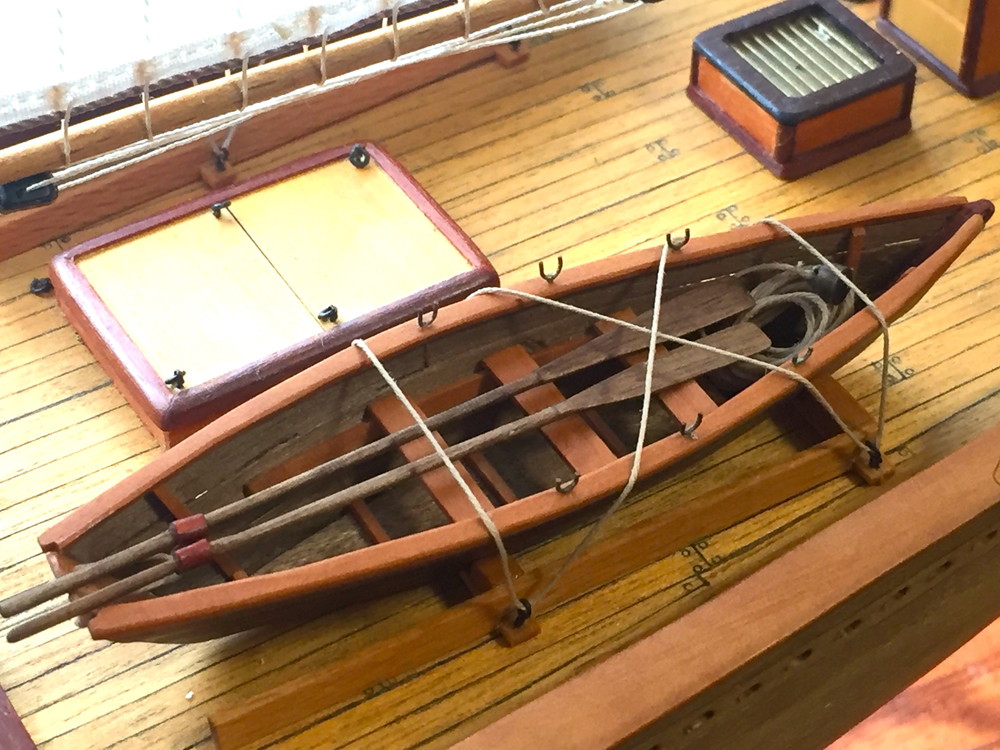 架台も作り、それに括り付けてデッキに置いてみる
この船のボートは10隻くらい積載していたという事なので、片側に4?5隻のボートを 重ねて取付けなければならないが、作るのも大変なのと模型として綺麗な見せ方を 考えると両側に1隻づつでも良いのではと考えた。オールも3人乗りなので6本必要 となるが6本置くよりもオールとして解るほうが良いのでは、とか色々と考えると 模型としての見せ方はどうなんだろうといつも考えてしまうことです。
Because what I made the footstool and tied it to it and put it on the deck and seem to have loaded this ship with ten boats and I repeated four or five boats and must be able to possess the one side and made was serious, I was cool and set it by by one on both sides.Because it is three-passenger, six of them become necessary, and all is the thing that I am seen neatly how or always think about as the model.
③ 航海灯の製作 3 The production of lanterns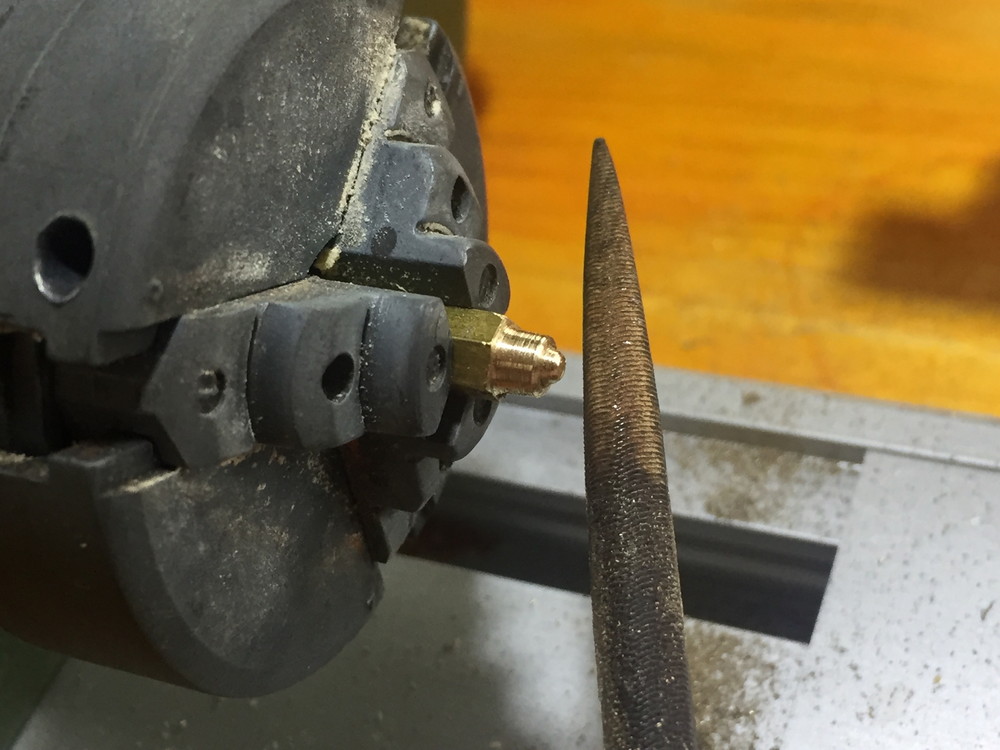
航海等のランタンの頭の部分を真鍮棒をヤスリで成形
I molded a brass stick with a file in the part of the head of the lanterns such as voyages.
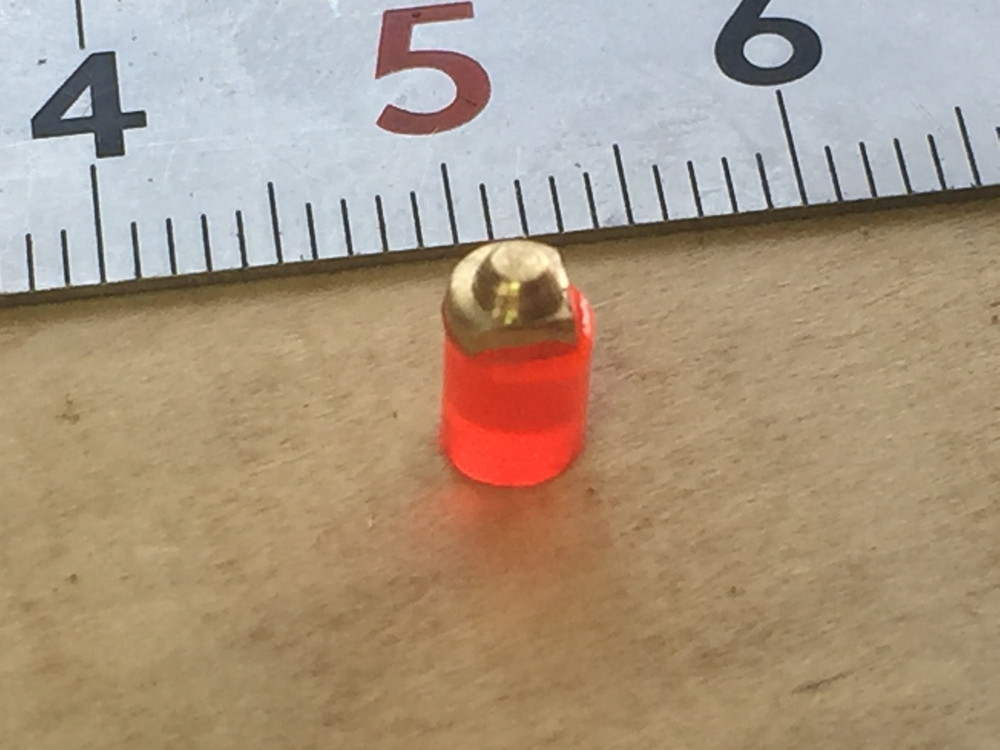 4ミリの赤と緑の透明樹脂の棒をネットで見つけ、購入し頭の部分に接着
I found red of 4 millimeters and a green transparent resinous stick in a net.
 真鍮板で周りを囲み、黒染めで少し着色すると風格あるランタンらしくなってきた
When I surrounded the circumference with a brass board and I was dyed and did black, a personality seems to have become the lantern which there was.
 シュラウドに取り付ける台座の部分の部品の製作
The production of the part of the part of the pedestal to install to a shroud
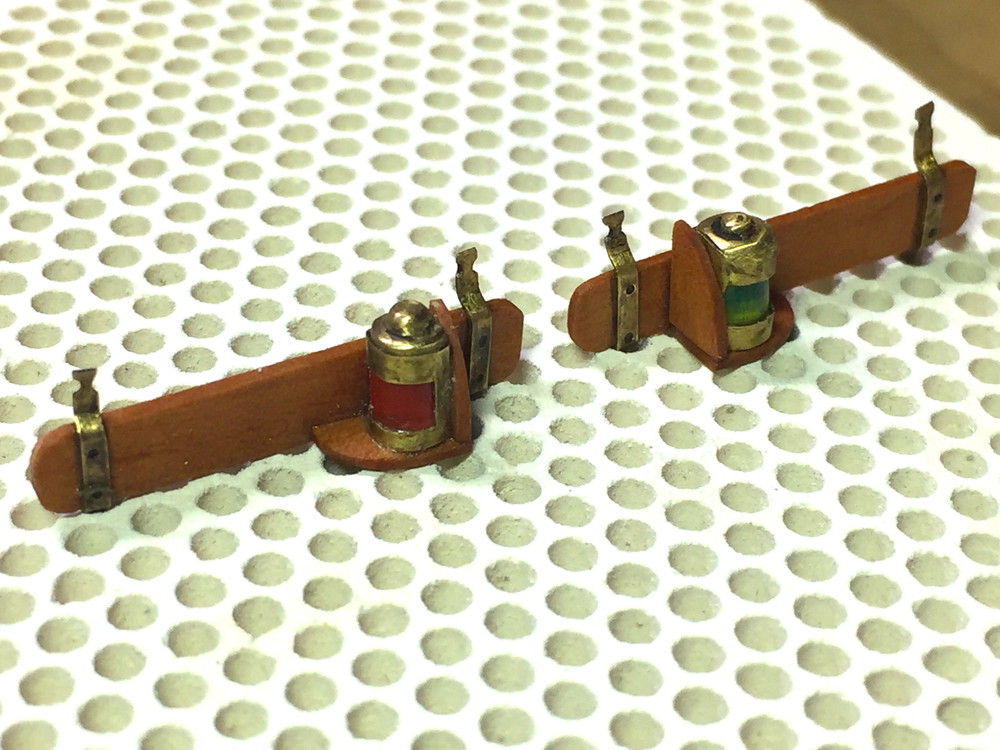 組み付けて、ワトコオイルを塗って、右舷の緑、左舷の赤のそれぞれの航海灯の完成
I install it and paint with watoko oil, and it is finished green of the starboard, each port red lantern.
 シュラウドに取り付けると、本物らしい航海灯に
When install a lantern to a shroud, seem to be genuine; see it.
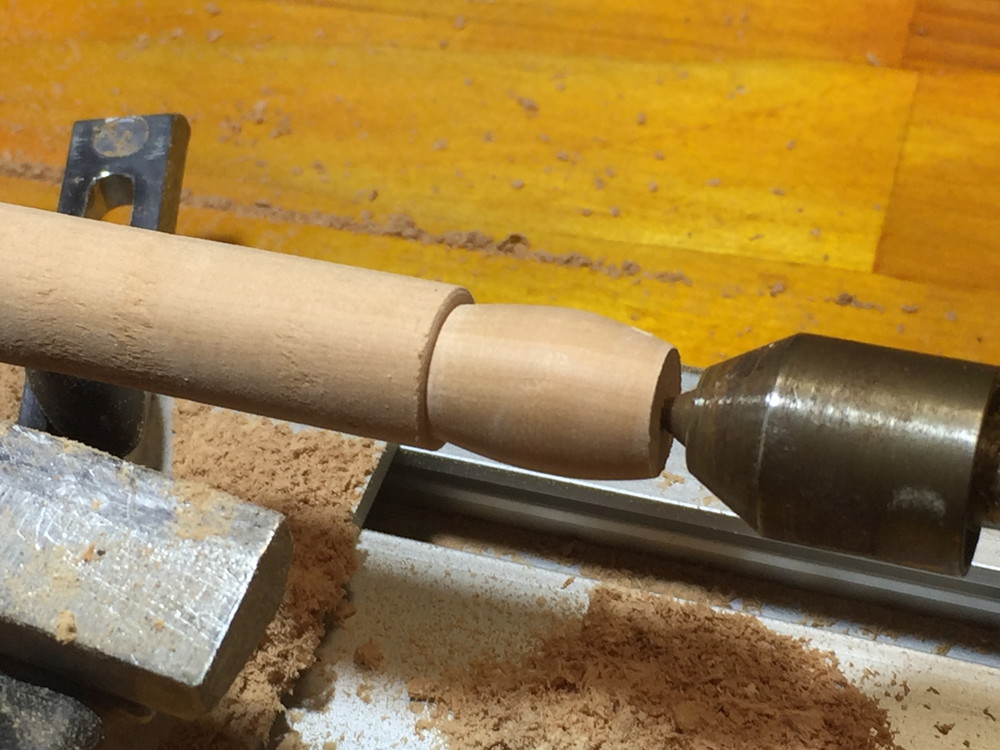 ④ 樽(ワイン、水等の)の製作
4 The production of the barrel (such as wine, the water)図面には無いがデッキ上の賑やかしに樽の製作
旋盤で成形、4個製作予定なので形を揃えるのに注意して成形
It is molding in what a plan does not have it, but prepare form because I decided to put it, and the production of the barrel molded it with a lathe and is going to produce a barrel four on a deck with care.
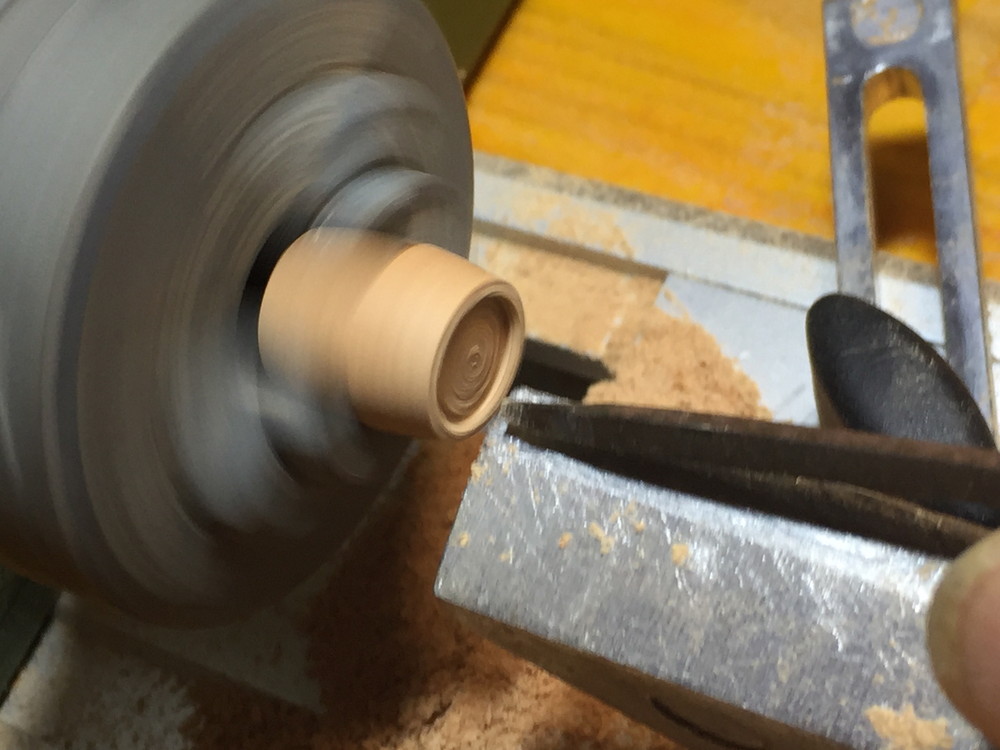 蓋の部分の凹みは特製工具で
The dent of the part of the cover is made with a specially made tool.
 板の繋ぎ目の表現はまず、鉛筆で等分にケガく.幸いに旋盤の主軸がタイミングベルトで伝達されており、一歯づつ廻すと等分出来ることに気が付きそれを利用してケガいた
When I drew the joint of the board of the barrel with a pencil, and, fortunately, the main shaft of the lathe turned the layout to by one the tooth of the belt in a timing, I could divide it equally and came.
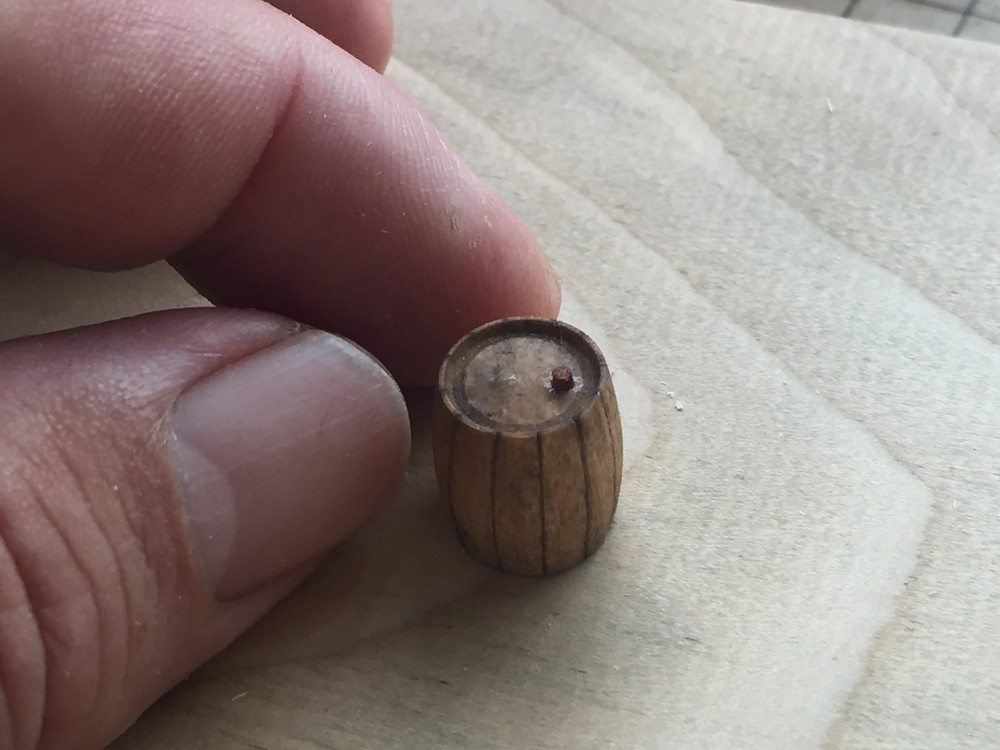 鉛筆でケガいた線にナイフをあて浅く切り込みを作り、ワトコオイルを塗ると線のところが濃くなって、いかにも板の継ぎ目らしくなった蓋には栓も取り付けた
I put a knife on the line which I drew with a pencil, and the place of the line thickened when it was shallow and made a cut and painted with watoko oil next and did it, and it seems to have become really the joint of the board of the barrel, and the stopper was able to possess a cover.
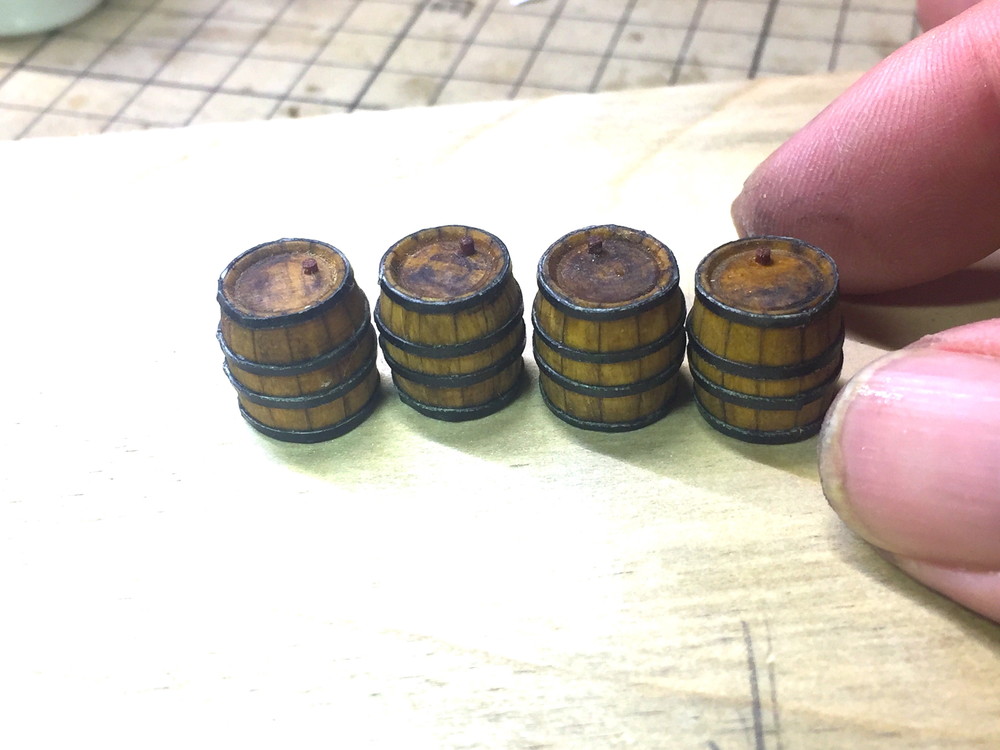 輪っぱは最初、真鍮板を切って黒染めし接着しようとしたが、作業していると黒染めが剥がれてしまい、酷い見栄えになったので、プリントの光沢紙に着色し貼り付けた、ワトコオイルのナチュラルを塗り、同じワトコのエボニーで汚れを表現すると本物らしくなった、只、これが良いかどうかは難しいところ
I thought about the belt of the barrel first I cut a brass board and I was dyed and did black, and to glue it together. The black coloring of the band has come off when I worked. I became the severe look. I colored coated paper and stuck it. The method how I seem to have become genuine when I paint with a natural of the watoko oil and express a dirt in an ebony of same watoko, and this is good is a place with the argument.
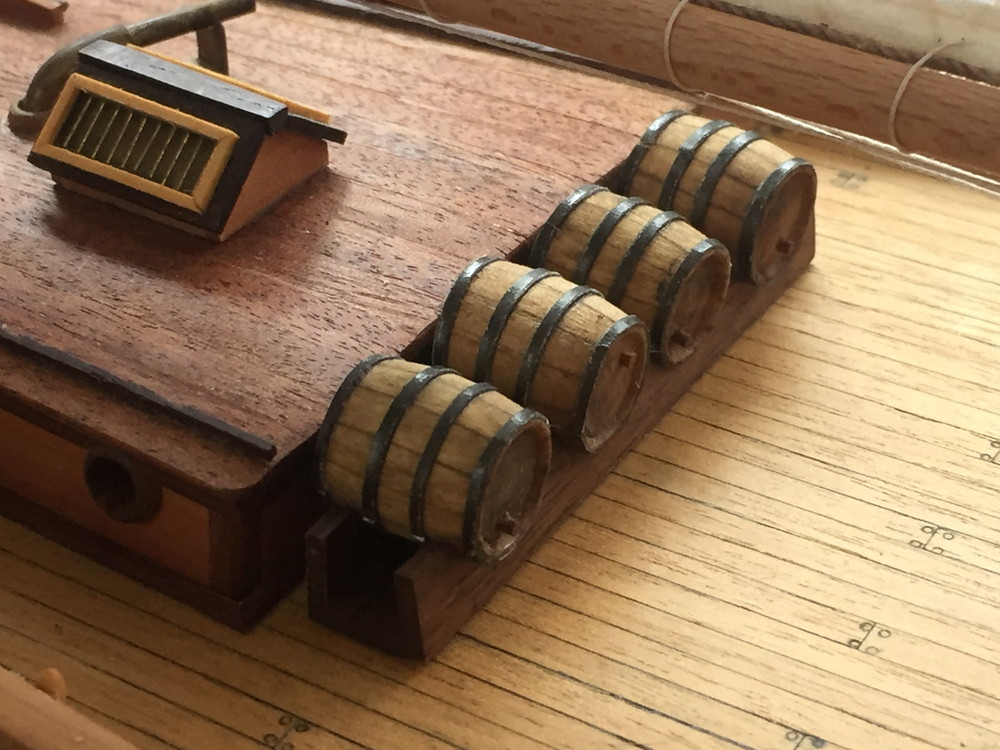 置台をつくりキャビンの横に設置、こういう物を置くと何となく生活感が出てきた
I made a stand, and a feeling of life came out setting somehow beside a cabin when I put such a thing.
 ⑤ ネームプレート
5 A nameplate
両側についているネームプレートの字をどうやって書くのか悩んでいたところタトゥーシールを使うのが良いと教えてもらい、シールにパソコンでプリントし真鍮板に貼り付けた、フィルムで少し曇りはするが気にならない程度上手く出来てよかった。
I was troubled how I wrote the character of the nameplate which stuck to both sides. I had you tell that you have had better use the seal. I printed a letter on a seal with a PC and stuck it on a brass board. I did some cloudiness with a film, but it was possible to be good at the degree that I was not worried about.
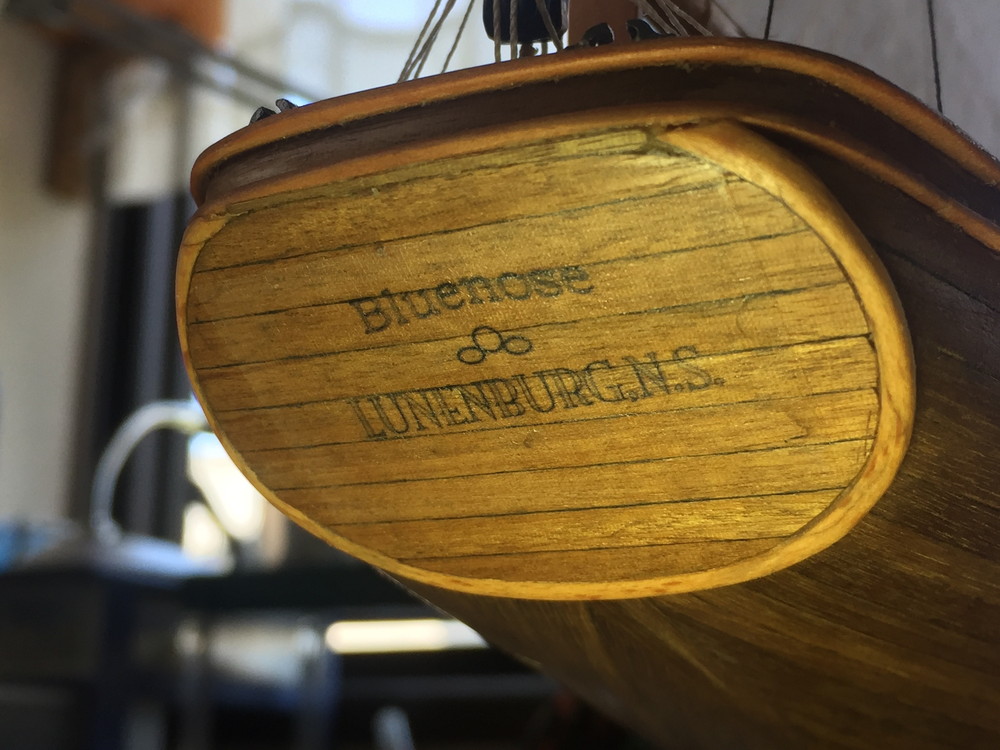 船尾の字も同じくタトゥーシールで
The character of the stern operated by a method in the same way, too.
 ⑥ 完成しました(ザ・ロープオーサカの作品展に出展させて頂いた)
(6) Was completed (exhibited it for a work exhibition of the ropu-Osaka)
 ようやく完成まで漕ぎ着けました。
かっこいい船だと飛びついて買ってみたものの、図面をよく観ると、作れる自信が無くなり なんで向こう見ずに買ったのかと後悔したが、趣味なんだからやれるところまでやってみたら
と言われ倶楽部のメンバーに一つ一つ教えてもらい、助けてもらったお陰で 自分なりに満足できるものが出来、少しは自信に繋がりました 我が京都の倶楽部の合言葉『飽きず、焦らず、諦めず』の取組みの姿勢をいつも教えられますが まさにその通りだと実感、なんとかなる、なるまでや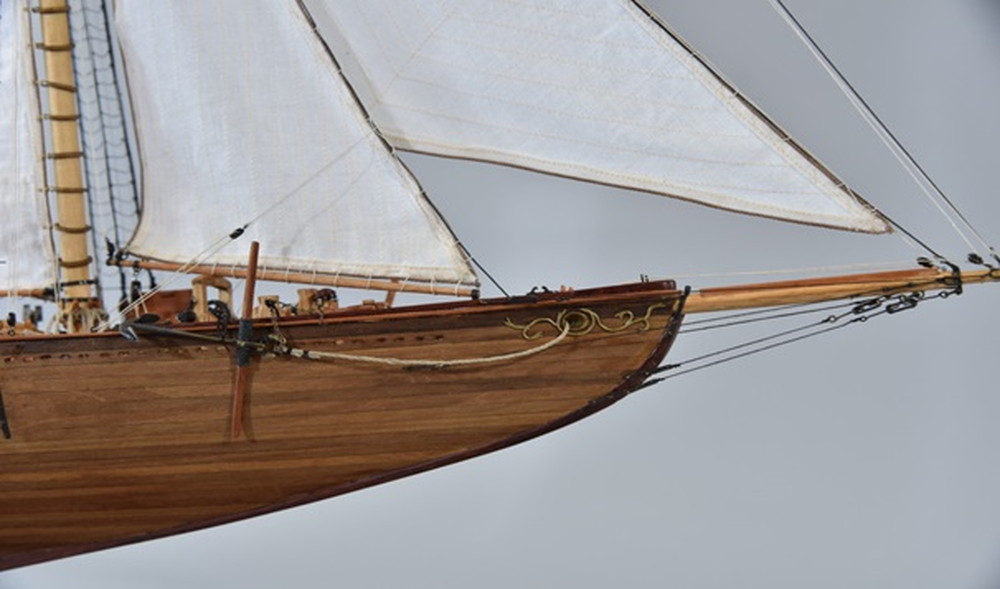 る、やったら出来る。
2年近くに渡り、お付き合い頂きありがとうございました
次は3隻目の製作に向かって出港致します。
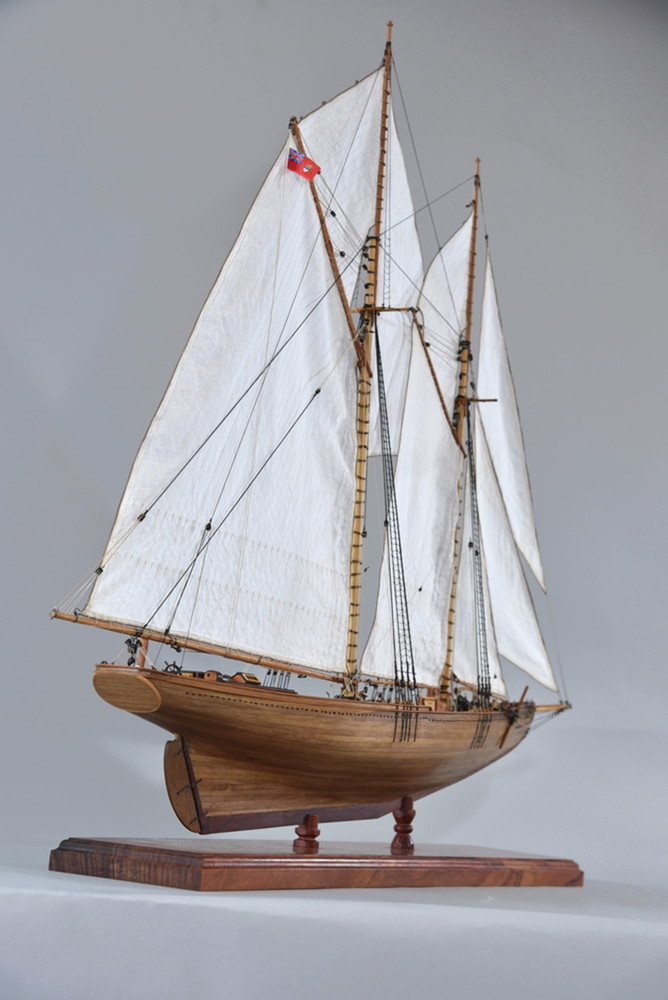
I finally managed to reach it to completion.Confidence to be able to make disappeared when I watched plans well although I bought it when it was a cool ship.I was sorry why I did absurd shopping.Because it was a hobby, it was said that I tried it to the place to be able to do it.I had the member of the club teach it one by one and had you help it.Thanks to you, the thing which can be satisfied with for oneself is made.It led to confidence 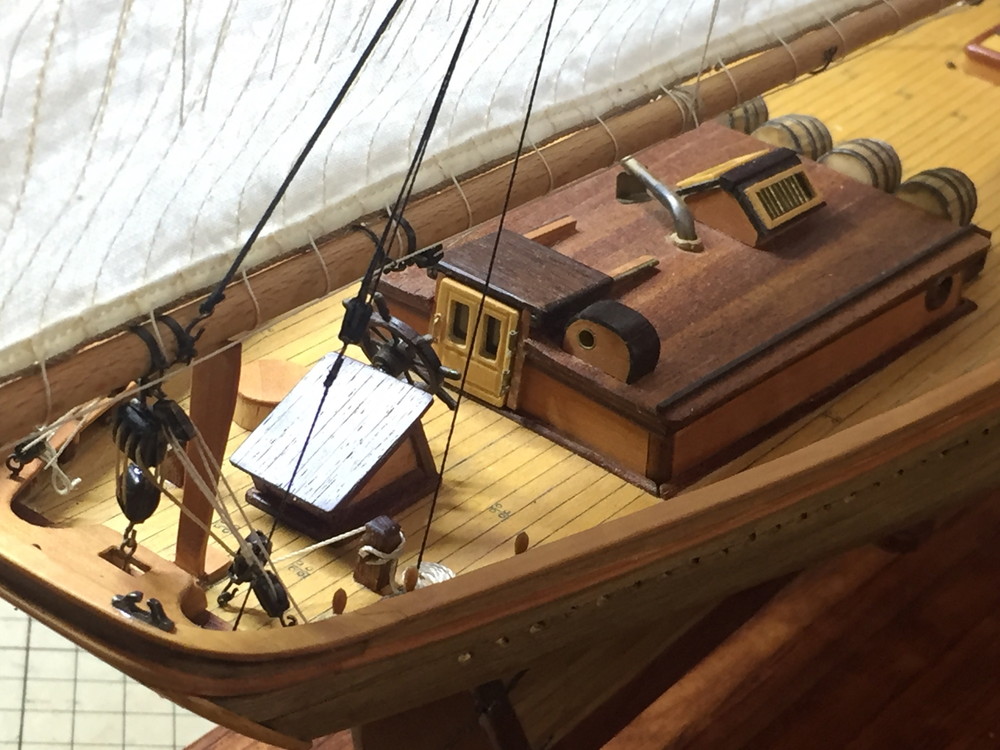 a little.Is always taught posture of an action “giving up patiently the password of the club of our Kyoto without getting tired”,; but is right the just what.Manage it; do it till become; if do it, it is possible.I had you keep company, and, for nearly two years, thank you.
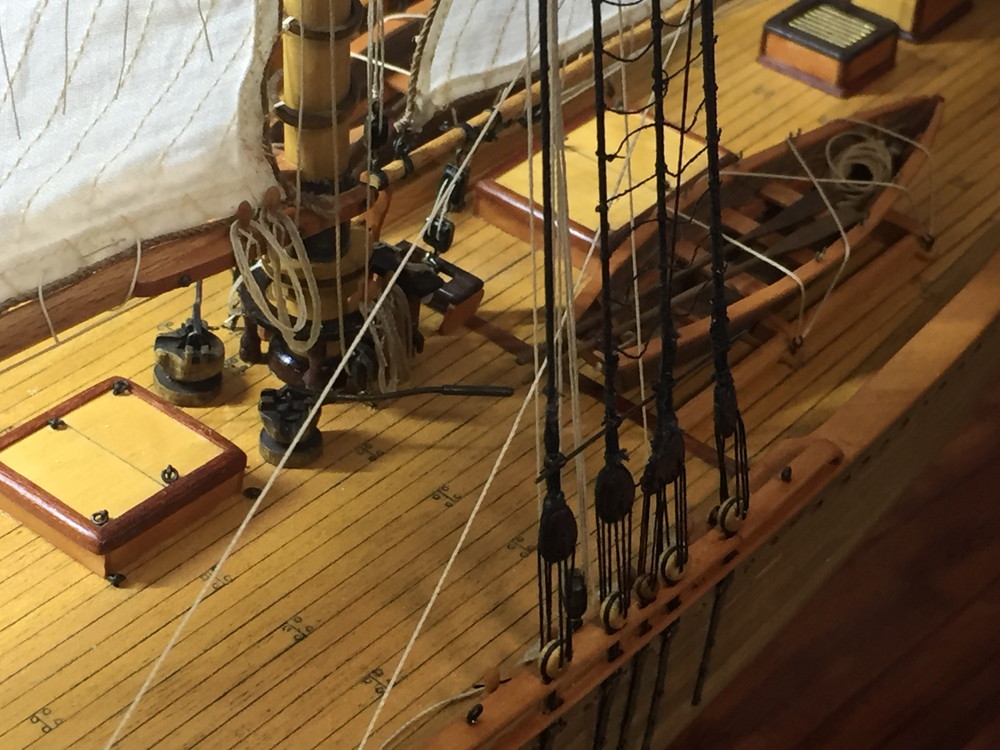 The next departs toward the production of the 3rd ship.
Ausrüstung eines Schiffes und die Vollendung von 24 #andere
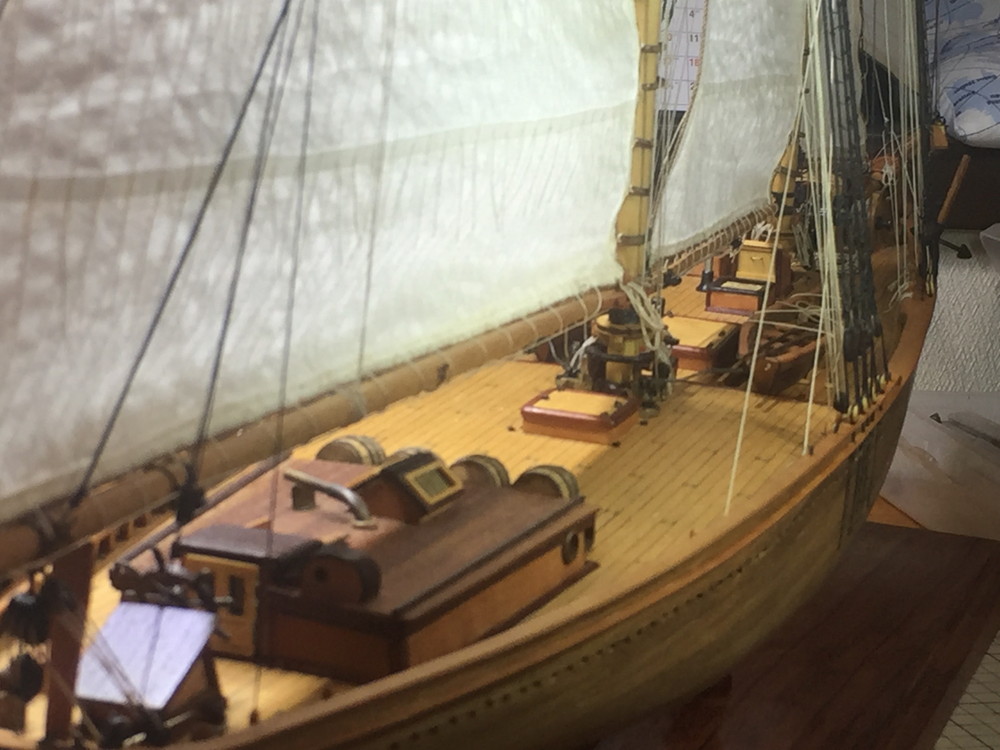 1 Zeichnen Sie es; eine Pumpe für
Der Teil von der Pumpe, den das Foto am Werkzeug befestigt wird, und es gibt.Weil der echte Artikel es nicht zeigte, auch wenn ich diesen Schwarzen malte, ich entschied mich, durch sich mit einem Baum zusammenzusetzen.Ich runde geklärtes Bauholz, und, wie für die 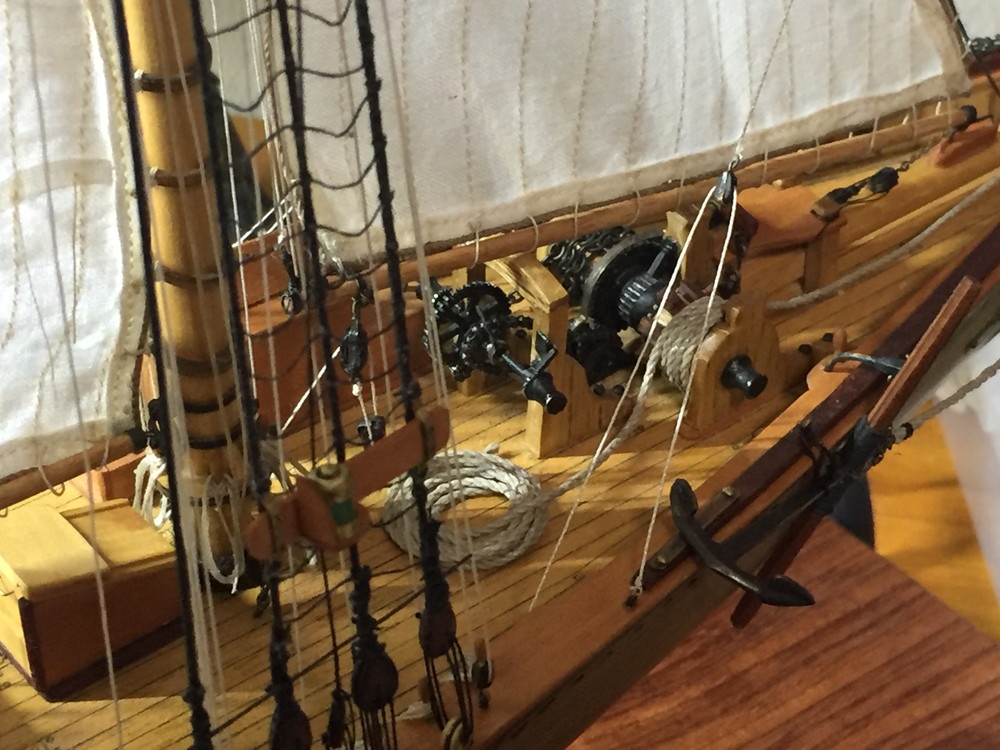 wilde letzte Aufführung ist ein Diskettenschleifer schnell am meisten.Ich machte es ordentlich mit einer Drehbank zum Kreisstock der größten Dimension und formte den Durchmesserkurs.Die Schuld, die sich vom zentralen Loch und externer Form sammelt.Ich formte eine kleine Stelle mit einer Endmühle.Als es es trennte, scheint es der Körper der Pumpe geworden zu sein.Ich setzte einem Ausschuß des Messings, einem Stock, eine Leitung zusammen und machte Silver-Soldering und machte einen Griff.Der Körper brachte die Färbung in Verbindung, der Griff mit einem Körper mit einer Nadel nach schwarzer Färbung in Ölfleck.Ich war fähig, ein Deck zu besitzen, und eigentlich konnte der Griff der Pumpe es nur zur Zeit des Entwässerns von der Arbeit besitzen, aber war fähig, es zu besitzen, weil es ein Modell war.
2 Die Produktion des Bootes
Ich begann die Arbeit, während ich auf farukata-Materialien eine Zeichnung klebte und es formte, und die Produktion des Bootes war das erste Mal überhaupt, und das Halten von Unbehagen.Ich machte es leicht, daß ich den Ausschuß vom Umfang auf eine Form klebte und nach Arbeitsvollendung eine Form entferne und auf einer Form niedrig bewerbe, und nach der Haftfähigkeit abzugehen und steckt soleplate, ein Teil des Bogens streng.Ich befestigte dem Plan zufolge einige Schritte und steckte eine Muschel, und dieser Teil nutzte superglue.Schließlich von der Form kann vorsichtig fortschreiten damit entfernt es, und ist gut, und erwartet so gehen Sie ab, und der Ausschuß des Umfanges wird nicht gebrochen.Ich war fähig, ordentlich irgendwie eine Form zu entfernen.Als es ein Geländer und einen Sitz befestigte, scheint es ein Boot geworden zu sein.Ein Silver-Soldering machte das Schloß vom Ruder in 0.4 Messinglinie.Ich machte das Gewicht, das der Anker des Bootes mit Messing wurde, und behalte es mit einem Seil.Das Ruder wird in einer Walnuß gemacht.Ich klebte den Teil des Netzes von der Spitze und dem langen teilweise kurzen Teil der Stange zur Hand, vier Stücke des Teiles gleich zum Schloß zusammen, und der zum Schloß gleiche Teil machte es in anderen Farben in paorossa-Materialien.Gehabte andere Dokumente zu einem Klub, und zog die Länge vom Ruder in Erwägung; ist zuerst vier Produktion von allem.Weil das, was ich den Schemel machte und es daran band und es auf das Deck setzte, und scheine dieses Schiff mit zehn Booten beladen zu haben und ich wiederholte vier oder fünf Boote und muß fähig sein, die eine Seite zu besitzen und machen, war ernst, ich war kühl und setzte es durch um einen auf beide Seiten.Weil es drei-Fahrgast ist, werden sechs von ihnen notwendig, und alles ist die Sache, daß ich ordentlich gesehen werde, wie oder denkt immer ungefähr als das Modell.
3 der Produktion of lanterns
Ich formte im Teil des Kopfes der Laternen wie Reisen einen Messingstock mit einer Akte.Ich fand durchsichtiger harziger Stock von 4 Millimetern und einem Grün rot in einem Netz.Als ich den Umfang mit einem Messingausschuß umgab, und ich wurde gefärbt und machte Schwarzen, eine Persönlichkeit scheint die Laterne geworden zu sein, die es gab.Die Produktion des Teiles des Teiles des Sockels, um zu einem Leichentuch zu installieren.Ich installiere es und Farbe mit watoko-Öl, und es ist fertig vom Steuerbord grün, jeder Hafen rote Laterne.Wenn installiert zu einem Leichentuch eine Laterne, scheinen Sie echt zu sein; sehen Sie es.
4 die Produktion vom Faß (wie Wein, das Wasser)
Es schimmelt worin für einem Plan, haben Sie es nicht, aber bereitet Form vor, weil ich mich entschied, es zu setzen, und die Produktion vom Faß formte es mit einer Drehbank und wird einen Faß vier auf einem Deck mit Sorge produzieren.Die Beule des Teiles der Decke wird mit einem besonders gemachten Werkzeug gemacht.Als ich das Gelenk des Ausschusses vom Faß mit einem Bleistift zeichnete, und, glücklicherweise drehte der Hauptstiel der Drehbank die Anordnung zu um einen der Zahn des Gürtels in einem Timing, ich konnte es gleich teilen und kommen.Ich setzte ein Messer auf die Linie, die ich mit einem Bleistift zeichnete, und die Stelle der Linie wurde dicker, als es seicht war und einen Schnitt machte und mit watoko malte, ölen Sie danach und machte es, und es scheint wirklich das Gelenk des Ausschusses vom Faß geworden zu sein, und der Pfropfen war fähig, eine Decke zu besitzen.Ich dachte zuerst über den Gürtel vom Faß nach, ich schnitt einen Messingausschuß und ich wurde gefärbt und machte Schwarzen, und es zusammen zu kleben, Die schwarze Färbung der Band ist abgegangen, als ich arbeitete. Ich wurde das schwere Aussehen. Ich färbte gestrichenes Papier und steckte es. Die Methode, wie ich echt geworden zu sein scheine, wenn ich mit einem natürlichen des watoko male, ölt und drückt einen Schmutz in einem Ebenholz gleichen watoko aus, und dies ist, Gutes ist eine Stelle mit dem Argument.Ich machte eine Einstellung, und ein Gefühl des Lebens kam daraus heraus, neben eine Kabine irgendwie zu setzen, als ich so eine Sache setzte.
5 ein Namensschild
Ich wurde gestört, wie ich dem Charakter vom Namensschild schrieb, das an beiden Seiten klebte. Ich ließ Sie erzählen, daß Sie besserer Verwendung die Versiegelung gehabt haben. Ich druckte mit einem PC einen Brief über eine Versiegelung und klebte es auf einen Messingausschuß. Ich machte etwas Bewölktheit mit einem Film, aber es war möglich, gut für den Grad, über dem ich nicht zugesetzt wurde, zu sein.Der Charakter vom strengen operierte auch durch eine Methode auf die gleiche Weise.
6 wurde (zeigte es für eine Arbeitsausstellung des ropuosaka) vervollständigt.Ich schaffte es schließlich, es bis Vollendung zu reichen.Zuversicht, um fähig zu sein, zu machen, verschwand, als ich Pläne gut ansah, obwohl ich es kaufte, als es ein kühles Schiff war.Mir tat es leid, warum ich absurde Einkäufe machte.Weil es ein Hobby war, wurde es gesagt, daß ich es zur Stelle versuchte, fähig zu sein, es zu machen.Ich ließ das Mitglied beim Klub es einer um einen unterrichten und ließ Sie ihm helfen.Dank zu Ihnen, die Sache wird gemacht, die mit für sich selbst zufriedengestellt werden kann.Es führte ein kleines zu Zuversicht.Ist immer unterrichtete Haltung einer Handlung, die “auf geduldig dem Paßwort des Klubs von unserem Kyoto draußen gibt, “ermüdet”;, aber ist das Gerechte das richtig was.Werden Sie damit fertig; es bebaut geworden; wenn macht es, es ist möglich.Ich ließ Sie Gesellschaft behalten, und, beinahe zwei Jahre lang, danke.Der nächste geht zur Produktion des dritten Schiffes fort.